
Oh, friend, when those warm days hit, my brain immediately screams for anything pink and summery. And nothing, absolutely nothing, hits that spot quite like a perfect piece of cake that tastes like sunshine and berries!
Forget the fuss, though. While people think layered cakes are a weekend-long commitment, I’ve got a secret weapon that gets me the ultimate reward with minimal effort. I’m talking about my foolproof, incredibly easy Strawberry Crunch Cake. Seriously, it’s the best summer bake because it uses a box mix as a backbone, but the flavor is all homemade magic, especially that amazing topping.
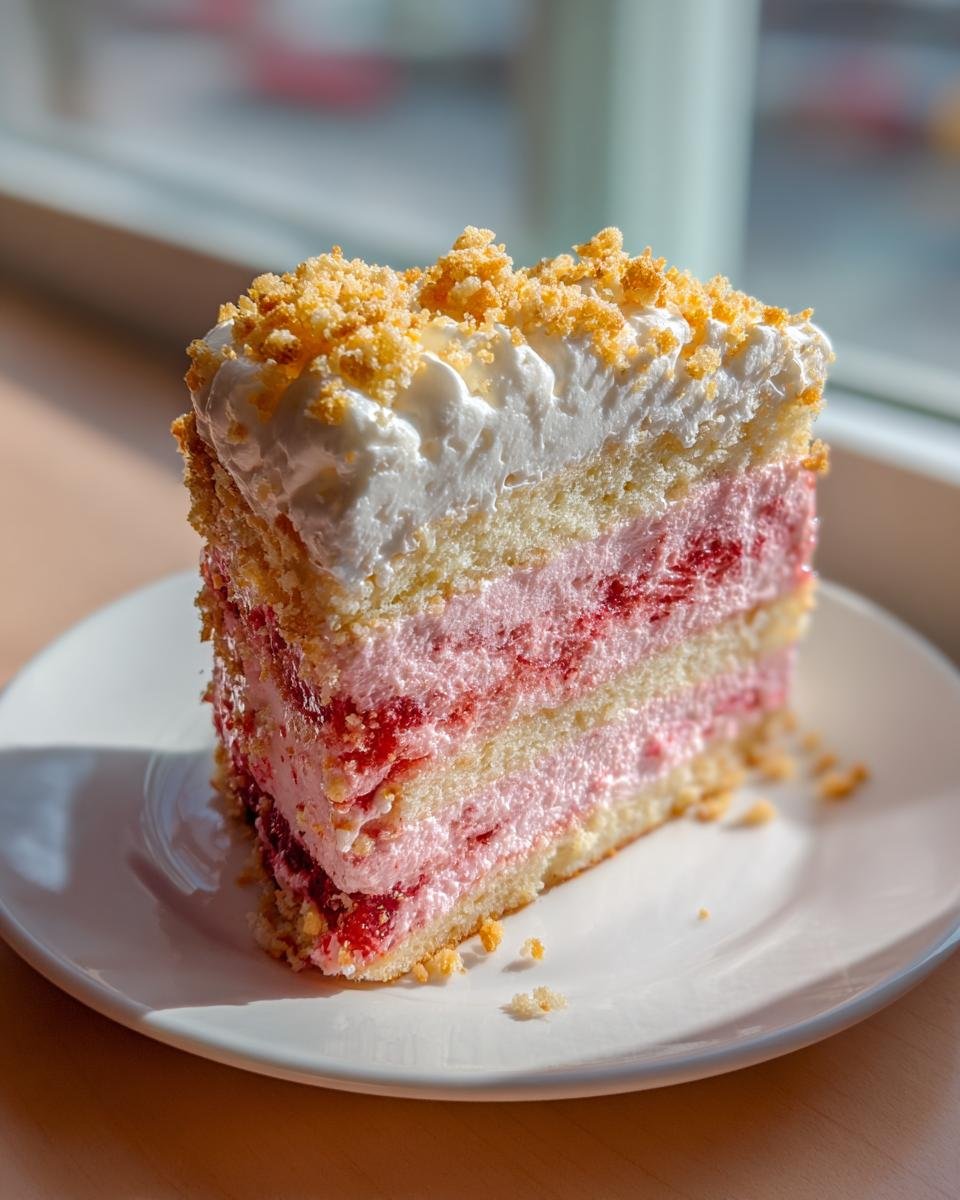
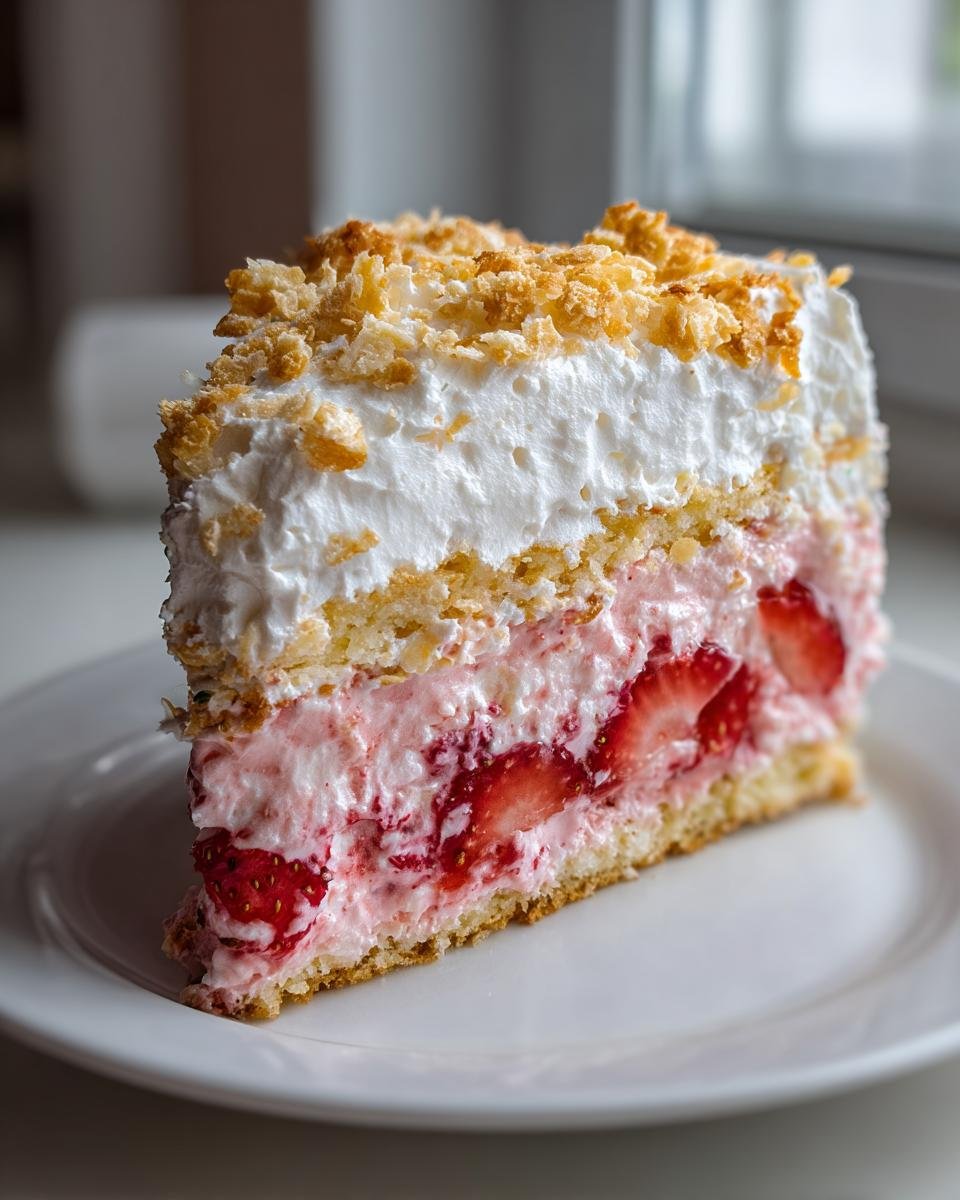
I love this recipe because it perfectly balances textures. You get soft, moist strawberry cake, creamy, light frosting, and then BAM—that addictive crunch! It just tastes like childhood nostalgia in the best way possible. Trust me, once you try this layered beauty, it’ll become your go-to for potlucks and spontaneous sweet cravings.
Why This Strawberry Crunch Cake Recipe Stands Out
There are a million strawberry cake recipes out there, but this one? It just hits differently. I love it partly because it’s honest about how busy we are, but mostly because the payoff is spectacular. You get that bakery-quality look without spending all day in the kitchen whipping things from scratch.
Here’s why I always reach for this specific method:
- It cuts down on stress by using a trusted white cake mix as the base. No worrying about weird ratios there!
- We dump the boring sprinkles and make a glorious, buttery, toasted vanilla wafer crunch topping. That’s the real star, trust me.
- The moisture level is perfect. The strawberry puree keeps the cake layers tender, balancing that crisp exterior beautifully.
- It’s deceptively easy. People think it’s a fancy three-layer creation, but it comes together faster than you think. If you’re looking for other easy fruit desserts, check out my thoughts on no-bake options too!
Gathering Ingredients for Your Strawberry Crunch Cake
Okay, ingredient gathering time! This is where we set the stage for success. Because we’re leaning on that convenient cake mix, most of the real flavor work is concentrated in those easy additions. Don’t skimp on quality here, especially with the fruit!
For the cake itself, grab that standard box of white cake mix, and whatever liquids your box tells you to use—usually eggs and oil. But here’s the flavor swap: instead of the water, we’re using fresh or frozen strawberries that you’ve blitzed into a smooth puree. I always tell people, if you can use fresh berries, please do it! They bring a brighter, more authentic taste than anything else. If you need tips on making intense fruit sauces, I’ve got a deep dive on my favorite strawberry sauce methods.
Then we move to the creamy layer—this is our frosting. You need heavy cream, powdered sugar for that smooth sweetness, and just a splash of vanilla extract. If you want that classic pale pink hue, a tiny drop of food coloring is optional, but I often skip it unless I’m making it for a special party; the strawberry flavor shines through even without the extra color.
Finally, the crunchy magic! This is non-negotiable: you must have vanilla wafers. Crush those up well and mix them with melted butter. That’s it! It seems almost too simple, but when you toast those wafers, they turn into pure gold.
Step-by-Step Instructions for the Perfect Strawberry Crunch Cake
This is where the magic happens, and honestly, it’s way easier than it looks! I always tell people that if you can follow directions on a box, you can nail this showstopping cake. We are breaking this down into manageable chunks so you don’t feel overwhelmed. If you want to learn more about blending ingredients quickly, I have a fun article on making cakes in a blender, but for this one, a standard mixer works great!
Preparing and Baking the Strawberry Cake Layers
First things first, get your oven preheated according to the cake box instructions, usually to 350 degrees F. Next, you’re going to prepare the cake batter exactly as the box tells you to, with one crucial swap. Instead of adding the water the recipe calls for, you substitute it entirely with that gorgeous strawberry puree you made earlier. This is what injects real berry flavor right into the crumb!
Pour the batter evenly into your prepared cake pans—I usually use two 8-inch rounds—and pop them in to bake. Time varies, so check around the time the box suggests. Most importantly? You absolutely must let those cake layers cool completely on a wire rack. If you rush this step, the whole thing will turn into strawberry soup when you try to frost it. Don’t learn that the hard way!

Making the Whipped Cream Frosting for the Strawberry Crunch Cake
While those layers are cooling down, we move onto the dreamy frosting. Forget heavy buttercream; this cake begs for a light, airy finish! In a chilled bowl, whip up your heavy cream, powdered sugar, and vanilla extract. You need to beat this stuff until you get stiff peaks. I mean it—when you lift the whisk, the cream should stand straight up and hold its shape. That structure is what keeps the middle layer firm.
If you’re feeling extra fancy, this is the time to add just a small drop of pink food coloring to give your frosting that perfect pale strawberry shade. Mix slowly until it’s uniform. Set this bowl in the fridge while you finish the topping; keeping it cold helps it stay stable!
Creating and Toasting the Vanilla Wafer Crunch Topping
Now for the main event: the crunch! Take your vanilla wafers and crush them up until they resemble coarse sand. You can use a food processor if you want, but I love crushing them in a sealed bag with a rolling pin; it feels more satisfying! Mix those crumbs right into a small bowl with the melted butter until everything is moistened.
Spread this buttery crumb mixture out in a thin, even layer on a baking sheet. Pop this into the oven where you baked the cake (or use the residual heat if you’re timing it right) at 350 degrees F for just about 5 to 7 minutes. You want them lightly toasted, not burnt! Crucial timing tip: Let this crunch topping cool down entirely, maybe even stick it in the fridge for 10 minutes. If it’s warm when you put it on the cake, I promise you, it will dissolve into mush.
Assembling Your Strawberry Crunch Cake
Time to put this beautiful creation together! Once your cake layers are totally cool—give them a tap to check—level the tops if they domed up too much. Place your first layer on your serving plate. Take about a third of that stiff whipped cream frosting and spread it evenly across the top of that bottom layer.
Carefully place the second cake layer on top. Now, cover the entire cake—top and sides—with the remaining whipped cream. Don’t worry about making it perfectly smooth; texture is the name of the game here! Then, you’re going to take that completely cooled crunch topping and gently press it all over the sides and the top surface. Use your palms to gently pat it on so it adheres well to the cream. I love how this looks, almost like a sparkly berry coating. If you’re looking for layering ideas for other desserts, check out my guide on strawberry parfaits!
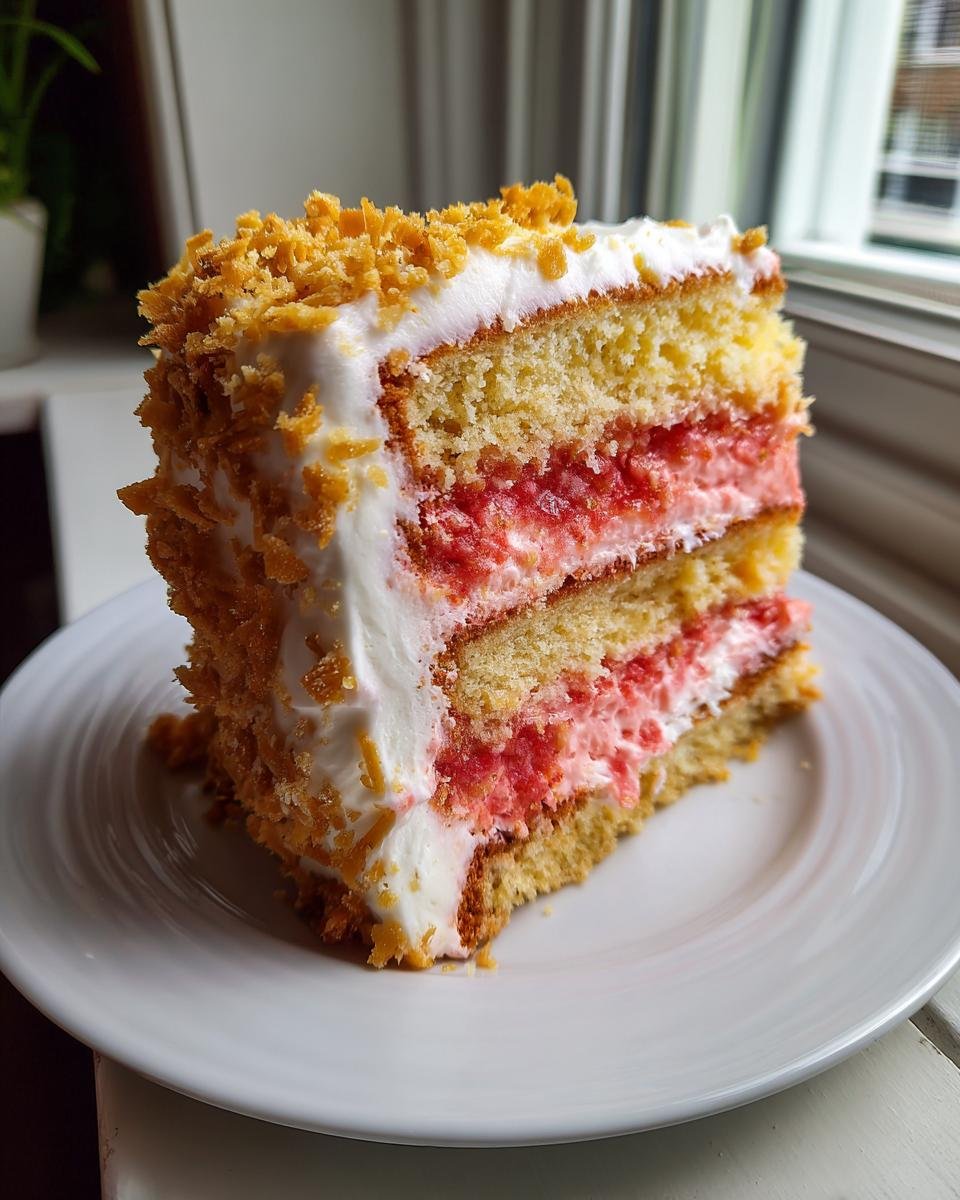
Chilling the Finished Strawberry Crunch Cake
We aren’t quite done yet because we need setting time. This cake needs to chill out! Cover it loosely with plastic wrap or place it in a cake carrier and stick it in the refrigerator for at least one full hour before you even think about slicing into it. This time allows the whipped cream frosting to firm up nicely so it doesn’t squirt out the sides when you cut through it, and it helps all those layers meld together perfectly.
Tips for Success with Your Strawberry Crunch Cake
Listen, the difference between a good strawberry cake and a legendary one is all in the timing and temperature. My biggest piece of advice? Keep that crunch topping freezing cold before it meets the creamy cake. If you toast those wafers and they’re still warm when you press them on, they’ll steam the frosting and instantly go soft. You want that auditory crunch when you bite in!
Also, when you’re pureeing your strawberries—whether fresh or frozen—make sure you get rid of any excess liquid that might not be flavorful. You want concentrated strawberry essence, not watery sadness baked into your layers. For the most intense berry boost possible, I sometimes whip a tiny bit of strawberry reduction, like the one I use in my featured sauce recipe, right into the whipped cream.
Don’t overmix that cake batter once you add the puree, either. We want to keep those air bubbles we built up in the cake mix intact. A gentle fold is all you need!
Ingredient Notes and Substitutions for Strawberry Crunch Cake
We established that this recipe is super easy because it starts with that trusty cake mix, but we still have a few spots where your choices really matter for the final flavor. Let’s talk about those strawberries and the crunch because they are the heart of this dessert.
First, the berries. Can you use frozen ones? Absolutely! That’s one of the reasons I love this recipe so much—it works year-round. If you use frozen strawberries for the puree, just make sure you let them thaw completely before blending them down. You might need to drain off a tiny bit of extra liquid if the thawed batch seems wetter than usual, because too much water equals a soggy cake layer. Fresh is usually brighter, but frozen bags give you that guaranteed sweetness when local berries aren’t in season.
Now, the crunch component, which is really about the vanilla wafer. The specific flavor comes from that slightly buttery, distinct vanilla note in the wafer. If you absolutely cannot find vanilla wafers—which, honestly, happens sometimes—you *can* try using Nilla Wafers alternatives, but the flavor profile will shift a bit. Shortbread cookies are too buttery, and graham crackers are too wheaty. If you need to go that route, I suggest adding a tiny splash more vanilla extract to the melted butter mixture to try and compensate for the lost flavor. If you’re exploring lighter dessert options in general, swing by my notes on baking cakes without heavy fats!
The good news is the butter and powdered sugar are pretty straightforward! Use real butter for the crunch, though—the oils just don’t toast the same way and you need that richness to balance the dry wafer.
Storing and Reheating Your Strawberry Crunch Cake
Since this beauty relies on real whipped cream and that glorious crunchy topping, storage is pretty specific. You absolutely have to keep this cake chilled. Pop any leftovers into an airtight container or cover the plate tightly with plastic wrap and back into the refrigerator it goes. It’s usually good for about three to four days, but honestly, it rarely lasts that long!
Now, reheating? Don’t even try it, honestly. Heating this cake would turn that amazing crunchy topping soggy immediately, and the whipped cream would melt into a puddle of sweet liquid. This cake is designed to be served cold straight from the fridge. Just take it out about 15 minutes before serving so it’s not rock hard, but keep it cool!
Frequently Asked Questions About the Strawberry Crunch Cake
Can I use a different cake flavor instead of strawberry?
You totally can! The beauty of using the cake mix as your base is that you can swap up the flavor profile easily. If you want a lemon crunch cake, use lemon puree instead of strawberry and maybe use lemon zest in your whipped cream frosting. If you use chocolate cake mix, you might want to try a vanilla wafer topping with a darker chocolate flavor instead of pure vanilla wafers!
How far ahead of time can I make the crunchy vanilla wafer topping?
This is a fantastic question because sometimes you need a prep day! You can definitely make the crunch topping ahead of time. I usually make a big batch and store it in an airtight container right on the counter. It keeps perfectly crisp for about three or four days. The trick is to make sure it’s completely cool before sealing the container. If you’re making other great desserts using cake mixes, you should check out my guide on using mixes for coffee cake!
Is it possible to make this Strawberry Crunch Cake gluten-free?
Yes, adapting recipes is fun! To make this gluten-free, you’ll need two swaps. First, buy a gluten-free white cake mix—they are widely available now and work just as well. Second, you’ll need to substitute the vanilla wafers with gluten-free vanilla wafer cookies. Companies make great copies now, so just make sure you check the label, and the rest of the recipe (the fresh puree and whipped cream) stays exactly the same!
My whipped cream frosting isn’t getting stiff peaks, what’s wrong?
Oh, that’s frustrating! Stiff peaks mean your cream is cold enough and you’re whipping enough air into it. Make sure your heavy cream is straight from the fridge—icy cold is best. If it’s still struggling, try chilling your mixing bowl and whisk attachment in the freezer for about 15 minutes before you start beating. Also, ensure you aren’t accidentally using half-and-half or milk; it *must* be heavy whipping cream for that structure to hold up!
Estimated Nutritional Snapshot for Strawberry Crunch Cake
Look, I bake with love, not with an actual lab in my kitchen, so you have to take these numbers with a tiny grain of salt! These are just estimates based on the ingredients listed, using the standard nutrition facts available for scratch ingredients and cake mix base. If you start swapping out the sugar for honey or using low-fat cream, your numbers will change, obviously!
This snapshot is calculated assuming the recipe yields 10 generous slices, which is how I usually cut it when serving company. If you slice it smaller for a big dessert bar, the numbers per serving will come down a bit, of course. When I serve this up at family events, I just focus on the smiles, not the macros, but here is the breakdown for those of you who like to keep track!
- Serving Size: 1 slice
- Calories: Around 350 per slice
- Total Fat: Roughly 18 grams (with about 8 grams being saturated fat)
- Carbohydrates: About 45 grams
- Total Sugar: Approximately 35 grams (Yes, it’s a treat, but the berries help balance it!)
- Protein: Around 4 grams
Remember, this is a celebration cake, not an everyday breakfast staple! It’s rich, it’s creamy, and it tastes like summer vacation, which is worth every calorie in my book. If you’re looking for more data on my other baked goods, you can usually find that info linked near the instructions. Happy baking!
Share Your Strawberry Crunch Cake Creations
Whew! We made it through the baking, the frosting, and the chilling process. Now comes my favorite part: seeing what you brilliant bakers did with my recipe!
I absolutely live for seeing your interpretation of this cake. Did you stick to the classic look? Did you add extra orange zest to the cream? Did you make a huge batch for a picnic? Tell me everything in the comments below!
If you loved this cake as much as my family does, would you take a second to give it a rating? Five stars if it knocked your socks off! Even three stars helps me understand where I can clarify things for the next baker. If you tried a fun variation—maybe you used different cookie crumbs or swapped the cake mix—definitely share that, too! I love learning from you all.
And please, please, please share pictures! Tag me on social media or drop a link if you wrote about your experience creating this amazing strawberry dessert. Nothing makes my day faster than seeing that bright pink, crunchy masterpiece sitting on someone else’s table. Happy baking, and I can’t wait to see your gorgeous versions!
Print
Strawberry Crunch Cake
- Total Time: 65 min
- Yield: 10 servings 1x
- Diet: Vegetarian
Description
A layered cake featuring strawberry flavor and a crunchy topping.
Ingredients
- 1 box white cake mix
- Ingredients required by cake mix box (eggs, oil, water)
- 1 cup fresh or frozen strawberries, pureed
- 1/2 cup heavy cream
- 1/4 cup powdered sugar
- 1 teaspoon vanilla extract
- 1 cup crushed vanilla wafers
- 1/4 cup melted butter
- Pink food coloring (optional)
Instructions
- Prepare the white cake mix according to package directions, substituting the required water with strawberry puree.
- Bake the cake layers as directed and let them cool completely.
- While the cake cools, prepare the whipped cream: Beat the heavy cream, powdered sugar, and vanilla extract until stiff peaks form. Add a drop of pink food coloring if desired.
- To make the crunch topping, mix the crushed vanilla wafers and melted butter together until combined. Spread this mixture on a baking sheet and bake at 350 degrees F for 5 to 7 minutes until lightly toasted. Let it cool completely.
- Once the cake layers are cool, level the tops if necessary.
- Place one cake layer on a serving plate. Spread a layer of whipped cream over the top.
- Top with the second cake layer. Frost the top and sides of the entire cake with the remaining whipped cream.
- Press the cooled strawberry crunch topping onto the sides and top of the frosted cake.
- Chill the cake for at least 1 hour before slicing and serving.
Notes
- Use fresh strawberries for the best flavor in the puree.
- Ensure the crunch topping is completely cool before applying it to the cake so it stays crisp.
- Prep Time: 30 min
- Cook Time: 35 min
- Category: Dessert
- Method: Baking
- Cuisine: American
Nutrition
- Serving Size: 1 slice
- Calories: 350
- Sugar: 35
- Sodium: 250
- Fat: 18
- Saturated Fat: 8
- Unsaturated Fat: 10
- Trans Fat: 0
- Carbohydrates: 45
- Fiber: 1
- Protein: 4
- Cholesterol: 35
Keywords: strawberry crunch cake, strawberry cake, vanilla wafer topping, layer cake, dessert