
If you’ve ever wrestled with a whole chicken on the grill only to end up with burnt skin and dry breast meat—followed by raw thigh meat—you know the frustration! I’ve been there more times than I care to admit trying to bake or grill a whole bird. But let me tell you, there’s a technique that changes everything: spatchcocking. It sounds fancy, but it’s just a fancy word for flattening the chicken out by removing the backbone. Trust me on this one; this Spatchcock Grilled Chicken method is the absolute secret to achieving spectacularly even cooking and the crispiest skin you’ve ever tasted coming off your barbecue. It’s how I finally mastered grilling poultry, and now you can skip right to the good part!

Why This Spatchcock Grilled Chicken Recipe Delivers
Honestly, what’s not to love about this method? It solves all the problems I used to have with whole chickens on the fire. It’s all about efficiency and flavor payoff, really.
- You get drastically faster cook times—we’re talking 50 minutes total!
- Every single bite has perfectly cooked meat because it lies flat.
- That glorious, crackly crispy skin—it’s practically begging for your favorite sauce.
Essential Ingredients for Perfect Spatchcock Grilled Chicken
The ingredient list for this barbecue masterpiece is super simple, which is exactly how I like it when I’m firing up the grill. We want that chicken flavor to shine, right? Make sure your chicken is totally clean, and don’t forget to keep that backbone!
- One whole chicken, about 4 pounds, with the giblets removed.
- 2 tablespoons of olive oil, we’ll use this twice!
- 1 tablespoon of kosher salt—don’t skimp here.
- 1 teaspoon black pepper.
- 1 teaspoon paprika for color and depth.
- 1/2 teaspoon garlic powder and 1/2 teaspoon onion powder.
Oh, and a quick important note: When you take the backbone out, save it! Toss that bony piece right into a freezer bag. It’s the start of the best, deepest chicken stock you’ll ever make later on.
Equipment Needed for Your Spatchcock Grilled Chicken
You don’t need a huge arsenal of gadgets for this recipe, but there is one tool that is non-negotiable if you want this to go smoothly. Seriously, don’t try to substitute this part—it just leads to frustration and ripped chicken skin.
You absolutely must have a pair of strong, sharp kitchen shears. I mean heavy-duty shears! Trying to hack through the chicken’s rib cage with regular scissors or, heaven forbid, a dull knife is just asking for trouble. You need those shears to snip right through the backbone, and they need to be tough enough to handle cartilage without bending.
Here is the short list of things you’ll need ready on your prep station—besides your grill, of course:
- Strong kitchen shears (this is your MVP!).
- A sturdy cutting board that won’t slip.
- A small bowl for mixing up your dry rub and oil.
- Your favorite spice measuring spoons.
- An instant-read thermometer—this is the key to knowing when the chicken is safe and perfectly done. No guessing allowed!
Having these things ready means once you start cutting, you can move fast without scrambling for tools. And trust me, once you see how easy it is to flatten that bird, you’ll never go back to tying up a whole chicken again!
Step-by-Step Instructions for Spatchcock Grilled Chicken
Okay, setting up this chicken is the part that seems scary, but I promise you it’s easy once you get the hang of it. Just remember to move deliberately, especially when you’re dealing with those bones. I usually prep mine the night before, but if you’re doing it last minute, just have patience and use those strong shears!
Preparing the Chicken: The Spatchcock Cut
First things first, lay your clean, dry chicken breast-side down right on your cutting board. See that backbone running down the middle? Grab your heavy-duty shears. You need to cut right along one side of that backbone, all the way from the tail end up to the neck cavity. Don’t be shy; you’re cutting through some cartilage here. Repeat that cut on the other side of the backbone, and pop it out! Save that piece for stock, like we talked about. Now, flip the bird over so it’s skin-side up. Position your palm right on the center of the breastbone and push down firmly and quickly. Crack! It should flatten right out. It sounds dramatic, but it’s necessary so the whole thing cooks evenly.
Seasoning Your Spatchcock Grilled Chicken
Now for the flavor explosion! Grab that small bowl. We’re mixing up a quick but mighty dry rub. Mix your olive oil, kosher salt, pepper, paprika, garlic powder, and onion powder together until it forms a rough paste. Don’t worry about perfectly measuring the oil; you just want enough to help the spices stick. Get your hands in there! Rub that seasoning mix everywhere—all over the skin, under the wings, and make sure you work some of it right into the cavity space. You want this chicken coated like it’s ready for a spa day.
Grilling the Spatchcock Grilled Chicken
Next, preheat your grill to a nice medium-high heat, aiming for about 400°F. This two-part cooking is crucial for success. You want to start the chicken on the cooler side of the grill, using indirect heat. Place it skin-side down for about 30 minutes. Keep that grill lid closed! Trapping that smoky heat is essential for even cooking. After thirty minutes, move the chicken over onto the direct heat side, carefully flipping it skin-side up. Now, you just roast it until the thickest part of the thigh hits 165°F on your thermometer. Don’t overcook it trying to check! Once it’s done, pull it off to rest for 10 minutes. Resting locks in those juices. You’ll want a fantastic topping for this when it comes off, maybe something bright like this chimichurri sauce.
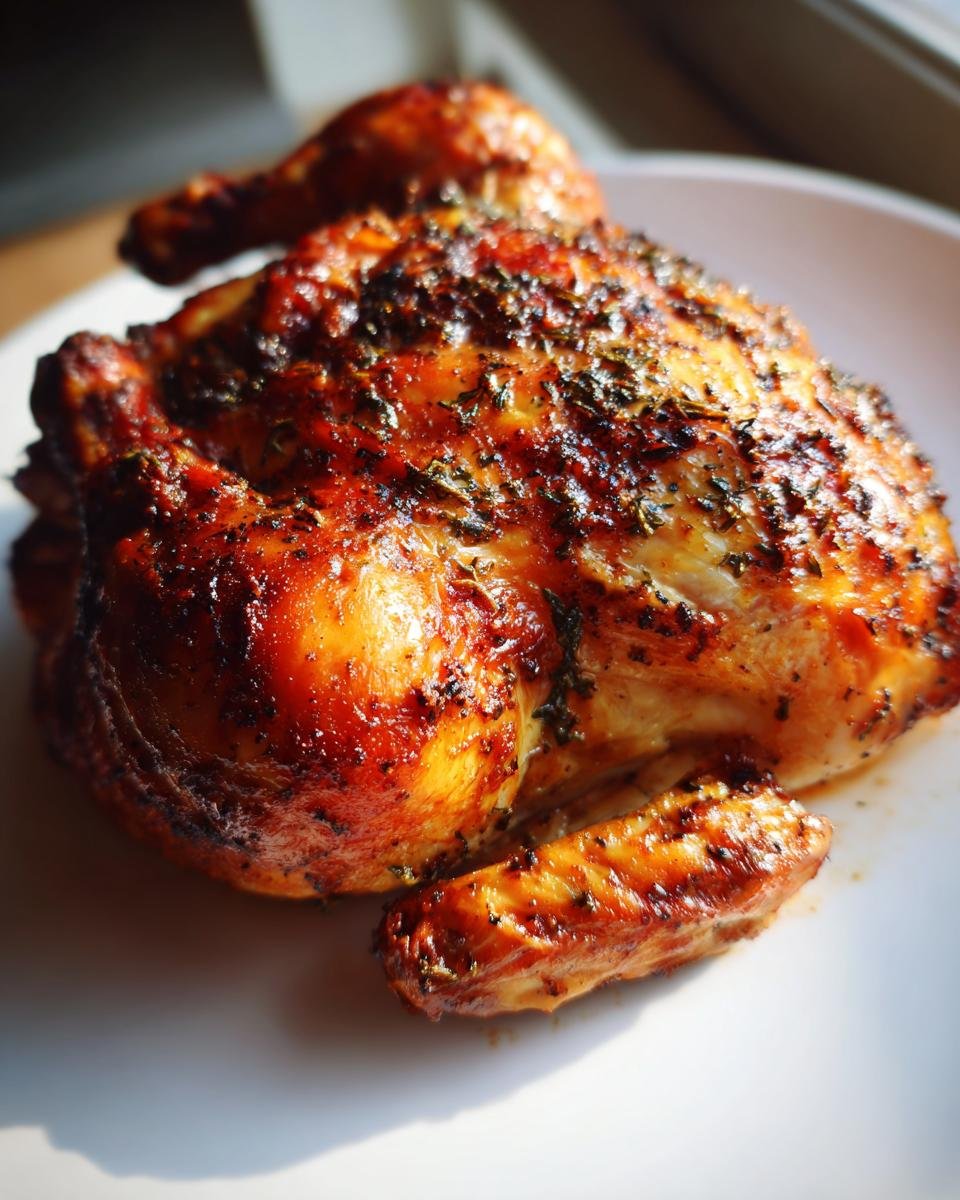
Tips for Achieving Ultimate Crispy Skin on Your Spatchcock Grilled Chicken
We talked about how flattening the chicken helps it cook evenly, but let’s be real: everyone—and I mean everyone—is here for that shatteringly crisp skin, right? It’s the sign of a truly mastered barbecue chicken, and it takes just a couple of extra minutes of prep work to get there. Skip this prep and you might as well just use the oven!
My number one secret, which applies to everything I grill or roast, is making sure the skin is bone dry before it ever touches oil. When I pull my 4-pounder out of the package, I use paper towels—a whole roll of them—and gently pat every single surface of the skin until I think it couldn’t possibly be drier. Moisture creates steam, and steam equals soggy skin. We want to avoid steam at all costs!
If you follow my seasoning steps, the oil helps crisp things up, but here’s a trick I learned from a very intense BBQ competition guy years ago. If you want skin that truly stands up tall and crackly, mix 1 teaspoon of baking powder (the regular kind, not double-acting) into your spice rub before you apply it. Now, only do this if you are positive your grill temperature is accurate and set for indirect heat to start. Baking powder slightly raises the pH level of the skin, which helps those water molecules escape way faster during cooking. It makes a huge, crispy difference! Don’t worry, you cannot taste it at all once it’s cooked.
Once it’s seasoned, if you have time—and this is where you can plan ahead—let the seasoned chicken sit uncovered in the fridge for a few hours, or even overnight! Yes, right on the rack in the fridge. The cool air will further dry out the skin, setting you up for maximum crisp potential when it hits that 400°F heat. It’s the ultimate game-changer for keeping up with recipes like these garlic-parmesan chicken wings.

Finally, remember the temperature change on the grill. Starting low and slow indirect, and finishing skin-side up over direct heat, gives the fat time to render out slowly before you blast it with high heat to toast that skin perfectly. That one-two punch is how you win the crispy skin battle every single time.
Serving Suggestions for Spatchcock Grilled Chicken
Now that you’ve got this gorgeous, perfectly flat, juicy chicken resting on the cutting board—the hardest part is over! But you can’t just serve a masterpiece like this all by itself, right? It needs friends. When I pull this bird off the grill, I usually keep the sides just as simple and smoky as the main event. That way, I’m not standing over a hot stove while everyone is eager to dig in.
Because we grilled it flat, it cooks so fast that you can easily throw some vegetables on at the same time. Since everything is already hot and ready to go, you might as well get some color on those veggies too! I love anything that can go right next to it on the grill grates.
My absolute favorite pairing is something light and vibrant to cut through the richness of the grilled skin and savory rub. Corn on the cob is a classic, of course, but if you want something a little more exciting that captures that smoky barbecue vibe, you need some skewered veggies! Honestly, if you haven’t tried making these vegetable brochettes alongside your chicken, you are missing out. Peppers, onions, zucchini—they cook fast and soak up all that delicious residual smoke flavor.
If you’re aiming for something lighter, a simple, bright salad works wonders. Think mixed greens with a sharp lemon vinaigrette. The acidity in the dressing just sings when it hits that poultry. Just make sure whatever you serve it with doesn’t overshadow the flavor of your perfectly cooked chicken. It deserves the spotlight!
Storage and Reheating Instructions for Spatchcock Grilled Chicken
That beautiful 4-pound chicken never lasts long in my house, but when it inevitably does, you need to know the right way to treat those leftovers. Nobody wants dry, crumbly chicken on day two! The key to success here is moving fast and keeping things cool before you warm them back up.
First, safety first, always! Once the chicken has cooled down to room temperature—don’t leave it sitting on the counter for more than two hours, seriously. Put it in an airtight container or wrap it tightly in foil or plastic wrap. Because it’s already spatchcocked and carved, you can store the pieces—breasts separate from thighs—which actually helps them cool down faster.
When you’re ready to reheat, remember the enemy is dryness. You want to bring back the moisture and heat it through without turning that amazing crispy skin back into armor. Forget the microwave unless you plan on shredding it immediately!
Reheating Gently on the Grill
If your grill is already dirty from the night before, just give the grates a quick brush and lower that heat way down. We’re talking low, indirect heat, maybe 275°F max. Place your leftover chicken pieces skin-side up on the cool side of the grill, shut the lid, and let it gently warm through for about 10 to 15 minutes. The indirect heat warms the meat gently, keeping it tender.
If you have just a few small pieces, you can even place a tiny splash of water or chicken broth in a small metal pan right next to the chicken on the cooler side of the grill. That little bit of steam helps keep the meat from seizing up. It works wonders!
Oven Method for Moisture Retention
For those nights when the grill is packed away, the oven is your next best friend. Preheat your oven to a very low 300°F. Place your leftover chicken pieces—breast sides up—in a shallow baking dish. Here’s the trick: pour just a tablespoon or two of chicken broth or water into the bottom of that dish, never covering the skin! This creates a steamy little micro-environment around the meat.
Cover that dish tightly with aluminum foil. Letting it bake covered for about 15 minutes ensures the inside gets hot and juicy. If you want a quick final crisp, take the foil off for the last five minutes. That helps revive just a little bit of texture on the skin without fully drying out the meat underneath. It’s almost like it was freshly grilled!

Frequently Asked Questions About Spatchcock Grilled Chicken
Grilling a whole bird always brings up a few questions, even when you’ve done the spatchcock prep! It’s smart to ask before you fire up the grill. I get asked these same things whenever I bring this dish out for a cookout. Here are the ones I hear most often about cooking that whole chicken flat!
Can I do this Spatchcock Grilled Chicken in the oven instead of on the barbecue?
Absolutely, you can! I prefer the grill because you get that amazing smoky flavor that you just can’t replicate inside, and the crispy skin is better. But if the weather isn’t cooperating, this method works wonders in the oven. You’ll want to stick to that medium-high heat—400°F (200°C) is perfect. Place the chicken on a wire rack set inside a rimmed baking sheet so the air can circulate underneath. It usually takes about 45 to 55 minutes total, using the same two-stage approach: start skin-side down on a lower rack for 30 minutes, then move it up skin-side up for the final cook until the thigh hits 165°F. It’s a fantastic alternative if you’re worried about flare-ups!
How long does it take to grill a 5lb chicken this way?
That’s a great question because chicken size definitely impacts your timing! Since we are flattening it out, it cooks much quicker than a regular whole roasted bird. For the 4-pound chicken listed in the recipe, 50 minutes is usually perfect. If you move up to a heavier 5-pound chicken, you just need to give it a little extra time on the indirect heat side. I’d say plan for about 35–40 minutes indirect, and then check it. You should still expect the total cooking time to be under an hour, maybe closer to 60–65 minutes, but always, always rely on that meat thermometer rather than the clock when grilling poultry!
What exact temperature should the grill be set to when I start cooking?
For this technique, we’re aiming for medium-high heat, which translates to about 400°F on your grill gauge. However, the most important part of the spatchcock grilled chicken process is managing heat zones. You need one area of the grill hot (direct heat) and one area cooler (indirect heat). Start the chicken on the indirect side to cook it through gently without scorching the skin. Once the meat temperature is climbing, you move it over to the direct heat side just for those final 15–25 minutes to firm up that skin and get it golden brown. If your grill runs hot, definitely keep an eye on it and maybe even dial it back to 375°F to start.
Can I make the spice rub ahead of time?
You sure can! The dry spices themselves are fine sitting in a sealed jar for weeks, but for the absolute best flavor saturation on your chicken, you want the spice paste mixture that includes the oil. Mixing the rub and oil 24 hours ahead of time allows those spices like paprika and garlic powder to really bloom in the olive oil flavor. When you rub it onto the chicken, make sure you treat it like a marinade—let it sit on the chicken for at least an hour before grilling, or better yet, let it sit overnight in the fridge. This lets that salt penetrate the meat, which drastically improves moisture and taste, especially if you’re cooking for a crowd!
If you’re looking for other great chicken ideas that might need baking, check out this chicken and vegetable pasta bake for those cooler evenings!
Estimated Nutrition Facts for Spatchcock Grilled Chicken
When you’re cooking chicken this way, especially just with olive oil and basic spices—no heavy sauces or batters—the nutrition profile is fantastic. It’s lean, it’s high in protein, and it’s just pure grilled goodness. Keep in mind these numbers are my best estimate based on the standard 4-pound bird and the amounts given.
Here’s what you can generally expect per serving size for the Spatchcock Grilled Chicken:
- Serving Size: 4 oz cooked meat
- Calories: 250
- Protein: 33g (That’s big!)
- Total Fat: 12g
- Saturated Fat: 3g
- Carbohydrates & Fiber: 0g (Yep, totally carb-free!)
- Sodium: 350mg
- Cholesterol: 100mg
Since we aren’t adding any heavy glazes or sugar-laden sauces to the chicken itself using this base recipe, it stays incredibly clean! Of course, if you smother it in BBQ sauce later, those numbers are going to jump up, so keep that in mind when you choose your toppings!
Share Your Spatchcock Grilled Chicken Success
Seriously, I want to see the results! There is nothing more satisfying than taking a whole chicken, cutting it up, and throwing it on the grill only to end up with the juiciest, crispiest bird around. If you try this technique, please leave me a rating right here on the recipe card. Did you try the baking powder trick? Did your skin get ultra-crispy? Don’t hold back!
Snap a picture of that beautifully flattened, golden-brown bird coming off the grates and tag me on social media. Seeing your success stories is what keeps me testing new recipes and perfecting these old family favorites. Happy grilling, everyone!
Estimated Nutrition Facts for Spatchcock Grilled Chicken
When you’re cooking chicken this way, especially just with olive oil and basic spices—no heavy sauces or batters—the nutrition profile is fantastic. It’s lean, it’s high in protein, and it’s just pure grilled goodness. Keep in mind these numbers are my best estimate based on the standard 4-pound bird and the amounts given.
Here’s what you can generally expect per serving size for the Spatchcock Grilled Chicken:
- Serving Size: 4 oz cooked meat
- Calories: 250
- Protein: 33g (That’s big!)
- Total Fat: 12g
- Saturated Fat: 3g
- Carbohydrates & Fiber: 0g (Yep, totally carb-free!)
- Sodium: 350mg
- Cholesterol: 100mg
Since we aren’t adding any heavy glazes or sugar-laden sauces to the chicken itself using this base recipe, it stays incredibly clean! Of course, if you smother it in BBQ sauce later, those numbers are going to jump up, so keep that in mind when you choose your toppings! Always remember these are estimates because, let’s be honest, sometimes I use an extra pinch of salt—we all do it!
Share Your Spatchcock Grilled Chicken Success
Seriously, I want to see the results! There is nothing more satisfying than taking a whole chicken, cutting it up, and throwing it on the grill only to end up with the juiciest, crispiest bird around. If you try this technique, please leave me a rating right here on the recipe card. Did you try the baking powder trick? Did your skin get ultra-crispy? Don’t hold back!
Snap a picture of that beautifully flattened, golden-brown bird coming off the grates and tag me on social media. Seeing your success stories is what keeps me testing new recipes and perfecting these old family favorites. Happy grilling, everyone!
Print
Spatchcock Grilled Chicken
- Total Time: 65 min
- Yield: 4 servings 1x
- Diet: Low Fat
Description
A method for grilling a whole chicken flat for even cooking and crispy skin.
Ingredients
- 1 whole chicken (about 4 lbs)
- 2 tablespoons olive oil
- 1 tablespoon kosher salt
- 1 teaspoon black pepper
- 1 teaspoon paprika
- 1/2 teaspoon garlic powder
- 1/2 teaspoon onion powder
Instructions
- Place the chicken breast-side down on a cutting board.
- Use strong kitchen shears to cut along both sides of the backbone, removing it completely.
- Flip the chicken over and press firmly on the breastbone until it lies flat.
- In a small bowl, mix the olive oil, salt, pepper, paprika, garlic powder, and onion powder.
- Rub the spice mixture all over the chicken, inside and out.
- Preheat your grill to medium-high heat (about 400°F or 200°C).
- Place the chicken skin-side down on the cooler side of the grill (indirect heat).
- Grill for 30 minutes.
- Move the chicken to the direct heat side of the grill, skin-side up.
- Grill for another 15-25 minutes, or until an instant-read thermometer inserted into the thickest part of the thigh reads 165°F (74°C).
- Remove the chicken from the grill and let it rest for 10 minutes before carving.
Notes
- Save the removed backbone to make chicken stock later.
- If your grill has a lid, keep it closed during cooking to maintain a steady temperature.
- Prep Time: 15 min
- Cook Time: 50 min
- Category: Main Course
- Method: Grilling
- Cuisine: American
Nutrition
- Serving Size: 4 oz cooked meat
- Calories: 250
- Sugar: 0
- Sodium: 350
- Fat: 12
- Saturated Fat: 3
- Unsaturated Fat: 9
- Trans Fat: 0
- Carbohydrates: 0
- Fiber: 0
- Protein: 33
- Cholesterol: 100
Keywords: spatchcock, grilled chicken, whole chicken, barbecue, grilling recipe, crispy skin