
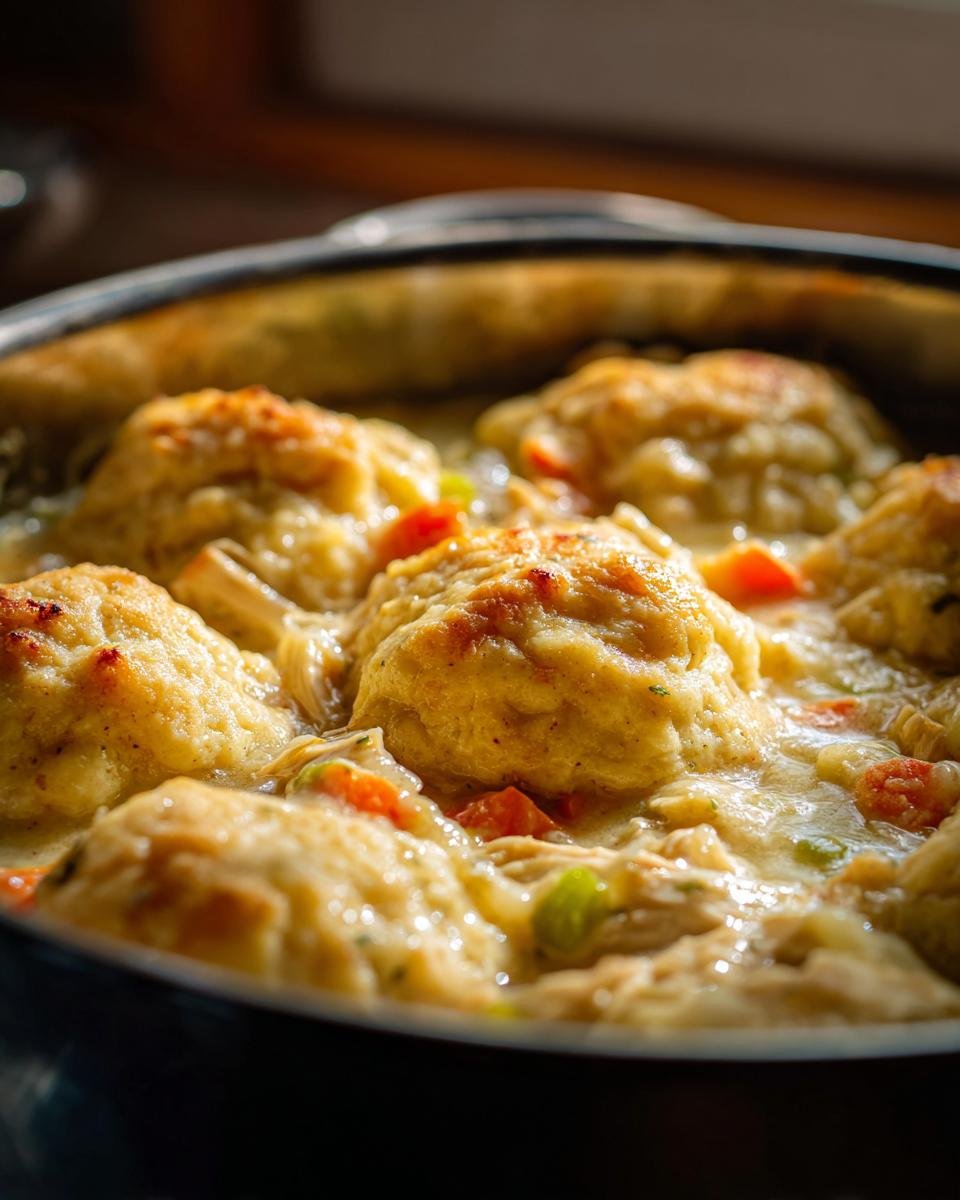
Oh, who doesn’t just instantly feel better when they see a big, steaming bowl of chicken and dumplings? Seriously, for me, this dish is the definition of cozy comfort food, especially when the weather just won’t cooperate outside. I used to think making that creamy stew and perfectly fluffy dumplings took all day simmering on the stove, which usually meant it was only for special weekends. Not anymore! This week, I cracked the code on making rich, classic Instant Pot Chicken and Dumplings fast. The magic of the pressure cooker means we get incredibly tender chicken and the creamiest sauce base in half the time. It’s my new secret weapon for getting that deep, satisfying flavor on a Tuesday night without stressing out!
Why This Instant Pot Chicken And Dumplings Recipe Works So Well
I love taking a dish that feels heavy on time, like chicken and dumplings, and making it lightning fast. Using the Instant Pot in this way completely changes the game! Trust me, this isn’t your grandma’s slow afternoon recipe (though we love those too!).

- We get ridiculously tender chicken because the pressure coaxes all that moisture right into the meat.
- Clean up is a dream! We’re using one pot for everything—browning, cooking, simmering, and steaming.
- The dumplings cook perfectly on top of the stew without getting soggy underneath. They become wonderfully individual and fluffy.
- It locks in that deep herb flavor so you feel like it simmered all day. If you love other cozy meals, you should check out my soup recipes like my chicken pot pie soup!
Ingredients for the Best Instant Pot Chicken And Dumplings
The beauty of this Instant Pot Chicken and Dumplings recipe is that it relies on simple, pantry-friendly shortcuts that still taste amazing. You don’t need to spend an hour chopping mirepoix; the pressure cooker handles the hard work!
For the Chicken Base, I usually grab boneless, skinless thighs because they stay juicier under pressure, but breasts work if that’s what you have on hand. We season it simply with salt and pepper before browning. Don’t be shy with the olive oil here; that initial browning step adds so much background flavor to the whole dish. Oh, and speaking of simple shortcuts, if you ever need amazing rolls, check out my two-ingredient biscuit recipe for another night!
Crucial aromatics are onion, carrots, and celery—just chop them up standard size. The broth needs to be good quality since it forms the stew base; I use four cups of store-bought stuff and a teaspoon of dried thyme. Now for the thickening magic later, you’ll mix flour with cold water to make a slurry, use plain milk for creaminess, and then the star: refrigerated biscuit dough, which you absolutely must cut into quarters before the dumplings go in.
Equipment Needed for Instant Pot Chicken And Dumplings
Okay, you don’t need a ton of fancy gadgets for this one, which is great because we’re already relying on the Instant Pot to do most of the heavy lifting! That marvelous machine is the absolute star here, handling the pressure cooking and even the final simmer.
First things first, you obviously need your **Instant Pot**, or whatever electric pressure cooker you use. Make sure the inner stainless steel pot is clean and ready to go, especially if you’ve just used it for rice!
Aside from that, you’ll want a couple of simple kitchen tools that make the manual steps way easier. When we brown the chicken, a good **pair of tongs** is handy for flipping; nobody wants burned fingers.
After the pressure cycle is done, you need something to shred that beautifully tender meat. I just use **two forks**—it’s primitive, but it works perfectly for pulling the chicken apart right in the pot. And because we make a slurry to thicken the stew, you’ll need a **small bowl and a whisk** to make sure there are zero lumps of flour floating around before you add it to the pot.
Finally, when those biscuits are steaming on top, you need to cover the pot, but *remember*, you don’t lock the valve down. A simple **lid**, maybe even the glass one you already own if your Instant Pot came with one, is perfect for trapping that steam to cook the dumplings through.
Step-by-Step Instructions for Instant Pot Chicken And Dumplings
This is where the pressure cooker really earns its keep! I divide this process into three main acts: getting that flavor foundation built, running the pressure cycle, and then the final, glorious simmer where the dumplings puff up. It’s so much easier than tending a pot all afternoon. Now, before you even start cooking, remember Step 4 in the instructions—when liquid goes in, you have to scrape up those browned bits, or your Instant Pot throws a ‘Burn’ notice. It happens to the best of us!
Sautéing Aromatics and Browning Chicken
First things first, we have to seal in the chicken flavor. Set your Instant Pot to **Sauté mode**—the high heat setting is what we need here. Add your olive oil, and once it shimmers just a little, season your chicken with salt and pepper and brown the breasts or thighs on both sides. They only need about three minutes per side; we aren’t trying to cook them through, just get a nice color going. Once they look golden, pull them out and put them on a plate beside your machine.
Next up are the vegetables! Toss your chopped onion, carrots, and celery right into that seasoned oil. Let them soften up using the same **Sauté** setting for about five minutes. This cooks the sharper edges off the onion and softens the carrots nicely before they go under pressure. If you wanted to make homemade noodles instead of using biscuits, this is where you’d start the process for fresh egg noodles down the road, but we are sticking to the quick route today!
Pressure Cooking the Chicken Base
Now, pour in those four cups of chicken broth and scrape the bottom of the pot vigorously with a wooden spoon. Seriously, scrape it all—any fond stuck down there will cause burns later on!
Return your browned chicken to that lovely broth mix, add your teaspoon of thyme, lock the lid on tight, and make sure that vent is set to **Sealing**. We are cooking this for a quick **10 minutes on High Pressure** using the Manual setting. Once the time is up, don’t rush it! Let the pressure release *naturally* for a full **10 minutes**. After those ten minutes, you can manually quick release any steam left over, open it up, and pull that unbelievably tender chicken out to shred it. Put the shredded chicken right back into the creamy base.
Thickening the Stew and Cooking the Dumplings
This next part makes it creamy! In a separate little bowl, quickly whisk your 1/2 cup of flour with the 1/2 cup of cold water until it forms a smooth slurry—no lumps allowed! Stir that slurry right into the chicken mixture in the pot, add in the cup of milk, and switch the Instant Pot back to **Sauté mode on Low**. You need to stir constantly for about three to five minutes until it bubbles gently and thickens up just enough to coat the back of a spoon.
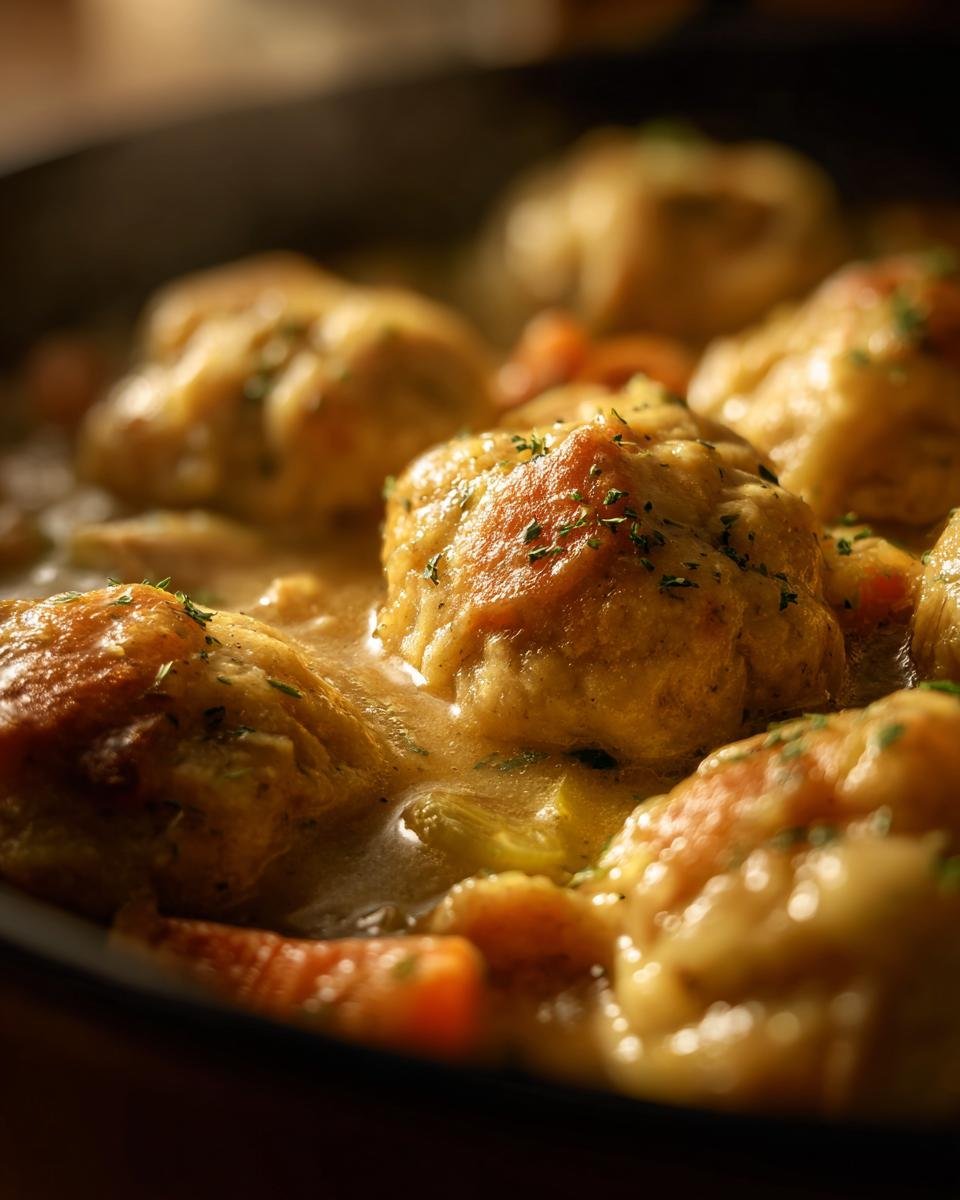
Once it’s simmering gently, take your refrigerated biscuit dough quarters and drop them evenly over the surface of that thickening stew. **Do not stir them!** That’s key. They need to sit right on top to steam properly. Cover the pot again, but this time, leave the vent set to **Venting** or just cover it loosely so the steam can escape but the heat stays trapped. Let the dumplings cook right there on the low Sauté setting for about **5 to 8 minutes** until they look puffed up and cooked all the way through. You’ll know it’s ready when you poke one gently and it springs back—perfection!
Tips for Perfect Instant Pot Chicken And Dumplings
Even though this is an “easy” recipe, a few little tweaks make the difference between good dumplings and those incredible, pillowy bites that melt in your mouth. I learned these things the hard way, so you don’t have to struggle with gummy dumplings or that dreaded burn notice!
Saving Time with Rotisserie Chicken
If you are truly making this on a super chaotic weeknight, don’t worry about browning your own meat! You can totally swap out the raw chicken breasts or thighs for about two cups of pre-cooked meat. I usually just pick up a store-bought rotisserie chicken. If you do this, skip Steps 1 and 2 entirely. Just wait until the vegetables are sautéed, scrape the bottom well, add your broth, and then stir in the already shredded rotisserie chicken right before you add the slurry in Step 8. It saves about 20 minutes right there!
Biscuit Dough Discipline
The recipe calls for cutting your refrigerated biscuit dough into quarters, but listen closely: the thickness matters a lot for steaming! If you cut them into tiny little nubs, they’ll cook through almost instantly, and you might end up with slightly dense bits submerged in the creamy sauce rather than light clouds floating on top.
Conversely, if you cut them into massive chunks, the center might still be doughy when the outside looks done. I aim for pieces about the size of a generous tablespoon. This size seems to be the sweet spot for achieving that fluffy, cooked-through texture in the 5 to 8 minutes we cook them on the Sauté setting without sealing the lid.
Fixing a Thin Stew Base
Sometimes, even when you think you whisked that flour slurry perfectly, your stew base just doesn’t seem creamy enough after simmering. This happens, don’t panic! You need to make another tiny slurry slurry right there on the spot—maybe a tablespoon of flour mixed with two tablespoons of *cold* water. Stir this into the simmering pot and let it cook down for about two minutes. It will thicken up nicely. If you love thick, rich stews, you might also want to check out my tips for thickening other soups, like my cozy chicken pot pie soup recipe!
Preventing the Burn Notice
I mentioned this before, but it’s the most important tip for any successful Instant Pot cooking: when you are done browning the chicken and you add the broth, you absolutely must scrape up every single browned speck left stuck to the bottom of the inner pot. If you leave that caramelized chicken residue stuck there, it will scorch when the pot builds pressure, and you’ll get that horrible “Burn” warning right in the middle of cooking. A good thirty seconds of dedicated scraping saves a whole lot of frustration!
Variations for Your Instant Pot Chicken And Dumplings
Now that you have the perfect, quick base recipe for creamy Instant Pot Chicken and Dumplings, you might want to play around a little bit. I love taking a classic comfort dish and giving it a little unexpected twist just to keep things interesting in our rotation. You don’t have to change much to get a whole new flavor profile!
Herbal Twists and Brightness
The thyme we use is classic, but honestly, if you have fresh rosemary, you should absolutely use it! Rosemary is so wonderful with chicken. Try adding just one or two fresh sprigs right in with the broth before you pressure cook. Make sure you pull those woody stems out before you start thickening the stew, though, because nobody wants to bite into a tough piece of rosemary.
If you want to cut through some of that richness from the milk and butterfat in the dumplings, a little acid wakes everything up. Right after you remove the lid from the pressure cooking stage (Step 7), stir in just a teaspoon of fresh lemon juice. It’s optional, but wow, does it brighten up the carrots and celery! If you enjoy bright flavors like that, you might also love my chimichurri sauce recipe—it’s amazing on grilled chicken, too.
Adding Extra Vegetables
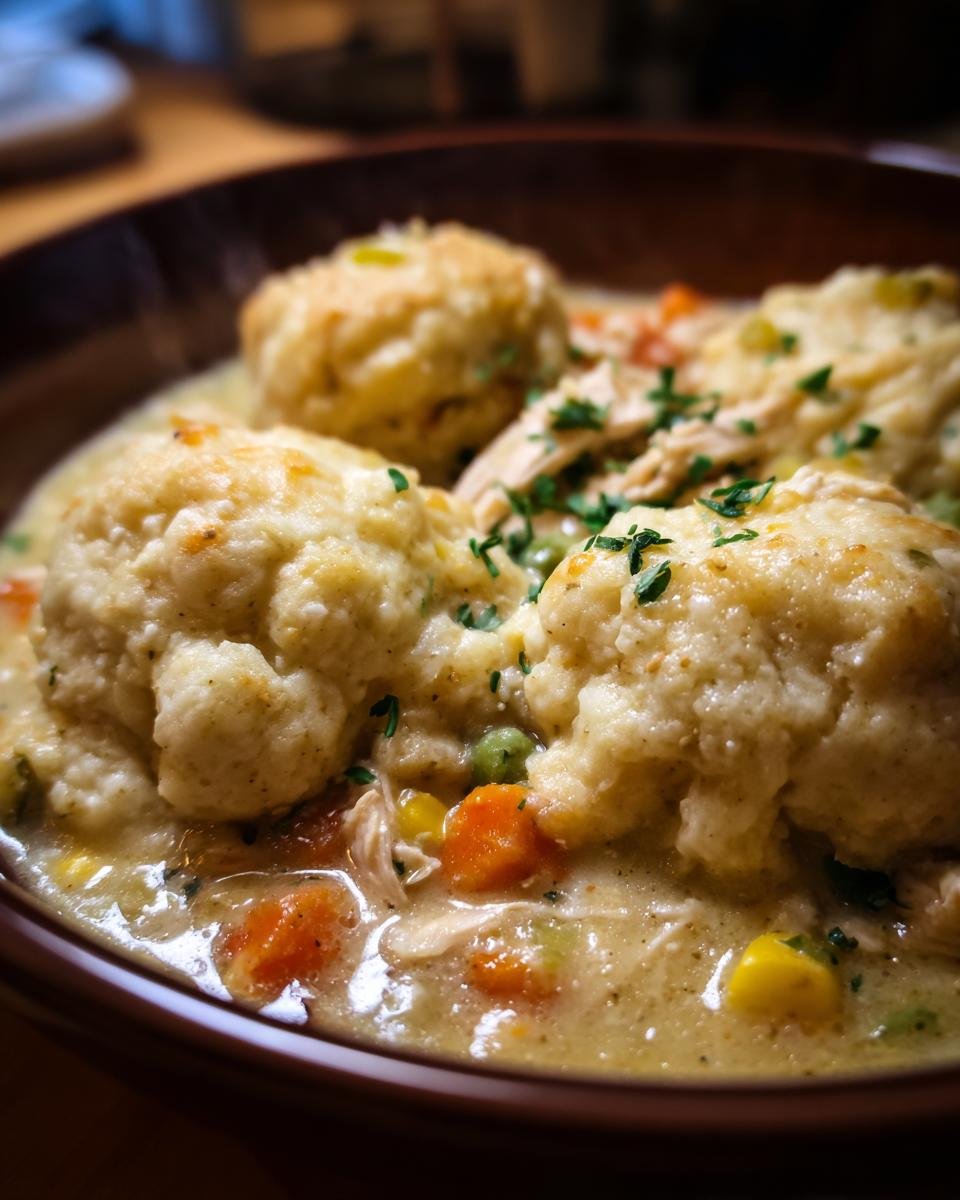
We keep the veggie count simple here—onion, carrot, and celery—because they hold up so well under pressure. But if you want to sneak in more green goodness, frozen vegetables are your best friend in the Instant Pot! Frozen peas or mixed vegetables work wonders.
If you toss in frozen peas, you want to add them *last*. They cook almost instantly. Just stir them in when you add the milk (Step 9) and let them heat through while you thicken the stew; they’ll stay bright green and sweet.
If you want something heartier, frozen corn is fantastic. Throw the corn in right when you drop your biscuit dumplings on top. They heat up beautifully while the dumplings steam, adding a nice little pop of sweetness to the stew underneath.
Boosting the Flavor Base with Wine (For Grown-Ups!)
This is a technique I started doing when my husband has a rough day and needs an extra comforting meal. Before you add the broth in Step 4, after you’ve sautéed your vegetables, pour in about 1/4 cup of dry white wine—something crisp, like a Pinot Grigio. Let the wine bubble and reduce down until almost all of it has evaporated, scraping up all those browned bits as it cooks. This adds a subtle depth that regular broth just can’t hit. Then, proceed with adding your chicken broth and thyme as normal.
Serving Suggestions for Instant Pot Chicken And Dumplings
Honestly, this Instant Pot Chicken and Dumplings recipe is so rich and hearty—it’s practically a whole meal in one pot! Because the stew base is so creamy and filling, you don’t really *need* a ton of heavy sides. I always like to balance out the richness with something fresh and sharp.
Keep it Simple for Balance
My biggest recommendation is to serve it with something green but very simple. When my kids finish their bowls of the thick stew, they usually want something they can crunch on.
Steamed green beans are perfect. They take five minutes to steam, a little salt and pepper, and they offer a nice, crisp texture contrast to the soft dumplings. Another family favorite is just lightly blanched asparagus spears.
The Perfect Side Salad
If you want something that feels a little more like a complete dinner spread, you definitely need a bright salad. You don’t want anything heavy, like a mayo-based coleslaw, because you already have a lot of richness going on in the main dish.
I always whip up a quick vinaigrette for a crisp salad. Something with sharp lemon or red wine vinegar cuts right through that creamy gravy beautifully. You can use whatever lettuce you have, but I like adding shaved carrots and maybe some toasted walnuts for texture. If you need a super easy, tangy dressing recipe, check out my recipe for a super crunchy salad dressing—it’s the ideal counterpoint to this heavy chicken dinner.
The goal here is contrast! A little freshness makes you appreciate that savory dumpling even more when you go back for another bite.
Storage and Reheating Instant Pot Chicken And Dumplings
The best part about making a big batch of comfort food like this Instant Pot Chicken and Dumplings is having leftovers! Seriously, I think it tastes even better the next day when all those thyme and onion flavors have really steeped into the sauce.
But here’s the thing you have to watch out for: those beautiful, fluffy dumplings. They are amazing fresh outta the pot, but they soak up liquid like magic when they sit in the fridge overnight. If you aren’t careful, they turn into little doughy sponges! Trust me, you don’t want to just toss the whole thing in the microwave and hope for the best.
Storing Your Leftovers Safely
When you have leftovers, the key is getting that creamy stew base separated somewhat from the dough. If you plan on saving the leftovers for more than a day, I recommend removing the dumplings entirely before storing. They just get too soggy once they cool down.
Put the chicken and thickened stew base into an airtight container—glass ones work best for even cooling—and pop that right into the fridge. They’ll be good for about three, maybe four days tucked away in there. Don’t leave the leftovers sitting on the counter for more than two hours, especially because of that dairy from the milk we added when thickening the sauce!
Reheating the Stew Base
When it’s time for round two, you’ll notice the stew base has probably firmed up quite a bit because of that flour and milk thickener. You absolutely need to thin it out again! Pour the amount of stew you want to eat into a saucepan over medium heat, and add a splash of extra chicken broth or even just water until it gets back to that luscious, pourable consistency you loved the first night.
Stovetop reheating is always my preferred method here because I can control the temperature perfectly and stir constantly. Heat it up slowly until it’s steaming hot all the way through.
Handling Dumplings for Reheating
Now for the dumplings. If you saved them, they might be dense. You have two options here: either toss them out and use emergency store-bought biscuits/pre-made noodles on the second night (zero shame in that!), or reheat them separately.
If you want to salvage those original dumplings, don’t microwave them dry! Add them to the steaming hot stew base on the stovetop right at the very end. Let them sit in the creamy sauce, covered, for just about five minutes. The gentle heat and moisture will help them soften up just enough so they aren’t rock hard anymore, though they won’t ever be quite as fluffy as fresh.
If you need serious speed, you can microwave the reheated stew base in a bowl, and then place a couple of the saved dumplings on top, cover them loosely with a damp paper towel, and microwave for just 30 seconds. It’s a quick cheat, but it works in a pinch when you’re starving!
Frequently Asked Questions About Instant Pot Chicken And Dumplings
I totally get it—when you’re ready to cook, you might have a few last-minute questions pop up, especially when using a pressure cooker for a classic dish like this. Don’t worry, I’ve gathered the things folks ask me most often about this Instant Pot Chicken and Dumplings recipe. Let’s sort these out so you can get cooking!
Can I make this entirely from scratch, skipping the refrigerated biscuit dough?
Yes, absolutely! I know some purists prefer making their dumplings completely homemade, and it’s definitely doable. If you want to ditch the store-bought dough, you’ll just need to make a simple drop-biscuit batter instead.
For homemade dumplings, you’ll mix about 1 1/2 cups of all-purpose flour, 1 teaspoon of baking powder, 1/2 teaspoon of salt, and about 1/2 cup of cold butter (cut into cubes) until it looks crumbly. Then, mix in just enough milk (usually around 1/2 cup) until it forms a shaggy dough. You drop this by spoonfuls onto the simmering stew in Step 11, just like you would the canned dough. They might cook a tad faster, so keep an eye on them!
I keep getting the ‘Burn’ notice when I use my Instant Pot. How do I prevent this with this recipe?
Oh, the dreaded ‘Burn’ notice! Since we’re using the Sauté function, that residue sticks easily to the bottom. This is the single most important thing to watch out for: **deglazing**. After you brown the chicken and remove it (Step 2), you must scrape up every single browned bit stuck to the bottom of the stainless steel insert when you add the broth (Step 4). If you leave that caramelized crust there, the temperature difference when it builds pressure will trigger the warning. If you’ve made my chicken pot pie soup, you know this rule applies there too!
Can I use frozen, unthawed chicken breasts for this recipe?
I generally advise against using frozen meat for the initial browning step, as you really need that surface to sear to build flavor, and the Instant Pot can’t brown frozen meat properly. However, if you are truly in a rush, you can skip Steps 1 and 2, put the frozen chicken directly into the broth (Step 4), and increase your pressure cooking time significantly. I’m talking maybe 15 to 18 minutes on High Pressure instead of 10. Just be sure to use the full 10-minute Natural Release so the chicken cooks through safely in the center.
I don’t have fresh celery or carrots. Can I use frozen mixed vegetables instead?
You sure can! While fresh vegetables give you that bright, crisp texture when sautéed, frozen vegetables work perfectly fine for the pressure cooking base. If you use frozen mirepoix (onion, carrot, celery mix), just toss them in straight from the freezer when you add the broth in Step 4. They will cook down completely during the pressure cycle, so you won’t lose any texture in the final stew base.
Why do I simmer the dumplings without sealing the lid?
That creamy stew part is cooked, but the dumplings need to steam until they are light and fluffy on top, not cook down in the liquid! If you seal the pressure valve, the Instant Pot will try to build pressure again, which it can’t do when the lid is full of biscuit dough sitting on top.
We keep the Instant Pot on the Sauté setting (low heat) and cover it loosely. This traps the heat and steam right above the stew, cooking the dough from the top down, just like putting a lid on a boiling pot on the stove. This is how we get that perfect, cloud-like dumpling texture without turning them into dense little sinkers!
Nutritional Snapshot of This Comfort Meal
When you’re diving into a big bowl of homemade comfort food, the last thing you want is to feel guilty about it! I always check the nutrition facts, even though, let’s be honest, chicken and dumplings isn’t exactly health food. It’s nourishing, though, and that counts for something, right?
Based on the ingredients we used—especially the chicken, the creamy base, and the biscuit topping—here’s a pretty good estimate of what one satisfying serving gives you. It provides a great punch of protein!
Here’s the quick breakdown for one generous serving, according to my recipe calculations:
- Calories: Around 450 calories. That’s honestly pretty decent for a stick-to-your-ribs dinner!
- Protein: We’re looking at about 45 grams. Hello, muscle fuel!
- Fat: Approximately 15 grams of total fat. That comes mostly from the chicken skin (if you use thighs) and the butter/oil needed for that delicious creamy texture.
- Carbohydrates: About 35 grams, mostly coming from the flour slurry and, of course, those lovely biscuit topping pieces.
Keep in mind that these numbers are just an estimate. If you decide to use all lean white breast meat instead of thighs, or if you use low-fat milk instead of whole, those numbers will absolutely shift. For example, if you use a different brand of canned biscuit dough, the carb count might vary slightly. But overall, this recipe gives you a really solid, hearty meal clocking in under 500 calories, which I think is a huge win for a homemade, creamy stew!
Share Your Experience Making This Dish
Alright friends, now it’s your turn! I’ve shared all my secrets for getting that rich, creamy, and fast Instant Pot Chicken and Dumplings on your table, and I truly hope you love the ease and flavor as much as my family does.
The greatest joy for me is hearing from you all! Did your dumplings fluff up exactly as mine did? What was your favorite part—the speed of the pressure cooker or the taste of that thick, herby gravy?
Don’t be shy! Please stop down below, leave me a star rating so I know how it went, and drop a comment telling me what you thought. Did you add any secret spices of your own? I’m always looking for little tweaks to try next time we make this beautiful comfort meal!
Print
Instant Pot Chicken and Dumplings
- Total Time: 50 min
- Yield: 6 servings 1x
- Diet: Low Fat
Description
A simple recipe for making creamy chicken and dumplings in the Instant Pot.
Ingredients
- 2 pounds boneless, skinless chicken breasts or thighs
- 1 teaspoon salt
- 1/2 teaspoon black pepper
- 1 tablespoon olive oil
- 1 medium onion, chopped
- 2 carrots, chopped
- 2 celery stalks, chopped
- 4 cups chicken broth
- 1 teaspoon dried thyme
- 1/2 cup all-purpose flour
- 1/2 cup cold water
- 1 cup milk
- 1 cup refrigerated biscuit dough, cut into quarters
Instructions
- Season chicken with salt and pepper.
- Set the Instant Pot to Sauté mode. Add olive oil. Brown the chicken on both sides, about 3 minutes per side. Remove chicken and set aside.
- Add onion, carrots, and celery to the pot. Sauté until softened, about 5 minutes.
- Pour in chicken broth and add thyme. Scrape up any browned bits from the bottom of the pot.
- Return the chicken to the pot. Secure the lid and set the valve to sealing.
- Cook on Manual/Pressure Cook for 10 minutes on High Pressure. Allow pressure to naturally release for 10 minutes, then quick release any remaining pressure.
- Remove chicken, shred it, and return it to the pot.
- In a small bowl, whisk together flour and cold water to make a slurry. Stir the slurry into the pot contents.
- Stir in the milk. Set the Instant Pot to Sauté mode (Low). Bring the mixture to a gentle simmer, stirring constantly until the sauce thickens slightly, about 3-5 minutes.
- Drop the biscuit pieces evenly over the top of the simmering mixture. Do not stir them in.
- Cover the pot with a lid (do not seal the pressure valve). Cook on the Sauté setting until the dumplings are cooked through, about 5-8 minutes.
Notes
- You can use pre-cooked rotisserie chicken to save time.
- For thicker dumplings, use slightly less liquid in the stew base.
- Prep Time: 15 min
- Cook Time: 35 min
- Category: Dinner
- Method: Pressure Cooking
- Cuisine: American
Nutrition
- Serving Size: 1 serving
- Calories: 450
- Sugar: 5
- Sodium: 750
- Fat: 15
- Saturated Fat: 4
- Unsaturated Fat: 11
- Trans Fat: 0
- Carbohydrates: 35
- Fiber: 2
- Protein: 45
- Cholesterol: 120
Keywords: Instant Pot, chicken and dumplings, pressure cooker, easy dinner, comfort food