
Oh my gosh, when the weather turns just a little bit chilly, or honestly, any time I need a serious chocolate hug, you know what I reach for? This incredible Chocolate Cobbler recipe. Forget those fussy French pastries; this is pure, unadulterated comfort baked into an 8×8 pan, and it’s ready faster than you can decide what movie to watch!
This recipe isn’t just easy; it’s borderline magic. It’s the one I make when company drops by unexpectedly, or when I’ve completely forgotten I promised dessert. The main attraction here is the strange way the water sinks to the bottom and creates this incredible, fudgy, spoon-tender layer that tastes like pure melted chocolate decadence. Trust me, you are going to wonder why you haven’t been making baked desserts this simply your whole life. It really is the simplest, richest chocolate dessert I bake.

Why You Will Love This Simple Chocolate Cobbler Recipe
I swear by this recipe because it delivers maximum payoff for minimum sweat equity. Seriously, you barely have to dirty any bowls, and the result tastes like you spent an hour fussing over it. It’s just one of those humble baked desserts that always surprises people. I even sneak a peek at my much more complicated cherry cobbler instructions sometimes, and I just laugh because this chocolate version is so wonderfully straightforward. I’ve turned a few friends onto this recipe when they were looking for fast after-dinner treats.
- The prep time is ridiculously short—we’re talking about ten minutes tops before it goes into the oven.
- It uses basic pantry staples, so you rarely have to run out for special ingredients.
- The texture is everything: a set, slightly cakey top yielding to a warm, molten chocolate layer underneath. It’s the best of both worlds!
Quick Preparation Time for Your Chocolate Cobbler
When I say ten minutes, I mean it! You whisk the dry things, stir in the wet things, dump it in the dish, and pour hot water on top. It’s basically instant gratification. If you’re staring into the fridge at 8 PM wondering what to make for a late-night craving, this Chocolate Cobbler swoops in like a hero. You’ll have it baking before you can even decide on a movie.
Rich, Comforting Flavor of Chocolate Cobbler
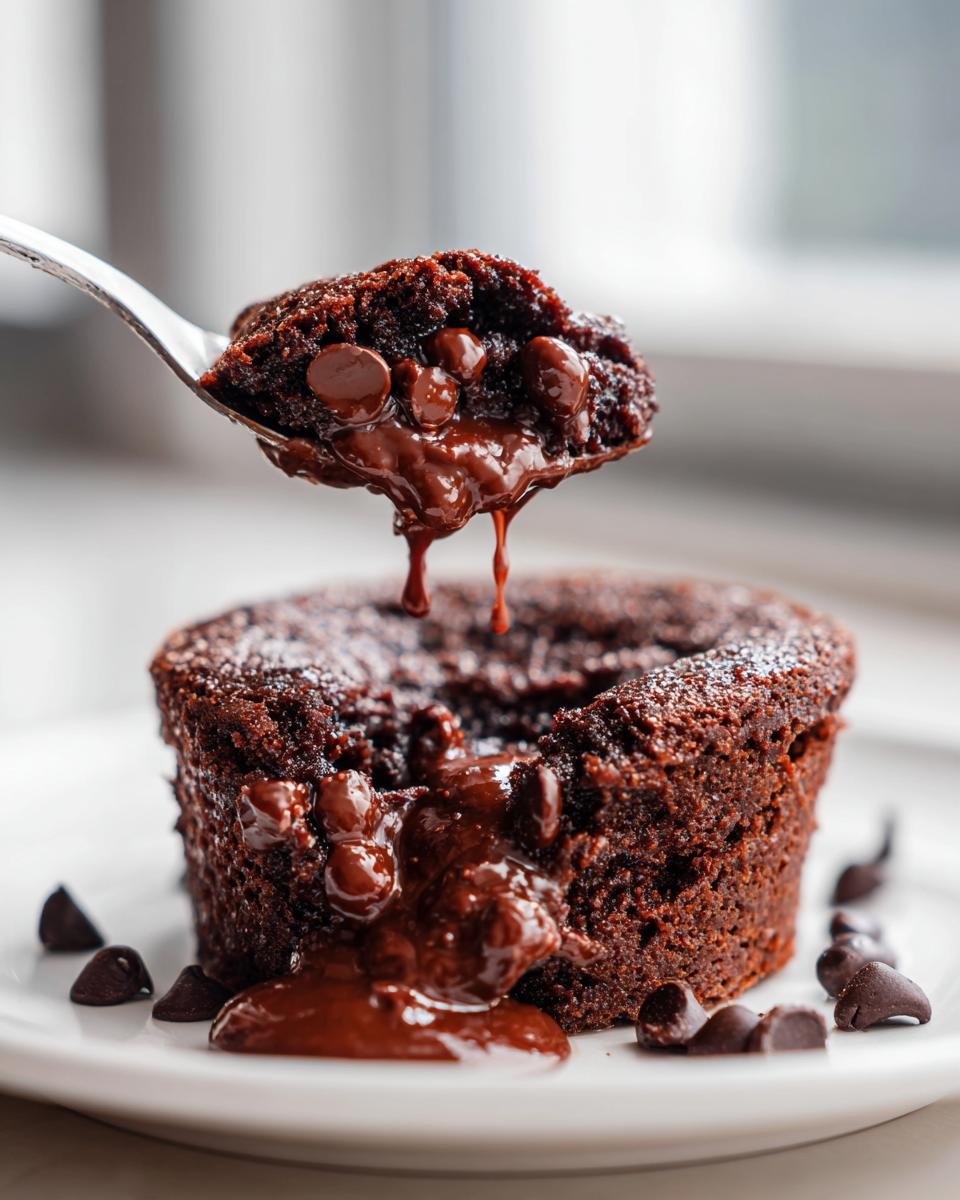
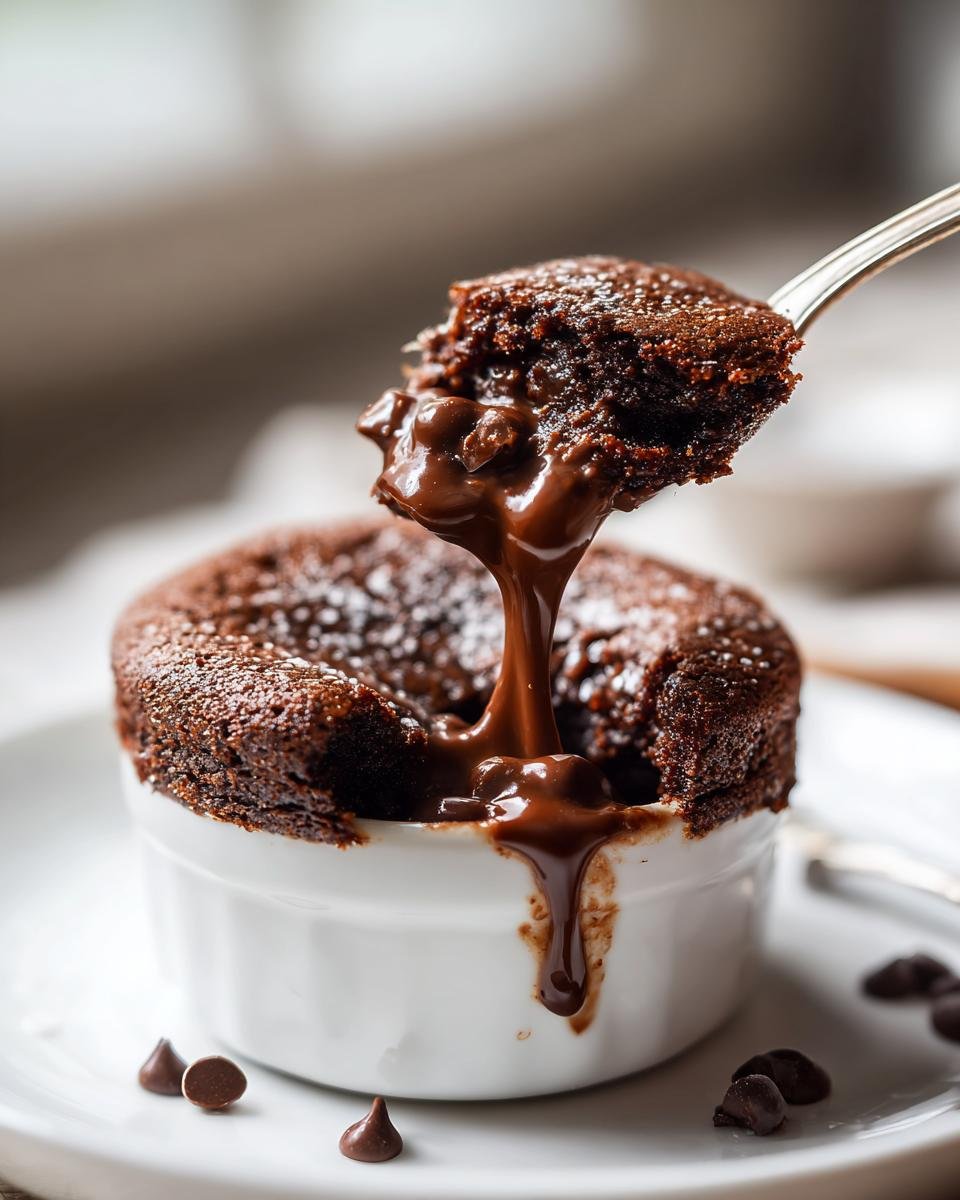
This isn’t a dry cake, folks. Not even close! As it bakes, the bottom layer becomes this glorious pool of warm, thick chocolate sauce. The top sets up just enough so you can scoop it without everything dissolving immediately. That perfectly set top, which holds its shape a little, is a great contrast to the gooey richness hiding underneath. It’s rich, it’s warm, and it’s heaven with a cold scoop of vanilla. You can see another easy fruit version just like this one, though mine uses cake mix; you can check out my cherry cobbler here while you wait for this one to bake!
Essential Ingredients for the Perfect Chocolate Cobbler
I know, I know, you want the magic trick, but the truth about this amazing Chocolate Cobbler is that it relies on totally normal, everyday things you probably already have. The beauty here is in the measurements and how they interact when the boiling water hits them. Don’t even think about trying to substitute the way the water works in this—it’s the whole point!
When I was first testing this recipe, I tried swapping out the sugar for a different kind, and it didn’t set right. It ended up being too runny! So, stick to the list exactly, and you’ll get that perfect gooey base you’re dreaming about. If you want to see how I handle other staples, like cornmeal, you can check out my cornbread recipe notes, but for this cobbler, precision matters!
Dry Ingredients for the Chocolate Cobbler Batter
First up, we build the structure on the dry side. You’ll need one full cup of regular all-purpose flour—nothing fancy needed here! Then, we toss in one cup of granulated sugar. It needs that clean sweetness to balance the cocoa. Speaking of which, grab 1/4 cup of unsweetened cocoa powder; this is where the rich chocolate flavor comes from, so use a good quality one if you have it! For lift, we use just one teaspoon of baking powder, and finally, a half teaspoon of salt to make all that chocolate pop.
Wet Ingredients and Chocolate Chips for Your Chocolate Cobbler
For the wet components that bring our dry mix together, you’ll need one cup of regular milk.termilk is okay too if that’s all you have, but stick to whole milk if you can for the richness! Then, a half cup of vegetable oil—using oil instead of butter keeps the base slightly looser, which we want for the sauce layer. One teaspoon of vanilla extract is non-negotiable; it deepens the chocolate wonderfully. And for the best part: one cup of chocolate chips sprinkled right on top before the final, dramatic pour!
Step-by-Step Instructions to Make Chocolate Cobbler
Okay, this is where the mild chaos of baking turns into pure, beautiful science. Don’t worry if things look weird at first—especially when you hit that water step. That thin batter floating on the water is exactly what you want! It separates perfectly during the bake time to give you that fudgy bottom and structured top. If you’re looking for other deeply chocolatey treats after this, you might want to bookmark my brownie copycat recipe!
Preparing the Pan and Oven for the Chocolate Cobbler
First things first: we need heat! Go ahead and preheat your oven to 350 degrees F (that’s 175 degrees C). While that’s warming up, grab your 8×8 inch baking dish. Give it a good, light greasing. You don’t need to do any fancy parchment paper lining here; a little butter or cooking spray is just fine for this recipe. This simple dish is going to hold all that warm, gooey goodness!
Mixing the Chocolate Cobbler Batter Components
Grab a medium bowl, and we start by whisking all those dry ingredients together: the flour, sugar, cocoa powder, baking powder, and salt. Whisk it well so those leavening agents get distributed evenly. Once that’s mixed, make a little well in the middle and pour in your wet stuff—the milk, the oil, and the vanilla extract. Mix it up, but listen to me closely here: mix until it’s *just* combined. I mean it! If you overmix, you’ll develop the gluten too much, and the top won’t be light; it’ll be tough. We want tender, not tough!
The Unique Pouring Technique for this Chocolate Cobbler
Now for the exciting part! Pour that slightly lumpy batter right into your prepared 8×8 dish. Next, take your cup of chocolate chips and sprinkle them all over the top of that raw batter. This is the step that makes me stop what I’m doing every single time just to watch the magic happen. Carefully, and I mean *carefully*, you are going to pour that full cup of boiling water right over the chocolate chips and the batter. Yes, boiling water! It looks crazy because the batter will just float on top of the water like a little chocolate raft, but do not stir it!
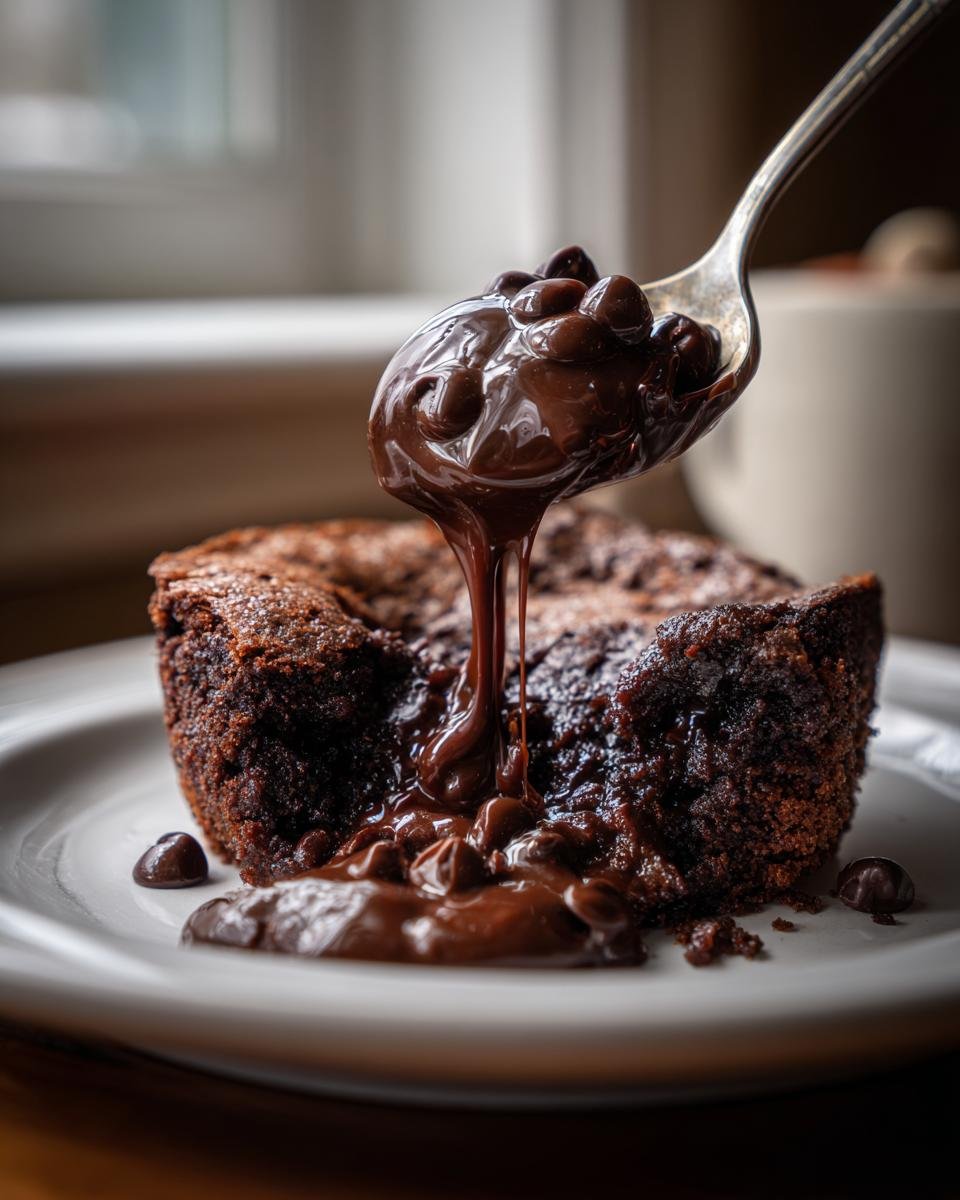
The hot water sinks down during the bake, creating that incredible saucy layer beneath the cake top. Place that dish right into the oven and bake it for about 35 to 40 minutes. You’ll know it’s done when the top looks set and firm to the touch. If you’re feeling adventurous later, you could try making a much more structured dessert like my triple chocolate mousse, but nothing beats this simple cobbler!
Tips for the Best Ever Chocolate Cobbler
Honestly, because this Chocolate Cobbler recipe is so simple, the chances of messing it up are pretty low—but there are definitely a couple of spots where people go wrong, leading to a result that’s slightly less gooey than it should be. I’ve learned these tricks over the years by making this thing way too many times, so listen up, and you’ll get that perfect rich bottom layer every single time!
The boiling water step is the key, no doubt about it. But even that can’t save you if you treat the batter like you’re making bread. If you want results that rival my fudgy fudgy brownie recipes, take these little coaching tips to heart!
Avoiding Common Chocolate Cobbler Mistakes
If you take away only one thing from this whole section, let it be this: DO NOT OVERMIX! When you add the milk, oil, and vanilla to the dry ingredients, you need to stop mixing the second those streaks of flour disappear. Seriously, stop stirring! If you keep going until it’s perfectly smooth, you activate too much gluten development in that flour. What happens then? You end up with a cakey top that is dense and slightly tough instead of light and tender. Worse yet, you might actually stir the water layer, which defeats the whole purpose of the sinking magic!
Just stir until you see no more white powder remaining, and then stop stirring. A few lumps here and there are perfectly fine; that’s flavor waiting to happen.
Expert Tip for Serving Your Warm Chocolate Cobbler
When that 35 or 40 minutes is up and you pull out that bubbly, set dish, the first urge is always to dive right in, right? Hold on just a second! Let the cobbler sit on the counter for at least 10 to 15 minutes before you even think about scooping. It needs that little bit of cooling time for the saucy bottom layer to settle and thicken up slightly. If you cut into it piping hot, that sauce will run everywhere; it won’t be messy in a good gooey way, just messy in a “where did all the sauce go?” way.
And the best way to eat this? You already know: warm with a giant scoop of vanilla ice cream melting right over the top. The cold cream meeting that warm, rich chocolate is pure perfection. Sometimes I’ll even grate a little bit of extra chocolate on top, just because I can!
Ingredient Substitutions for Your Chocolate Cobbler
Sometimes life happens, right? You go to make your amazing Chocolate Cobbler, and—gasp!—you’re missing one thing. Don’t stress about running to the store! This recipe is surprisingly forgiving, and I’ve successfully made a few tweaks over the years when I was in a bind. While I always encourage using the exact ingredients listed because they create that perfect sauce, desperate times call for delicious measures!
When I was testing ways to make healthier grab-and-go mixes, I experimented with a few swaps in my quick bread recipes, so I know what works and what deflates the final product. Believe me, an imperfect chocolate cobbler is still a million times better than no chocolate cobbler!
If you are ever looking for other versatile recipes where ingredient flexibility is key, check out my guide on 5 delicious quick bread recipes; those techniques translate well here too.
Swapping Out Milk
Remember how I mentioned using buttermilk in the notes? Go for it! If you substitute regular milk with buttermilk, you’ll get a slightly tangier flavor profile, which is kind of lovely against the deep chocolate. You don’t need to change anything else in the recipe when you swap milk for buttermilk. If you don’t have dairy milk at all, any unsweetened plant-based milk—like almond or soy—will work just fine here. Since the recipe uses oil instead of butter, the fat content stays relatively stable regardless of the milk type.
Dealing with Cocoa Powder or Oils
The cocoa powder is the hardest part to swap because it acts as part of the dry structure. I strongly recommend sticking with unsweetened natural cocoa powder, as Dutch-processed cocoa acts differently with baking powder. If you only have Dutch-processed, you might need to add a tiny pinch more baking powder, but honestly, just use what you have and see what happens—it will still taste like chocolate! As far as oil goes, vegetable oil is ideal because it’s flavorless, but canola oil works equally well. Melted coconut oil is fine, but be warned: it might impart a very, very subtle coconut note to your rich chocolate cobbler.
Chocolate Chip Alternatives
If you’re fresh out of the standard semisweet chocolate chips, don’t panic! You can absolutely chop up a nice dark chocolate bar if that’s what you have on hand. The different melting points just mean the chips might spread a little more or pool slightly differently, but that just adds to the homemade charm. If you’re avoiding dairy entirely, grab some dairy-free chocolate chips—they melt beautifully in this recipe. Honestly, even leaving them out isn’t the end of the world, though you’d be missing the little pockets of melted surprise!
Serving Suggestions for Chocolate Cobbler
Okay, we all know the drill: warm Chocolate Cobbler plus vanilla ice cream is basically the law of the land. And trust me, I follow that law very closely! But sometimes, you need to get a little creative, or maybe you just ran out of ice cream when that craving hits. Don’t worry, I’ve got you covered with a few other ways that this rich dessert tastes fantastic.
The great thing about a baked dessert like this is how well it pairs with textural contrast. Whether it’s creamy, crunchy, or even a little tart, it just works! If I’m feeling extra fancy, I might even whip up a simple peanut butter glaze to drizzle over the top—that salty-sweet combo is killer with dark chocolate, kind of like how I layer my pecan pie brownies. If you’ve never tried combining chocolate and pecan pie, you are missing out!
A Touch of Creamy Coolness
If you’re out of vanilla ice cream, don’t despair. A big dollop of fresh, lightly sweetened whipped cream is a dreamy substitute. It melts slower than ice cream, so you get that creamy texture without the immediate temperature shock. Another favorite of mine is a nice, thick crème fraîche. It has a slight tanginess—a little bit of sour—that cuts right through the richness of the chocolate sauce. It sounds kind of grown-up, I know, but it balances everything out beautifully.
Adding Texture and Crunch
Since the cobbler itself is so soft and gooey on the bottom, adding something crunchy on top makes every bite more interesting. I love to keep some toasted, chopped pecans around the house. A sprinkle of those right on top, maybe still warm from the oven, gives such a satisfying crunch. Chopped almonds work well too if you prefer a milder nut flavor.
If you don’t have nuts, try a dusting using a tiny bit of crushed cookie or even a few crushed-up graham crackers mixed with a pinch of cinnamon. It gives you that textural contrast without needing to bake another thing!
Bright Flavors to Cut the Chocolate
Because this is such a deep, dark chocolate flavor, sometimes a little something bright makes it sing! A few fresh raspberries scattered over a warm slice are stunning—the tartness is just the perfect counterpoint. If you don’t have fresh berries, you can make a very simple raspberry drizzle. Just take a few spoonfuls of raspberry jam, thin it out with a tiny splash of water or lemon juice, warm it up for ten seconds in the microwave, and spoon it over the top. Easy peasy, and it feels super gourmet!
Storage and Reheating Your Leftover Chocolate Cobbler
If you actually manage to have leftovers of this dreamy Chocolate Cobbler—which, honestly, I rarely do—storing it properly is crucial so that amazing gooey bottom layer stays intact. You need to treat this stuff right, or that bottom layer turns into sad, stiff pudding instead of warm sauce!
The main goal is keeping the moisture in. You can’t just leave it out on the counter uncovered and expect results the next day. We want that warm, spoonable texture back, not a dusty, stale slab! I’ve found the best way to keep it fresh is simple, but you have to be patient waiting for reheating.
How to Keep Your Chocolate Cobbler Fresh
After the cobbler has cooled down significantly—give it at least an hour after taking it out of the oven—cover the dish tightly with plastic wrap or foil. If you have extra, I sometimes scoop portions into little airtight containers. This traps the steam and moisture in. You can usually keep it on the counter for maybe one day if your house isn’t too warm, but for best results, pop it into the refrigerator for up to three or four days.
When it’s cold from the fridge, the sauce layer solidifies a bit, but don’t panic! That’s normal. It just needs some targeted heat to bring it back to life.
Reheating for That Just-Baked Gooeyness
The microwave is your fastest friend here, but you have to be careful not to nuke it too hard, or you end up with rubbery edges! For a single serving, put a slice on a microwave-safe plate. Microwave it for about 20 to 30 seconds on 50% power. Check it. If it’s not warm enough, give it another 10 seconds. The lower power helps heat the sauce without drying out that nice cakey top layer.
If you’re reheating the entire dish or a big piece, the oven is gentler. Cover the dish loosely with foil—this keeps the top from burning before the center warms up. Bake it in a 325°F oven for about 15 minutes. You’ll know it’s ready when you can see the sauce starting to bubble slightly around the edges. Seriously, right out of the oven, add ice cream, and forget that leftovers even existed!
Frequently Asked Questions About Chocolate Cobbler
I always check the comments to see what questions pop up, and honestly, people usually ask about baking time or how to boost the chocolate intensity! It’s great that you’re thinking ahead because a little planning makes these easy chocolate recipes even better. Here are some of the most common things I hear about making this simple chocolate cobbler. If you’re looking for even more fantastic sweet things to make after you master this one, check out my general desserts page for inspiration!
Can I use dark chocolate chips in this Chocolate Cobbler recipe?
Oh, please do! Using dark chocolate chips instead of semisweet is one of my favorite ways to change things up. Since this recipe already has such a rich cocoa flavor in the batter, using dark chocolate chips just pushes that flavor into deeper, more intense territory. It tones down the overall sweetness a touch, which I personally love. The key is that you still need a full cup of chips, whatever type you choose. The gooey result is just spectacular.
How do I know when my Chocolate Cobbler is fully baked?
This is super important because you don’t want batter that’s sloshing around when you serve it, but you also don’t want to dry out that perfect sauce layer! You are looking for two main things. First, the top crust should look set and firm when you gently tap it or nudge the edge of the pan. Second, you might see a tiny bit of bubbling sauce peaking up around the very edges of the dish. Because the bottom is essentially that hot water mixture cooking, you don’t really test the middle with a toothpick the way you would a standard cake. Firm top means it’s ready!
What is the difference between a cobbler and a crisp?
That’s a fun baking distinction! People mix them up all the time. The main difference is always in the topping. A cobbler, like this wonderful baked dessert, has a soft, biscuit-like or cake-like topping that bakes right on top of the fruit or filling. It often sinks a little into the filling, which is exactly what happens here with our chocolate sauce layer!
A crisp, on the other hand, always has a crumbly, streusel-type topping made with oats, flour, sugar, and often nuts or butter rubbed in. That topping stays firmly on top and gets crispy during baking—hence the name ‘crisp’! So, for this recipe: soft cake roof? Cobbler. Crunchy oat lid? Crisp!
Estimated Nutritional Information for Chocolate Cobbler
Alright, let’s talk numbers for a minute. I always feel a little funny posting nutrition facts because, let’s be honest, when you’re reaching for a warm, gooey slice of Chocolate Cobbler, you aren’t thinking about macronutrients—you’re thinking about pure joy! But for those of you who like to keep track, here is the breakdown based on the recipe yielding 6 generous servings.
This information is based on the exact measurements listed in the recipe and standard ingredient assumptions. Please remember this is just an estimate though! If you use extra dark chocolate chips or decide to use full-fat buttermilk, those numbers will shift a bit. It’s a guideline, not a gospel, okay?
- Calories: Approximately 350 per serving
- Sugar: Roughly 45g (That’s the good stuff helping create that sauce!)
- Total Fat: Around 16g
- Carbohydrates: About 50g
- Protein: Around 5g
Bottom line is: this is a comforting dessert, and it’s best enjoyed warm, maybe with a tiny side salad if you’re feeling virtuous! Seriously, don’t stress the details too much when you’re spooning up that amazing sauce.
Print
Simple Chocolate Cobbler
- Total Time: 50 min
- Yield: 6 servings 1x
- Diet: Vegetarian
Description
A straightforward recipe for a warm, rich chocolate cobbler dessert.
Ingredients
- 1 cup all-purpose flour
- 1 cup granulated sugar
- 1/4 cup unsweetened cocoa powder
- 1 teaspoon baking powder
- 1/2 teaspoon salt
- 1 cup milk
- 1/2 cup vegetable oil
- 1 teaspoon vanilla extract
- 1 cup boiling water
- 1/2 cup chocolate chips
Instructions
- Preheat your oven to 350 degrees F (175 degrees C). Lightly grease an 8×8 inch baking dish.
- In a medium bowl, whisk together the flour, sugar, cocoa powder, baking powder, and salt.
- Add the milk, oil, and vanilla extract to the dry ingredients. Mix until just combined; do not overmix.
- Pour the batter into the prepared baking dish. Sprinkle the chocolate chips evenly over the top of the batter.
- Carefully pour the 1 cup of boiling water over the chocolate chips and batter. The batter will float on top of the water.
- Bake for 35 to 40 minutes, or until the top is set and firm.
- Let the cobbler cool slightly before serving.
Notes
- Serve warm with a scoop of vanilla ice cream for the best flavor.
- You can substitute buttermilk for regular milk for a slightly tangier result.
- Prep Time: 10 min
- Cook Time: 40 min
- Category: Dessert
- Method: Baking
- Cuisine: American
Nutrition
- Serving Size: 1 serving
- Calories: 350
- Sugar: 45g
- Sodium: 200mg
- Fat: 16g
- Saturated Fat: 5g
- Unsaturated Fat: 11g
- Trans Fat: 0g
- Carbohydrates: 50g
- Fiber: 2g
- Protein: 5g
- Cholesterol: 10mg
Keywords: chocolate cobbler, dessert, easy chocolate recipe, baked dessert, chocolate chips