
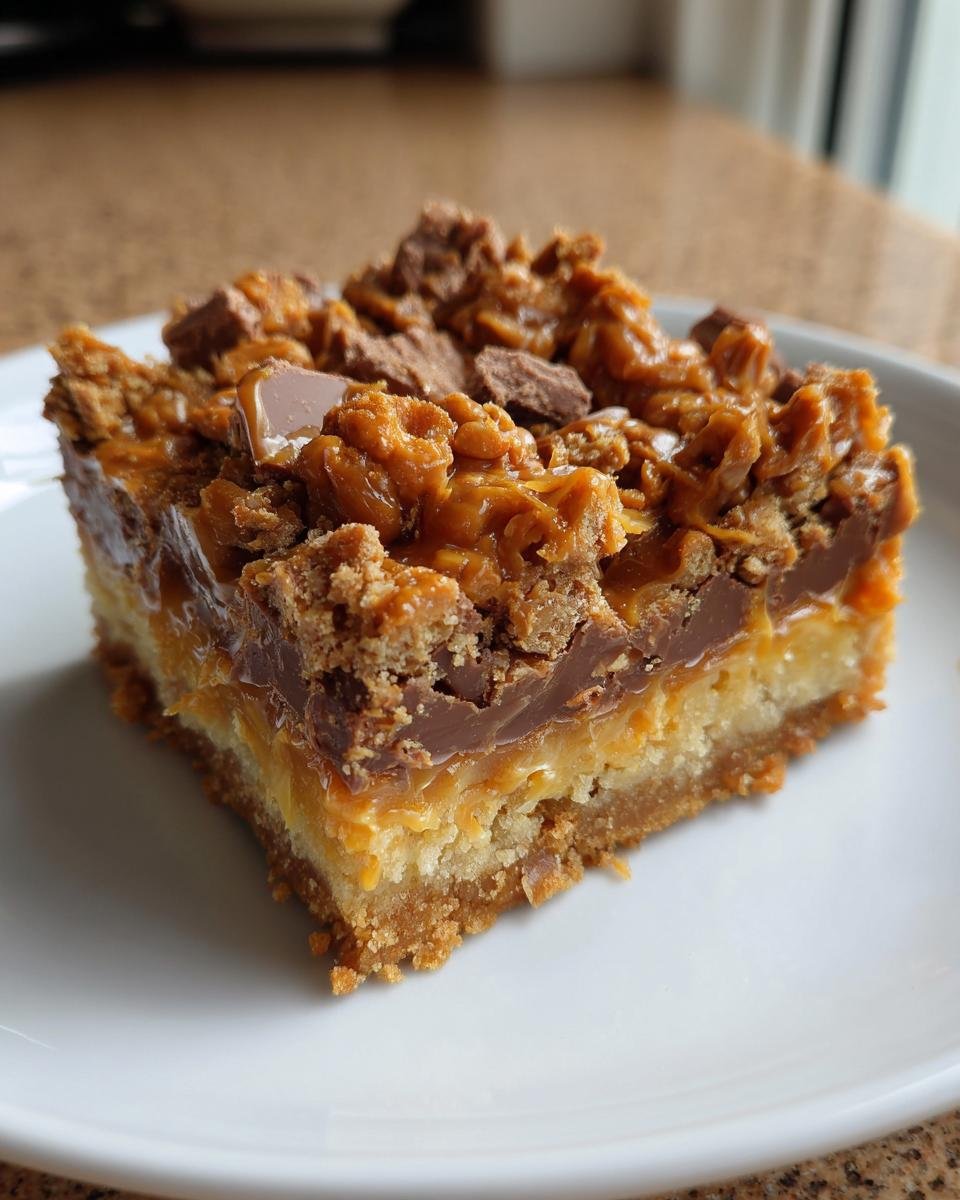
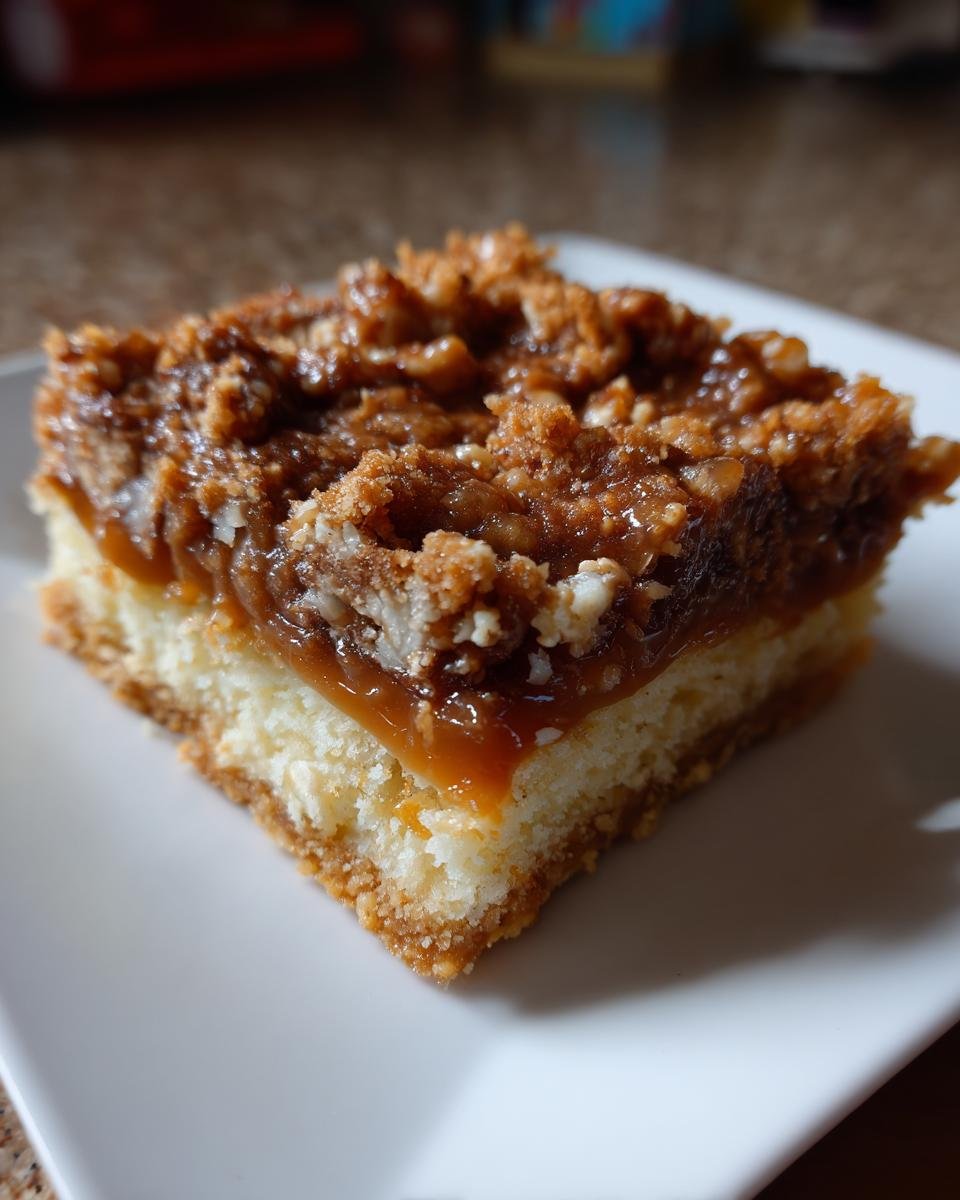
Honestly, sometimes you just need a dessert that hits every single craving without needing hours of fuss, right? Forget fancy techniques; we’re talking about pure, unadulterated baked happiness here! If you ever scroll through your Pinterest feed wishing for something impossibly gooey and crunchy all at once, then you absolutely need my **Butterfinger Caramel Bars** in your life immediately. This recipe combines a buttery, crisp shortbread base that actually tastes homemade, with a thick layer of warm caramel and a serious avalanche of crushed Butterfinger candy. Mine is the recipe everyone asks for at potlucks because it’s so simple but tastes like you spent all day in the kitchen. If you love mixing textures, trust me, you’ll want to bookmark this one!

If you’re looking for more totally irresistible, easy-to-make treats featuring that beloved peanut-buttery crunch, you should really check out my huge collection over at our favorite Butterfinger desserts. But for now, let’s focus on these unbelievable bars!
Why You Will Love These Butterfinger Caramel Bars
I’m serious when I say these bars are my emergency bake when company shows up unexpectedly. They are just magic! You get so much payoff for so little effort. Why are these absolutely going into your weekly rotation? Let’s dive in:
- Quick, buttery shortbread crust that bakes up perfectly crisp.
- The ultimate texture study: chewy caramel meets that signature Butterfinger crunch.
- Seriously minimal ingredients—most of that stuff is probably already in your pantry!
- Ready to eat (after cooling!) in under an hour. Who needs complicated layered cakes when you have this?
If you’re into fast, spectacular desserts, you might also want to check out my guide on the easiest no-bake cookie dough bites—perfect for those nights when the oven is a definite no-go.
Essential Ingredients for Perfect Butterfinger Caramel Bars
You only need six things to make these bars happen, and that’s part of why I love them so much! When you’re dealing with a recipe this simple, quality really matters for that top-tier flavor. Don’t skimp on the butter for that shortbread base—it makes all the difference to the crumble!
Here is exactly what you need ready to go before you even think about touching the mixer:
- 1 cup all-purpose flour
- 1/2 cup unsalted butter, making sure it’s nice and softened
- 1/4 cup granulated sugar
- 1/2 teaspoon vanilla extract
- 1 cup of your favorite caramel sauce (store-bought is fine, just make sure it’s smooth!)
- 1 cup crushed Butterfinger candy bars
Speaking of easy, delicious layers, if you haven’t tried my chewy butterscotch bars, you’re missing out on another easy win!
Ingredient Notes and Substitutions for Butterfinger Caramel Bars
Let’s talk specifics so you nail the texture. The butter is non-negotiable—it has to be truly softened, not melted, or your crust will turn out greasy instead of crumbly. For the Butterfinger, I just toss them in a sturdy Ziploc bag and give them a good whack with a rolling pin! You want a mix of textures—some smaller dust and some decent chunks for that surprise crunch.
Now, the caramel sauce. If you use a store-bought jar, make sure it’s the smooth, pourable kind. If you try to use stiff caramel candies that you’ve melted down, they might set up too hard after the second bake. We want gooey, not rock-solid, in the middle!
Step-by-Step Instructions for Making Butterfinger Caramel Bars
Okay, get ready because this process moves quickly once the oven is hot. Don’t walk away once that crust is in—we need to move fast to get that caramel layer perfectly set. We’re aiming for that melt-in-your-mouth base topped with maximum chew! If you’ve checked out my guide on brownie recipes that use pie filling, you know I love a good time-saver, and these bars are a prime example of that!
Preparing the Shortbread Crust for Your Butterfinger Caramel Bars
First things first: get your oven preheated to 350 degrees F (175 degrees C) and make sure that 8×8 pan is greased. Don’t just spray it—I like to grease and then line the bottom with a little parchment paper sling, just in case! For the dough, you’re just mixing the flour, softened butter, sugar, and vanilla until it looks like wet sand, you know? The key here is pressing. Take that crumbly mix and firmly press it into the bottom of the pan using the bottom of a measuring cup or just your clean fingers. Press it down hard, nice and even! Bake this base layer for 15 minutes until it’s just starting to look a little bit golden around the edges.
Layering Caramel and Crushing Butterfinger for the Best Butterfinger Caramel Bars
This is the crucial moment! As soon as that crust comes out of the oven—and I mean *immediately*—pour that cup of creamy caramel sauce all over the top. Work quickly to spread it into an even layer right to the edges while the crust is still piping hot. This heat helps the caramel actually adhere to the shortbread base instead of just sitting on top. Once the caramel is spread, rain down those crushed Butterfinger bits over everything. Really cover it! Don’t be shy with the candy; this is what makes these bars famous.
Final Bake and Cooling the Butterfinger Caramel Bars
Pop the whole glorious, sticky mess back into the oven for just 10 more minutes. This second bake just warms everything up and sets the caramel slightly so it doesn’t spread everywhere when you try to slice it later. When they come out this second time, you need patience—I know, it’s tough when they smell this good! You must let them cool completely in the pan before you even think about cutting them. Seriously, if you try to slice them warm, you’ll have a caramel disaster. For the cleanest, prettiest squares, I always chill mine in the fridge for at least an hour first. That chill is what gives you those perfect, neat slices every single time.
Tips for Success When Making Butterfinger Caramel Bars
Since these bars rely on layers setting just right, I’ve picked up a few tricks over the years to keep them from turning into a sticky mess or a crumbly disaster. Trust me, when you’ve made this recipe as many times as I have, you learn the small things that make a huge difference!
If the crust is bubbling up too much in the middle during that first 15-minute bake, it means your butter wasn’t evenly distributed, or you didn’t press it down hard enough. You want maximum density there to support all that gooey topping later! Also, make sure your 8×8 pan is completely square and level, otherwise one side of the caramel will pool up while the other side is too thin.
Here are a few non-negotiable hacks I use every single time:
- The Hot Caramel Rule: Never wait! Pour the caramel onto the crust within 30 seconds of pulling the crust out of the oven. If the crust cools down too much, the caramel won’t bond properly and might slide off when serving.
- Butterfinger Size Matters: When you crush those candies, try to avoid having too much super-fine powder (the dust). If you get too much dust, it mixes right into the caramel and makes it gritty instead of smooth. I look for pieces roughly the size of a small pea.
- Don’t Overbake the Crust: That first 15 minutes is only to pre-bake the shortbread; we want it pale golden. If you bake it dark brown, it will be hard and dry once the second 10-minute bake is done. We are aiming for tender, not crisp-on-its-own!
- Calories: Around 250 per bar
- Total Fat: Roughly 15 grams (a good chunk of that is the good saturated fat from the butter!)
- Carbohydrates: About 28 grams
- Protein: A small boost, around 3 grams
- Did you use store-bought caramel or make your own?
- Did you chill them for a full hour or did you cheat and try to cut them early?
- What side dish did you pair this masterpiece with?
- Total Time: 40 min
- Yield: 16 bars 1x
- Diet: Vegetarian
- 1 cup all-purpose flour
- 1/2 cup unsalted butter, softened
- 1/4 cup granulated sugar
- 1/2 teaspoon vanilla extract
- 1 cup caramel sauce
- 1 cup crushed Butterfinger candy bars
- Preheat your oven to 350 degrees F (175 degrees C). Lightly grease an 8×8 inch baking pan.
- Combine flour, softened butter, sugar, and vanilla extract in a bowl. Mix until a crumbly dough forms.
- Press the dough evenly into the bottom of the prepared baking pan.
- Bake the crust for 15 minutes, or until lightly golden brown.
- Remove the crust from the oven and immediately pour the caramel sauce evenly over the hot crust.
- Sprinkle the crushed Butterfinger candy bars over the caramel layer.
- Return the pan to the oven and bake for an additional 10 minutes.
- Let the bars cool completely in the pan before cutting into squares.
- For easier cutting, chill the cooled bars for at least one hour before slicing.
- You can use store-bought or homemade caramel sauce.
- Prep Time: 15 min
- Cook Time: 25 min
- Category: Dessert
- Method: Baking
- Cuisine: American
- Serving Size: 1 bar
- Calories: 250
- Sugar: 25
- Sodium: 150
- Fat: 15
- Saturated Fat: 8
- Unsaturated Fat: 7
- Trans Fat: 0.5
- Carbohydrates: 28
- Fiber: 1
- Protein: 3
- Cholesterol: 30
If you’re looking for something equally satisfying but maybe a little more classic, you absolutely must try my beloved recipe for the best chocolate chip blondies next!
Storage and Make-Ahead Options for Your Butterfinger Caramel Bars
The best part about these bars, besides eating them, is that they actually travel really well and keep for a decent amount of time! Because we have that nice sturdy shortbread base and the high sugar content of the caramel, they are quite stable. My go-to method is always making them the day before I need them, just so that second chilling step can work its magic properly.
At room temperature, tightly sealed in an airtight container, these **Butterfinger Caramel Bars** are just wonderful for about three or four days. I like to place a piece of parchment paper between the layers if I’m stacking them—otherwise, that caramel layer will definitely glue them together into one giant, sugary brick overnight!
If you need them to last longer, the fridge is your best friend. Storing them airtight in the refrigerator keeps them fresh for up to a week. Just a friendly heads-up, though: chilling makes that caramel layer much firmer, almost toffee-like. That’s why I always pull them out about 20 minutes before serving if they’ve been refrigerated. You want them slightly softened, not straight out of an ice bath!
Can you freeze them? Absolutely, yes! If you’re making a giant batch, slice them up *first*, then layer them in a freezer-safe container with parchment between the bars. You can tuck these away for a good two months. When you want a treat, just thaw them on the counter for about an hour or so. They reheat perfectly!
If you’re planning ahead, you can even make the shortbread crust a day early and keep it tightly wrapped. Just wait to add the caramel and candy until you’re ready for the two short bakes. For even more flexible make-ahead options for parties, check out my tips for pumpkin spice cake mix cookies—similar principles apply!
Serving Suggestions for These Sweet Butterfinger Caramel Bars
Okay, these bars are decadence in a square all on their own, but aren’t they even better when you dress them up a tiny bit? Part of the fun is figuring out the perfect sip or scoop to cut through all that sweetness. I never serve these plain if I can help it—they deserve the full presentation treatment!
My absolute favorite way to enjoy a **Butterfinger Caramel Bar** is slightly warm (after the mandatory chill, you know!) with a big, cold scoop of vanilla bean ice cream melting right next to it. That instant temperature contrast? Heavenly! The cold creaminess is the perfect foil for that crunchy, salty-sweet topping.
If you’re serving these after dinner with coffee, you don’t need anything else! But if you want to elevate it just a hair, a tiny drizzle of something rich on top of the plate does wonders. I sometimes take a little bit of that leftover caramel (if I had any patience to save any!) and swirl it around the plate before setting the bar down. Or, if you like the pure, rich flavor of dairy alongside that peanut butter taste, a glass of ice-cold whole milk is honestly unbeatable.
Thinking about a bigger dessert spread? Since these bars are so intensely flavored, they pair incredibly well with something a little tangy to balance things out. If I’m making a big party platter, I’ll always put these next to something that has an acidic brightness. Have you ever tried pairing rich caramel with a slice of my buttermilk sour cream pound cake with caramel icing? The slight tang in that cake is the exact counterpoint these bars need!
Frequently Asked Questions About Butterfinger Caramel Bars
I get so many questions about these bars because everyone wants that perfect combination of gooey and crisp. It always comes down to technique! I’ve compiled the most common things folks ask me when they are getting ready to bake these sweet squares. I hope this helps you avoid any sticky situations!
Can I use store-bought caramel sauce in the Butterfinger Caramel Bars?
Oh most definitely, yes! That’s half the reason this recipe is so fast! I usually keep a jar of good quality, smooth dulce de leche or caramel sauce in the pantry for emergencies. Just make sure it’s the smooth, spoonable kind you pour straight from the jar. If your store-bought caramel seems really thick—like it’s hard to stir—you might want to warm it up just for about 20 seconds in the microwave before pouring it over the crust. It helps it spread easily!
What is the best way to cut clean squares of these bars?
Oh, the cutting dilemma! We talked about this briefly, but it bears repeating: Chilling is your secret weapon against messy slices. If you try to cut these while they are even slightly warm or at room temperature, the caramel will just ooze out onto your knife and you will end up with puddles, not bars. So, after they have cooled on the counter completely, you need to wrap that whole pan up tight and pop it in the fridge for at least an hour, maybe two. When that caramel is cold, it firms right up, allowing you to run a large, hot knife through it for those clean, professional-looking squares. It’s worth the wait, I promise!

If you want to see another great make-ahead dessert that sets up beautifully, you should check out my recipe for creamy cream cheese gelatin—it requires zero baking and sets up super firm!
Estimated Nutritional Information for Butterfinger Caramel Bars
Now, I have to give you the usual baker’s disclaimer: because this recipe truly shines with real butter and loads of candy and caramel, it’s definitely a rich treat! These numbers are just my best guess based on the standard ingredients, so consider them a helpful guideline, not a guaranteed label. These aren’t exactly light fare, but boy, are they worth it!
I figured out the estimates based on getting 16 perfect squares out of the batch, which means each bar is a delicious, dense package of joy. If you are looking for ways to trim down the guilt factor, I have a whole post on baking lighter cakes without butter or sugar, but honestly, for these **Butterfinger Caramel Bars**, you have to lean into the decadence!
Here’s a quick look at what you can generally expect from one serving:
It’s the sugar and fat that really make these bars sing, so enjoy them responsibly—maybe just one with your coffee for breakfast! You deserve it.
Share Your Experience Making These Butterfinger Caramel Bars
Well, that’s it! You have the secrets to the most indulgent, ridiculously easy **Butterfinger Caramel Bars** ever created. Now comes the best part: I need to hear all about it!
Did you manage to keep your hands off the crushed Butterfinger before sprinkling them on? Did you manage to wait the full hour for them to cool before trying your first slice? I want to know every detail!
Please, take a moment and leave me a rating right below this section—five stars if your kitchen survived the sugar rush, fewer if you ate all the caramel straight from the jar (I won’t judge, promise!).
Send me photos! I absolutely adore seeing your creations pop up in my feed—it’s like having a giant potluck with all of you wonderful bakers. If you have any burning questions that I missed in the FAQ, or if you even made a fun little twist on the recipe (maybe extra vanilla?), drop those comments below too. I read every single one!
If you want to reach out privately with a suggestion or just to say hi, you can always use the contact form on my site. Happy baking, and I can’t wait to see your sticky, crunchy successes!
Print
Butterfinger Caramel Bars
Description
Simple bars featuring a shortbread base, a layer of caramel, and crushed Butterfinger candy pieces.
Ingredients
Instructions
Notes
Nutrition
Keywords: Butterfinger, caramel bars, shortbread, candy bar dessert, easy baking