
Seriously, if you need a dessert that looks like you spent all day on it but actually took maybe twenty minutes of assembly, you’ve come to the right place. Layered desserts just scream ‘special occasion,’ right? Well, my absolute fail-safe for impressing a crowd with zero actual baking stress is this incredible Cherry Cheesecake Trifle. I remember the first time I made this for a potluck—I mean, it vanished before the main course was even cleared! It’s fantastic because it’s completely no-bake, meaning you mix it, layer it up, and let the fridge do the heavy lifting overnight.
Why This Cherry Cheesecake Trifle Recipe Works So Well
Honestly, the best recipes are the ones that taste gourmet but use shortcuts meant for busy folks like us. This Cherry Cheesecake Trifle is pure genius for that reason. It takes all the rich, decadent flavor of a full cheesecake experience and turns it into a dump-and-layer assembly. Talk about building confidence in the kitchen!

- It’s a true no-bake wonder—no oven required, which is a lifesaver in the summer.
- It’s the ultimate make-ahead dessert; it tastes even better after chilling!
- The flavor profile is a guaranteed hit: sweet cherries meeting tangy cream cheese. It’s irresistible.
If you love simple, stunning desserts, you absolutely must check out my tips for other amazing no-bake strawberry desserts too!
Essential Components for the Perfect Cherry Cheesecake Trifle
Okay, listen up, because assembling a trifle isn’t just throwing things in a bowl! The texture here is everything, so we can’t just eyeball the ingredients. Since this is a no-bake recipe, the consistency of that cheesecake layer dictates the whole experience. That’s why you absolutely must bring that cream cheese to room temperature—if it’s cold, you’ll end up with lumps, and trust me, nobody wants a chunky, sad trifle.
Also, when you’re whipping that heavy cream, don’t stop until you see nice, firm peaks. That trapped air is what lightens up that inherently heavy cream cheese base. It’s all about these little details! For the base layer, feel free to swap out the shortbread cookies for vanilla wafers if that’s what you have on hand. If you’re exploring other wonderful uses for cream cheese, check out my recipe for cream cheese gelatin squares!
Ingredients for the Cherry Cheesecake Trifle Layers
Here’s what you’ll need for the layering magic. Make sure you have everything ready before you start mixing!
- 1 (8 ounce) package cream cheese, softened (non-negotiable!)
- 1 cup granulated sugar
- 1 teaspoon vanilla extract
- 1 cup heavy whipping cream (you’ll be whipping this to stiff peaks)
- 1 (12 ounce) container frozen whipped topping, thawed
- 1 (14 ounce) package shortbread cookies or graham crackers, crushed
- 1 (21 ounce) can cherry pie filling
Step-by-Step Assembly Instructions for Your Cherry Cheesecake Trifle
This is where the magic happens, and honestly, it’s basically adult finger painting! Since we aren’t baking anything, the goal here is just careful, gentle layering where everything stays distinct and beautiful. Remember that homemade creamy cheesecake fudge I shared? It’s sort of the same idea—we’re building structure without heat.
Preparing the Creamy Cheesecake Filling
First up, let’s get that creamy base whipped up. Beat your softened cream cheese together with that sugar and the vanilla extract until it looks totally smooth and dreamy. Don’t rush this part! In a totally separate bowl—and I mean separate—you need to whip your one cup of heavy cream until you have stiff peaks. That means when you pull the whisk out, the cream stands up straight.
Now for the careful part: gently fold that stiff whipped cream into the cream cheese mixture. You want to keep all that air in there! Once that’s combined, you fold in half of your thawed whipped topping. Don’t stir aggressively, or you’ll deflate it all!
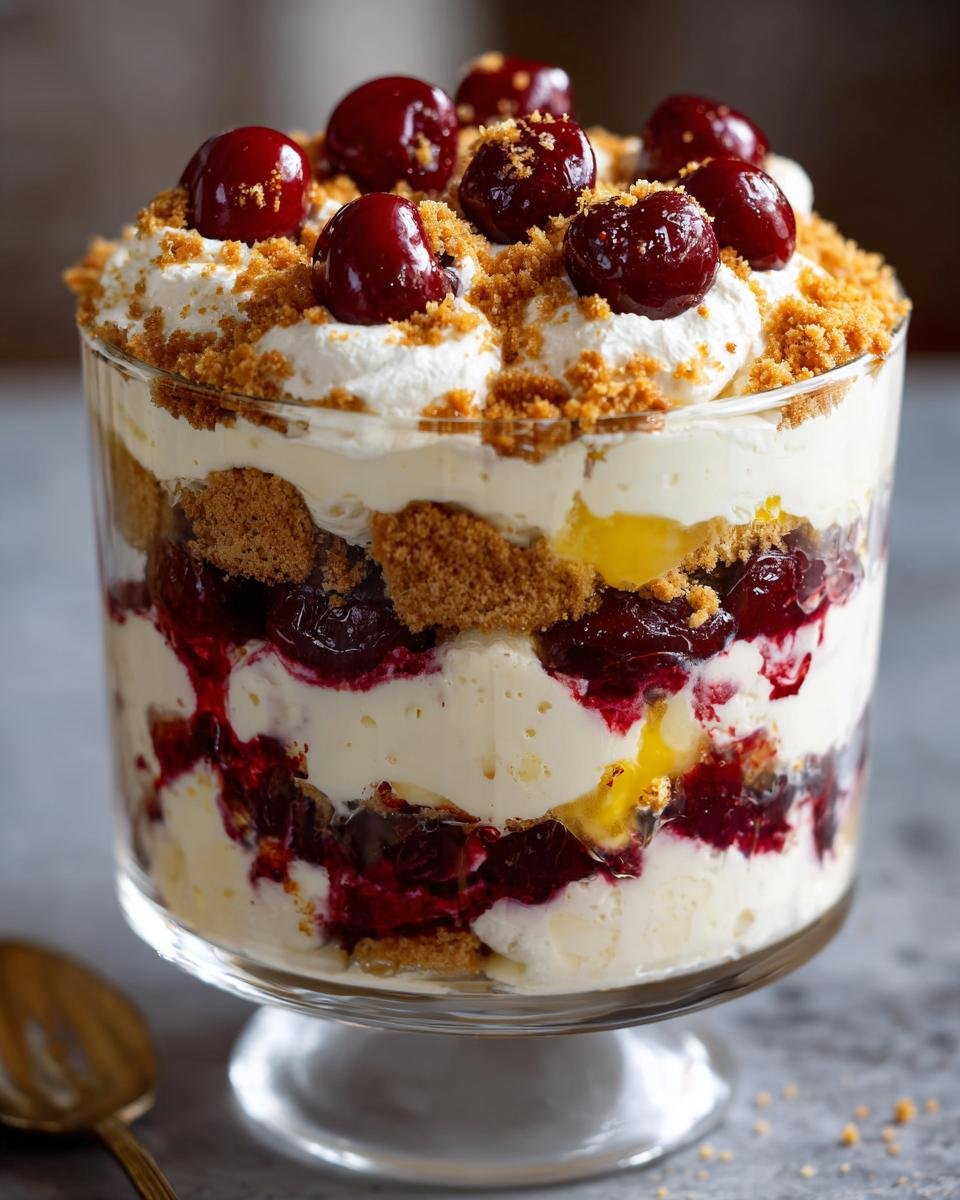
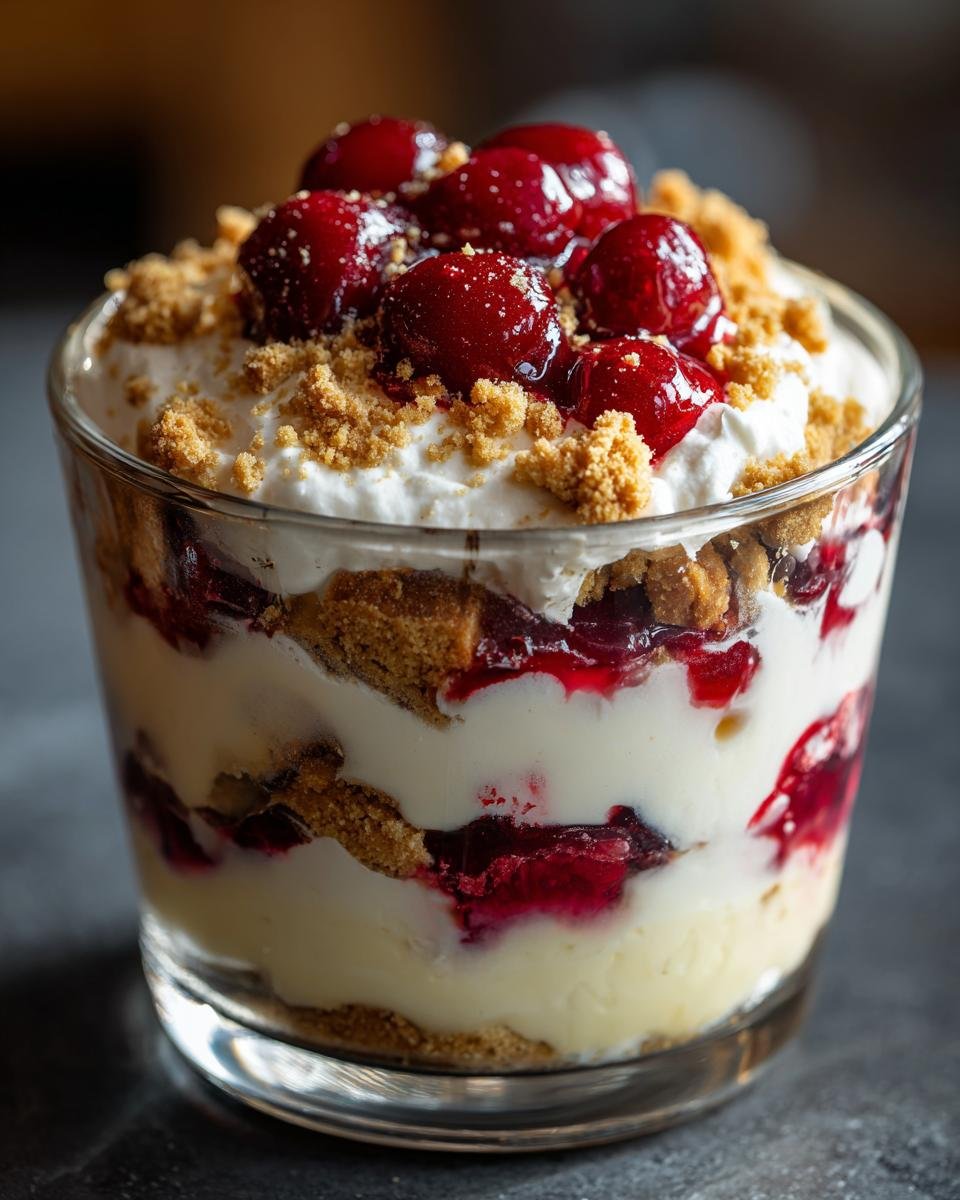
Layering the Cherry Cheesecake Trifle Components
Grab your big, beautiful glass trifle bowl—we want those layers to shine! Start by spreading half of your crushed cookies or graham crackers right across the bottom. That’s Layer One. Next, softly spoon half of that gorgeous cream cheese mixture evenly over the crumbs. Don’t press down, just guide it.
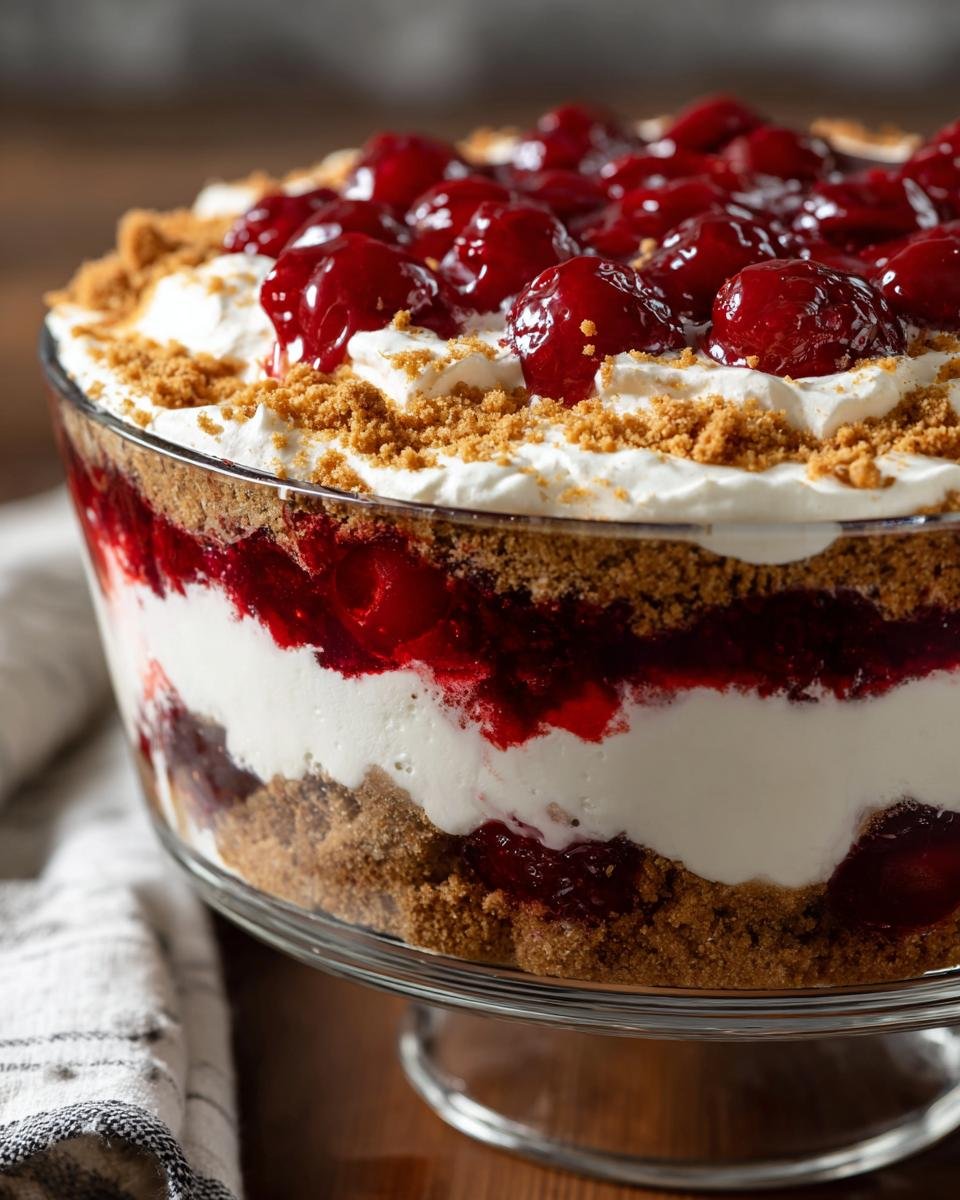
Then comes the star: spoon half of that bright cherry pie filling right on top of the cream cheese. Now we just repeat that entire process one more time using the remaining cookies, the remaining cream cheese mixture, and the rest of those sweet, tart cherries.
Final Touches and Chilling the Cherry Cheesecake Trifle
For the grand finale, take that remaining whipped topping and gently spread it across the very top layer. Make sure it covers everything perfectly to seal in that moisture. If you want it fancy, you can swirl it a bit with a spoon while you spread.
And here is the most important step, the one that separates the good trifles from the great ones: chilling! You absolutely must cover this whole creation and let it hang out in the fridge for at least four long hours. Seriously, overnight is even better! This time lets all those flavors have one big, happy party together and lets the crust soften just enough so it cuts beautifully.
Tips for Success When Making a Cherry Cheesecake Trifle
Making a trifle successfully is all about managing textures, which is easy once you know the little tricks! First, let’s talk temperature: your cream cheese needs to be truly soft—like, room temperature soft. If it’s cold when you start beating it, you’ll end up fighting it the entire time, and that means lumps, not luxurious smoothness.
Also, presentation counts here! You absolutely need a clear glass trifle bowl. Why hide those gorgeous layers? Seeing the contrast between the pink cherries and the white cream is half the fun. For the cookie base, if you’re crushing your own graham crackers, use a zip-top bag and a rolling pin—it crushes them evenly, and honestly, it’s way more fun than using a food processor sometimes!
If you’re ever looking for other simple assembly recipes, my guide to ultimate homemade cornbread has a rustic simplicity that I think you’ll appreciate too!
Creative Variations for Your Cherry Cheesecake Trifle
Just because this recipe is perfect as is doesn’t mean we can’t play with it a little! That’s the fun of no-bake desserts—they are so forgiving. Think of this structure as a template for any fruit and cookie combo you love. My fridge is practically a laboratory for testing these combinations, I kid you not!
If cherries aren’t your absolute favorite right now, don’t sweat it. You can swap out that pie filling for almost anything you find in a can or jar. I highly recommend grabbing a can of blueberry pie filling next time; the blueberries and the cream cheese mixture play really nicely together. Or, for a super bright flavor burst, try strawberry pie filling!
The base layer is another fun place to experiment with texture. You can absolutely stick with graham crackers, of course, but if you want something a little softer or quicker, try vanilla wafers. They absorb the moisture beautifully. For a spicy twist that really pops against the sweet cream, try crushing up some gingersnap cookies instead. The ginger note is unexpectedly wonderful.
If you’re feeling adventurous and want even more no-bake inspiration after you’ve devoured this trifle, you have to go check out my guide on other great no-bake strawberry desserts. It’s full of similar easy assembly ideas!
Serving Suggestions for Your Cherry Cheesecake Trifle
Since this Cherry Cheesecake Trifle is truly rich—we’re talking heavy cream and full-fat cream cheese here—you don’t want to weigh people down with heavy, sweet drinks alongside it. The whole point is that beautiful, creamy contrast, so we need beverages that cut through that richness perfectly.
My favorite thing to serve alongside a big slice is a nice, strong cup of black coffee. It doesn’t need any cream or sugar if you’re drinking it after the trifle, because the dessert handles the sweetness for both of you! The bitterness really snaps against the sweet tang of the cherries and cream cheese. It’s a classic pairing for a reason.
If coffee isn’t your speed, I honestly love serving this with a really light, refreshing herbal tea. Something clean and almost restorative. I recently made a batch of my healing cinnamon-turmeric tea, and the mild spice was the most wonderful, subtle pairing for the fruitiness of the cherries. It’s elegant without being fussy.
And remember, a trifle is ninety percent presentation! Because you did all that hard work layering, make sure you serve it from a clear spot where everyone can admire the stripes of graham cracker, cream cheese, and brilliant red cherry filling before they dig in. Use a nice long spoon so you can scoop deep and guarantee every serving gets all four elements!
Storage and Make-Ahead Instructions for Cherry Cheesecake Trifle
I want to shout from the rooftops that one of the BEST things about this Cherry Cheesecake Trifle is how perfectly suited it is for making ahead! Seriously, this isn’t the type of dessert you want to rush. You need that chilling time for the layers to really marry, so planning ahead is your secret weapon.
Once you’ve assembled the whole thing and slapped that final layer of whipped topping on top, cover the trifle bowl tightly with plastic wrap. You don’t want it soaking up any odd smells from the back of the fridge! It needs to chill for a minimum of four hours. If you can leave it overnight—do it. Trust me, the graham cracker layer softens just enough to give you that perfect, melt-in-your-mouth texture that tastes incredible with the tangy cream cheese.
Now, let’s talk about keeping it around. This rich dessert stays fantastic in the refrigerator for about three days. The crust might get a little softer as time goes on, but the flavor is still absolutely there. Just keep it covered!
One thing I absolutely must warn you about, though, is freezing. Do not freeze this trifle! The whipped topping and the cream cheese mixture just don’t thaw well. They tend to separate or get really watery and grainy once they thaw out, and we worked so hard to get that smooth texture. Stick to the fridge method.
If you need ideas for other things you can prep ahead of time, I have a little collection of simple things, including some great recipes in my guide to 5 delicious quick bread recipes that freeze beautifully. But for the trifle, keep it cool and keep it covered!
Frequently Asked Questions About Cherry Cheesecake Trifle
It’s funny, even with super straightforward assembly recipes like this one, people always have specific questions! I’ve gathered up the ones I hear most often about getting those perfect layers and keeping everything smooth and cold. Don’t worry if you have a question that isn’t here—just drop it in the comments!
Is this a true no-bake Cherry Cheesecake Trifle?
Oh yes, absolutely a 100% **no-bake** recipe! That’s what makes it my absolute favorite emergency dessert. You aren’t turning on the oven for the crust, and you aren’t baking the filling. It’s all about whipping, folding, and careful **layering** in that big glass bowl. The only thing it “cooks” in is the cold of the refrigerator!
What is the best bowl size for this Cherry Cheesecake Trifle?
For this specific recipe, which uses a 21-ounce can of pie filling and a full block of cream cheese, you need some serious real estate so you can truly see those beautiful layers! I always recommend a standard, large trifle bowl, aiming for something around an 8 to 10-cup volume. If your bowl is too small, your layers end up being half-inch thick little strips, and that ruins the visual effect. Use a big bowl to get those impressive, distinct stripes of color!
If you’re looking for another recipe where the presentation is just as important as the texture, you should try my cream cheese gelatin squares—they use a similar creamy base!
Estimated Nutritional Snapshot for Your Cherry Cheesecake Trifle
Now, look, because this is such a decadent, layered dessert made with *real* cream cheese and a nice crunchy crust, we know it’s not exactly a diet food! But I always like to give you guys a heads-up on what you’re digging into, just so you can plan the rest of your day accordingly, ha! This is just an estimate, based on standard ingredient amounts, so treat it as a friendly guideline rather than gospel.
This Cherry Cheesecake Trifle is certainly a special occasion treat, loaded with flavor and richness. If you’re looking for lighter options, sometimes I experiment with recipes for light cakes without butter and sugar, but those truly don’t have the same velvety texture as this beauty.
Here is the approximate nutritional breakdown per serving:
- Serving Size: 1 cup
- Calories: 450
- Sugar: 45g
- Fat: 25g (Keep an eye on that saturated fat!)
- Carbohydrates: 55g
- Protein: 5g
- Sodium: 250mg
See? Delicious, rich, and totally worth the occasional splurge. Enjoy every single layered bite!
Print
Cherry Cheesecake Trifle
- Total Time: 20 min
- Yield: 8 servings 1x
- Diet: Vegetarian
Description
A layered dessert featuring cream cheese filling, whipped cream, graham cracker crumbs, and cherry pie filling.
Ingredients
- 1 (8 ounce) package cream cheese, softened
- 1 cup granulated sugar
- 1 teaspoon vanilla extract
- 1 cup heavy whipping cream
- 1 (12 ounce) container frozen whipped topping, thawed
- 1 (14 ounce) package shortbread cookies or graham crackers, crushed
- 1 (21 ounce) can cherry pie filling
Instructions
- Beat the softened cream cheese, sugar, and vanilla extract until smooth.
- In a separate bowl, whip the heavy cream until stiff peaks form.
- Gently fold the whipped cream into the cream cheese mixture.
- Fold in half of the thawed whipped topping.
- In a large glass trifle bowl, create the first layer by spreading half of the crushed cookies or graham crackers on the bottom.
- Spread half of the cream cheese mixture over the cookie layer.
- Spoon half of the cherry pie filling over the cream cheese layer.
- Repeat the layers: remaining cookies, remaining cream cheese mixture, and remaining cherry pie filling.
- Spread the remaining whipped topping evenly over the top layer.
- Chill for at least 4 hours before serving.
Notes
- You can substitute graham crackers with vanilla wafers or shortbread cookies for a different texture.
- For a quicker preparation, use pre-made crushed graham crackers.
- Prep Time: 20 min
- Cook Time: 0 min
- Category: Dessert
- Method: Assembly
- Cuisine: American
Nutrition
- Serving Size: 1 cup
- Calories: 450
- Sugar: 45
- Sodium: 250
- Fat: 25
- Saturated Fat: 15
- Unsaturated Fat: 10
- Trans Fat: 0
- Carbohydrates: 55
- Fiber: 1
- Protein: 5
- Cholesterol: 75
Keywords: cherry, cheesecake, trifle, layered dessert, no bake, cream cheese, graham cracker