
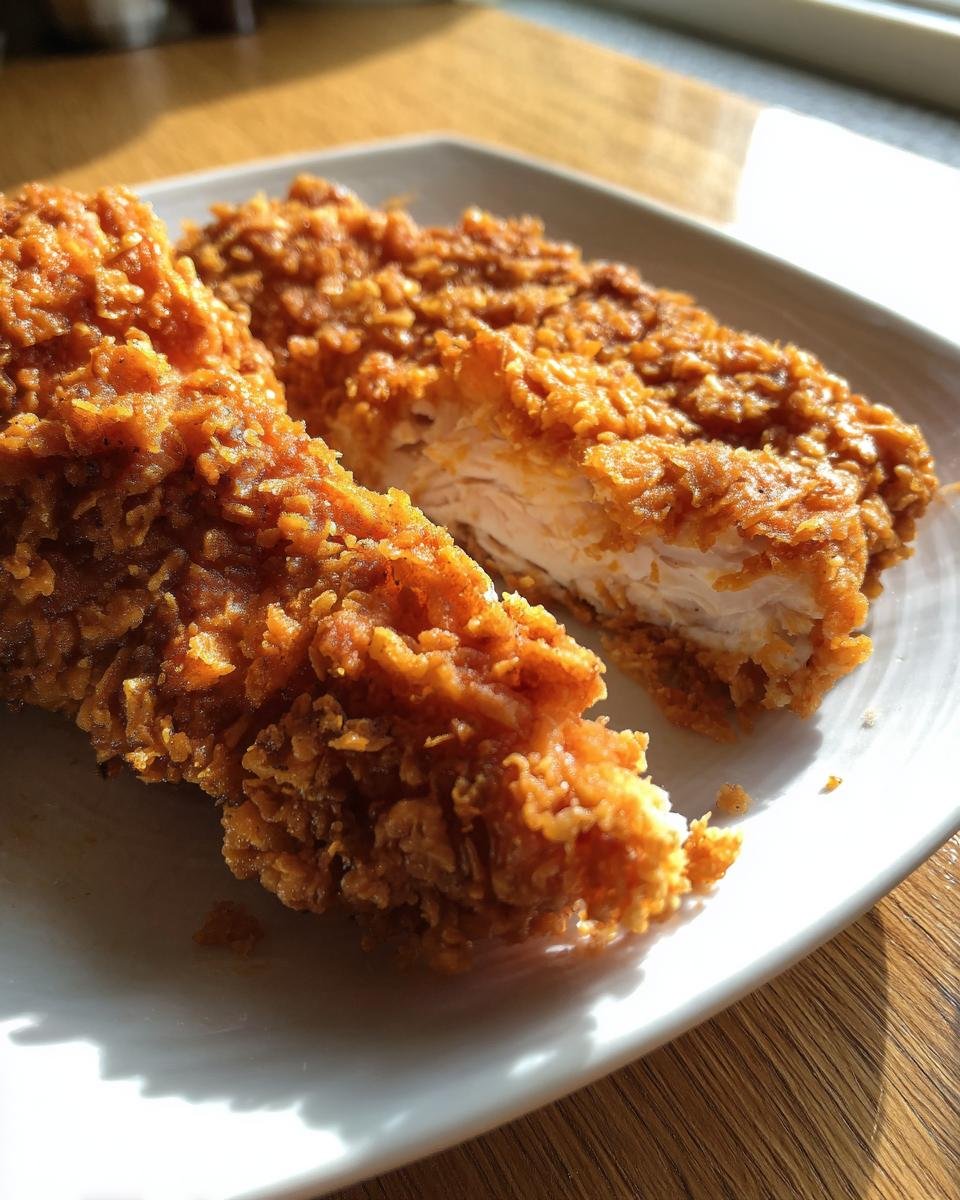
Oh my goodness, let’s talk about crunch. The sound of that first bite into truly perfect fried chicken—that audible shatter—is basically the sound of happiness, isn’t it? I spent years fighting soggy crusts and undercooked interiors. What a nightmare! But nope, not anymore. I figured out the secret sauce (and I don’t mean the dipping sauce!). This recipe for **Crispy Fried Chicken** is the one. It’s Southern-style, unapologetically rich, and delivers that legendary crackly coating every single time. I remember the first time I got the dredging right; I nearly scared the cat with how loud the crunch was. Trust me, we’re using reliable techniques here that take all the guesswork out of your hands.
Why This Crispy Fried Chicken Recipe Works (Experience & Trust)
Listen, the main issues folks run into with their homemade chicken are bland meat and a crust that falls off halfway through frying. Not a fun dinner! We fix that right here. This whole process is designed to lock in flavor and create armor for the meat. If you’ve ever had sad, soft chicken, you’re about to learn the secrets to truly great **Crispy Fried Chicken**. If you want to see some other amazing fried chicken techniques, you can check out my thoughts on beer-battered fried chicken too!
- The meat stays tender inside because of the buttermilk bath.
- The oil temperature is non-negotiable—it has to be right!
The Buttermilk Soak Secret for Tender Meat
Okay, buttermilk is the MVP here, seriously. It does two amazing things. First, those mild acids start breaking down the chicken fibers, making it crazy tender underneath all that crunch. Second, buttermilk is naturally sticky! When you pull the chicken out, it leaves this slightly tacky surface just begging for the flour mixture to grab hold. It’s the glue!
Achieving the Ultimate Coating for Crispy Fried Chicken
This is where you stop messing around and start getting professional-level crunch. My secret weapon in the dredge is the cornstarch. Just a quarter cup mixed in with the flour does wonders! Cornstarch inhibits gluten formation, which keeps the crust light rather than dense and heavy. That little bit of starch guarantees you get that shatteringly crisp texture in every single bite of your **Crispy Fried Chicken**. It makes all the difference, I promise!

Ingredients You Need for Perfect Crispy Fried Chicken
You don’t need a million specialty items for this! We’re keeping it straightforward so you can get this **Crispy Fried Chicken** on the table fast. I always weigh my chicken pieces just to be sure, but eyeballing it is usually fine for a backyard batch like this. Remember, the quality of your oil matters hugely, so don’t skimp there!
When you’re ready for the perfect side dish, I have a fantastic recipe for ultimate homemade cornbread that goes perfectly here.
- Two pounds of chicken pieces—I like a mix of legs, thighs, and breasts so everyone gets what they want.
- Two cups of regular all-purpose flour.
- A quarter cup of cornstarch—don’t forget this for the crunch!
- Two teaspoons of salt, plus pepper, paprika, garlic powder, and onion powder for seasoning the dredge.
- One cup of buttermilk, which is our magic tenderizer.
- Two large eggs, whisked up with that buttermilk.
- Plenty of vegetable oil for frying—you need about two inches deep in your pot.
Essential Equipment for Making Crispy Fried Chicken
Look, you can make the best batter in the world, but if your tools aren’t up to the job, you’re going to end up stressed out or, worse, serving greasy chicken! Getting the right gear set up first makes the whole experience so much smoother. I learned the hard way that you can’t really eyeball the heat when you’re dealing with hot oil, so trust me on these necessities.
This setup isn’t fancy, but it’s what works every time to get that perfect golden color and stable temperature for the coating to set properly.
- You absolutely need a deep, heavy-bottomed pot or, if you have one, a dedicated deep fryer. You need enough depth for that two inches of oil to surround the chicken.
- A reliable, instant-read thermometer is your best friend here. I can’t stress this enough—it keeps the oil steady at 325°F while you’re working.
- Two shallow dishes or bowls for your wet and dry mixtures. Keep them wide enough for easy dredging.
- A sturdy pair of tongs for carefully lowering and flipping the chicken pieces—don’t use a fork; we don’t want to puncture that beautiful crust!
- Finally, the drainage station: A large wire rack set over a baking sheet. Never drain chicken directly on paper towels; that steam gets trapped underneath and makes the bottom soggy.
Step-by-Step Instructions to Make Crispy Fried Chicken
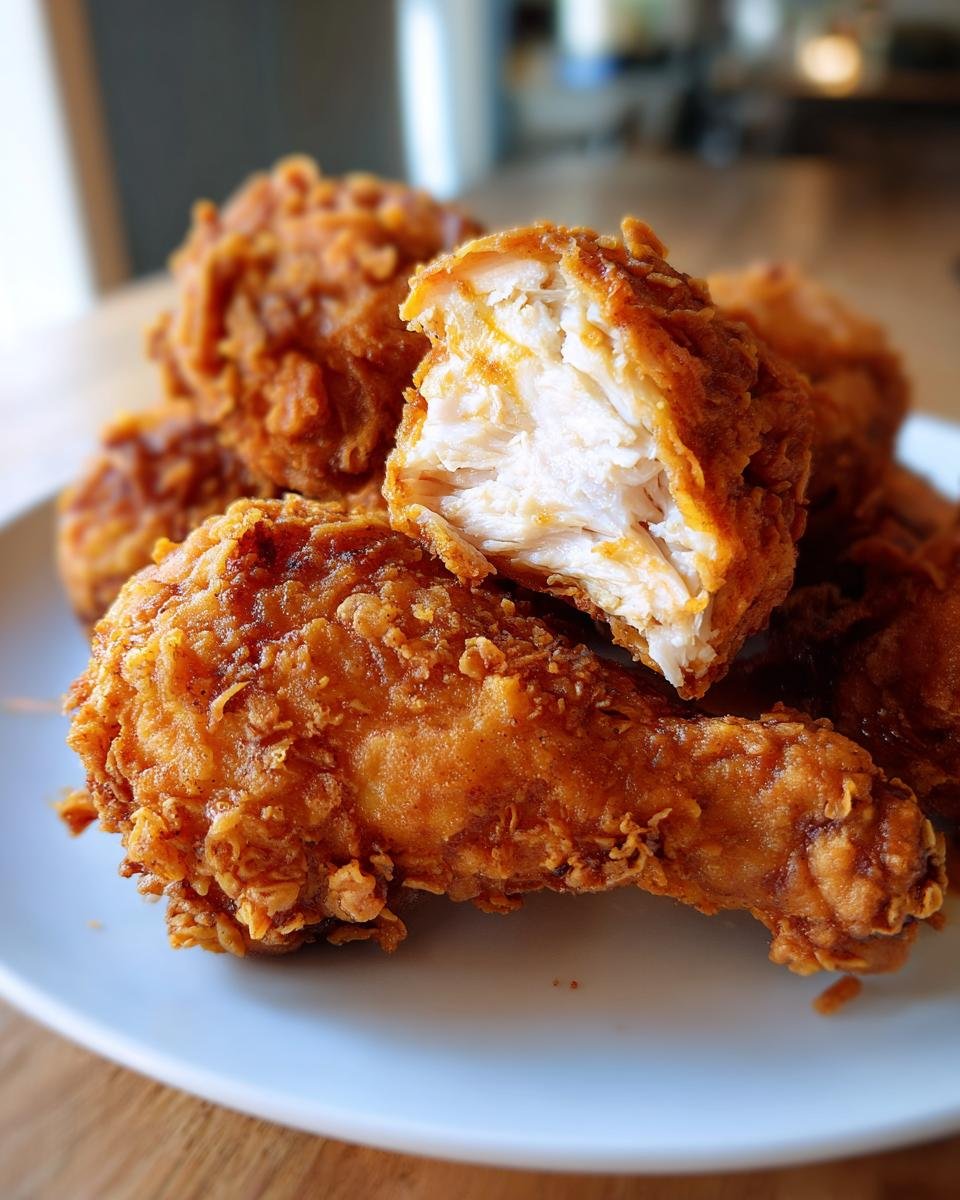
Alright, now that we have our magic armor (the coating) and our perfectly marinated meat, it’s time for the real show! Frying requires focus, honey. You can’t just walk away to text somebody. Keeping that heat steady is the absolute key to making sure the crust cooks at the same rate the inside gets done. We’re aiming for golden brown on the outside and a juicy 165°F internal temp. If you want to check out my tips on keeping chicken ridiculously juicy even when roasting, I talk all about it here. Let’s get stirring!
Preparing the Dry Mix and Wet Marinade for Crispy Fried Chicken
First things first, get your layers ready! In one wide, shallow dish, mix up all your dry ingredients really well. I mean *really* well—you don’t want pockets of pure paprika later! In the second bowl, take your buttermilk and whisk in those two eggs until they are totally combined into that cloudy, pale liquid. This wet mix is what activates the flavor in our Crispy Fried Chicken dredge.
Coating Technique for Maximum Crunch on Your Crispy Fried Chicken
This is the moment of truth for the crunch! Dip your chicken piece completely under the buttermilk mixture—let the excess drip for just a second. Then, drop it right into that flour mix. Now, here’s the pro move: don’t just toss it; grab that piece and press that flour coating on firmly all over. If you want insane crunch, try the double-dip: coat, back into the wet, and *then* coat in the flour again, pressing hard each time. That’s how you build armor for the best batch of Crispy Fried Chicken!

Frying the Chicken to Golden Perfection
Get your oil heated up to exactly 325 degrees Fahrenheit—no hotter! Carefully lower your coated pieces into the hot oil. You have to work in batches; if you crowd the pot, the temperature drops instantly, and everything turns greasy instead of crispy. Let them cook for about 6 to 8 minutes on each side, turning carefully. Pull them out when they look deep golden brown and use your thermometer to confirm they hit 165°F internally. Then, straight onto that cooling rack!
Tips for the Best Ever Crispy Fried Chicken
Okay, you’ve pulled the chicken out, it’s golden, it’s beautiful, but don’t eat it yet! I know it smells heavenly, but resting time is crucial. Let that chicken sit on that wire rack for at least ten minutes before serving. This resting time lets the internal juices redistribute—it keeps your meat moist—and it gives the crust a little extra time to firm up so it doesn’t steam itself soft.
Also, don’t just toss that oil out when you’re done! If you filtered out the crumbs after it cooled down completely, you can reuse that oil for your next batch of Crispy Fried Chicken. It actually gets better the second time around! If you’re looking to cut down on deep frying overall, I’ve got a whole breakdown on how to get decent results in the air fryer right here, though nothing beats the dunk in the deep pot.
Finally, remember that double-dip I mentioned? Even if you only do one layer of coating, make sure you really *press* that flour into the chicken; don’t be gentle! That pressing action creates those flaky little edges that get super crunchy.
Storage and Reheating Crispy Fried Chicken
The best part about making a big batch of **Crispy Fried Chicken** is having leftovers, right? But you can’t let that crust get soggy in the fridge! Always store your cooled chicken in an airtight container, maybe with a paper towel underneath to catch any residual oil, and keep it chilled. These leftovers are treasures, so treat them right!
When it comes to reheating, ditch the microwave—it’s the ultimate enemy of crunch. You want crispy again! I swear by popping the pieces on a wire rack set inside a baking sheet and heating them in a 375°F oven for about 10-15 minutes. If you want faster results, fire up the air fryer! You can find my favorite settings for that over on my air fryer chicken nuggets post; it works perfectly here, too.
Serving Suggestions for Your Meal
So, you’ve got this gorgeous, shatteringly crisp chicken sitting on the rack. Now what? You can’t just eat fried chicken naked, can you? Well, you *could*, but trust me, the experience is way better with the right supporting cast on the plate. My family goes totally traditional when this comes out of the kitchen. It’s all about comfort food classics that soak up the flavor and stand up to the richness of the chicken.
If you’re hunting for the perfect tangy counterpoint to all that savory, salty goodness, you absolutely have to make my super easy coleslaw. You can find my quick recipe for that simple coleslaw recipe, and it cuts right through the richness perfectly.
Here are my non-negotiable sides. Don’t try to skip these; they are part of the tradition!
- Mashed Potatoes and Gravy: You need that creamy landscape to catch any errant juices or seasoning that falls off the chicken skin. Homemade gravy is a must—don’t even think about that powdered stuff!
- Fluffy Biscuits: They should be warm, buttery, and perfect for scooping up the last bits of mashed potatoes or even making little chicken sandwiches.
- Simple Greens: Sometimes you need something slightly healthier, right? A quick side of collard greens cooked with a little smoked ham hock or even just some steamed green beans adds a nice pop of color and freshness.
Honestly, put these three things on the table, and you’ve got a complete, knockout meal that tastes like a Sunday dinner, even if it’s Tuesday night!
Frequently Asked Questions About Crispy Fried Chicken
I get so many wonderful questions about this recipe once people start trying it out. It’s funny how everyone has their own little hurdle they need to clear before they feel confident. I always try to answer them just like I’m chatting with you right across my kitchen counter. If you’ve got questions about pairings, definitely check out my thoughts on other fried chicken recipes!
Can I make this Crispy Fried Chicken recipe in an air fryer?
You absolutely can! But, fair warning—you are not going to get the *exact* same shatteringly crisp crust you get from the deep pot. The air fryer dries things out faster, which is great for chicken breasts, but it tends to leave the coating a little more crumbly or sandy than flaky. You’ll still get delicious meat, but the texture won’t be identical to this traditional **Crispy Fried Chicken** recipe.
What is the best oil to use for deep frying?
You need an oil with a high smoke point because we are holding that oil steady at 325°F. I stick to vegetable oil or peanut oil for the basics because they handle the heat beautifully and are pretty neutral in terms of flavor. Avoid olive oil or butter; they’ll smoke and burn way too fast, and nobody wants a kitchen fire over dinner!
Estimated Nutritional Data for Crispy Fried Chicken
Now, let’s talk turkey—or chicken, in this case! Because we are deep frying, this isn’t exactly a light meal, but wow, is it worth it. These numbers are my best guess based on using standard cuts and the ingredients listed, so take them as a helpful guide rather than gospel truth. Remember, the secret to great **Crispy Fried Chicken** is flavor, and that comes with a little indulgence!
For every standard serving piece, you’re looking at roughly:
- Calories: About 450
- Protein: A whopping 35 grams!
- Fat: Around 28 grams (keep in mind that’s mostly unsaturated if your oil is fresh!)
- Carbohydrates: About 15 grams
- Sodium: A little high at 550mg, so maybe go easy on the extra salt shaker!
If you’re watching your intake, you can always try making a lighter version in the air fryer which I discuss in the FAQs section!
Print
Crispy Fried Chicken
- Total Time: 50 min
- Yield: 4 servings 1x
- Diet: Low Fat
Description
A recipe for making classic crispy fried chicken.
Ingredients
- 2 pounds chicken pieces (legs, thighs, breasts)
- 2 cups all-purpose flour
- 1/4 cup cornstarch
- 2 teaspoons salt
- 1 teaspoon black pepper
- 1 teaspoon paprika
- 1/2 teaspoon garlic powder
- 1/2 teaspoon onion powder
- 1 cup buttermilk
- 2 large eggs
- Vegetable oil for frying
Instructions
- In a shallow dish, combine flour, cornstarch, salt, pepper, paprika, garlic powder, and onion powder.
- In a separate bowl, whisk together buttermilk and eggs.
- Dip each piece of chicken first into the buttermilk mixture, letting excess drip off.
- Dredge the chicken thoroughly in the flour mixture, pressing the coating onto the chicken.
- Heat about 2 inches of vegetable oil in a deep, heavy-bottomed pot or deep fryer to 325 degrees Fahrenheit (160 degrees Celsius).
- Carefully place chicken pieces into the hot oil, ensuring not to overcrowd the pot. Fry in batches if necessary.
- Fry chicken for about 6-8 minutes per side, turning occasionally, until golden brown and cooked through (internal temperature reaches 165 degrees Fahrenheit or 74 degrees Celsius).
- Remove chicken from oil and place on a wire rack set over a baking sheet to drain excess oil.
Notes
- For extra crispiness, you can double-dip the chicken: coat in flour, dip back into buttermilk, and coat in flour again.
- Maintain the oil temperature consistently for even cooking.
- Prep Time: 20 min
- Cook Time: 30 min
- Category: Dinner
- Method: Deep Frying
- Cuisine: American
Nutrition
- Serving Size: 1 piece
- Calories: 450
- Sugar: 1
- Sodium: 550
- Fat: 28
- Saturated Fat: 7
- Unsaturated Fat: 21
- Trans Fat: 0
- Carbohydrates: 15
- Fiber: 1
- Protein: 35
- Cholesterol: 120
Keywords: fried chicken, crispy chicken, southern fried chicken, chicken recipe, deep fried