
When you need something instantly decadent but have zero time for fussy baking, you call on these simple brownie truffles. Seriously, these little chocolate bombs are my secret weapon for last-minute potlucks or when that nighttime sweet craving hits hard. Forget cakes and cookies; we’re skipping straight to the fudgy center!
The best part? We start with a box mix! But trust me, after a little tweaking, no one will ever guess. I’ve spent way too much time obsessing over the perfect ratio of oil to brownie crumbs to make sure these aren’t cakey—they are dense, rich, and truly taste like the best part of a tray of fudge brownies. You simply can’t beat homemade chocolate truffles this easy. They always disappear first at every gathering, I promise you that!
Why You Will Love These Simple Brownie Truffles
I need you to understand how fast these come together. They sound fancy because they’re covered in chocolate, but honestly, they’re faster than most standard cookies. If you need a showstopper dessert made in under an hour of active cooking, this is your winner.
- They pass off as gourmet—your secret weapon when company shows up unexpectedly!
- Minimal cleanup because we’re basically just crumbling and rolling things.
- They use a box mix as a base, which cuts out about 90% of the measuring guesswork.
- You get the intense, fudgy flavor of the best brownies, but in a perfect, bite-sized ball.
- They require almost no actual baking skill; the hardest part is waiting for them to chill!
Quick Preparation for Amazing Brownie Truffles
Seriously, the active time here is so low. You bake the sheet pan brownie (about 30 minutes), then you let it cool. Once cooled, crushing and mixing takes maybe ten minutes tops. That’s when the magic starts! If you’re looking for more easy chocolate delights, you should definitely check out my tips for making Copycat Starbucks Double Chocolate Brownies, but for sheer speed, these brownie truffles win every time.
Rich, Fudgy Texture in Every Brownie Truffles Bite
Cakey brownies are great for a casual snack, but for a truffle? Forget it. We want that dense, almost dough-like interior. My key modification ensures that the crumb sticks together beautifully when you roll it. It’s all about manipulating those cooked crumbs with just enough binder (which we’ll talk about later!) to create that supremely satisfying, melt-in-your-mouth experience.
Essential Ingredients for Perfect Brownie Truffles
Okay, let’s talk about what goes into these incredible little bites. Since we’re building these from a baked base, the ingredient list is mercifully short! You rely heavily on your standard box mix, plus a few additions that really pivot it from ‘brownie’ to ‘truffle.’ We need richness, binding power, and that gorgeous chocolate shell.
Here is what you’ll need to gather up before you start crumbling away. If you want to dig deeper into fantastic brownie bases in general, I have a whole post about achieving the fudgiest brownie recipes, but for these truffles, follow this list exactly.
- One box (about 18 ounces) of your favorite fudge brownie mix.
- Vegetable oil—this is key, don’t skip it!
- Two large eggs.
- A teaspoon of good vanilla extract.
- Cup of semi-sweet chocolate chips for coating.
- One tablespoon of shortening (this helps the ganache set smoothly).
- Optional: About half a cup of powdered sugar if you want to roll the finished truffles in it.
Ingredient Notes and Substitutions for Brownie Truffles
Now that you see the list, I need to give you the insider scoop on a couple of these items. Why vegetable oil instead of the butter called for on the box? Because oil keeps the baked brownie much denser and moister once it’s turned into dough. Butter adds flavor, sure, but oil keeps these **Brownie Truffles** perfectly fudgy and prevents them from drying out once chilled.
For the topping: If you skip the powdered sugar, don’t think you have to stop there! I often switch it up. A quick roll in unsweetened cocoa powder gives it a sophisticated, darker look, or even a handful of rainbow sprinkles pressed gently on top before the chocolate sets makes them look instantly festive. It’s all about presentation!
How to Prepare Your Decadent Brownie Truffles
Listen, the steps sound intense because we cover baking, chilling, and coating, but honestly, the active time is short. The most critical thing here is patience during the cooling phases. If you try to crumble hot brownies, you’ll just get sad, mushy paste instead of the perfect dense dough we need for these **Brownie Truffles**.
Make sure you read through all the steps first. My favorite way to manage this is to bake the brownies the night before! Then, the next day, it’s just assembly. If you’ve got a special occasion coming up and need another easy chocolate winner, you absolutely must try my recipe for Pecan Pie Brownies, but for pure speed, these truffles are unbeatable.
Baking and Crushing the Brownie Base for Brownie Truffles
First things first, prepare your brownie mix, but swap out the water called for on the box for the vegetable oil, and remember to toss in the eggs and vanilla extract. You bake this right onto a 9×13 inch pan as the box recommends. Once they’re done, set them aside and let them cool COMPLETELY. I mean it, totally room temperature! This cooling is huge for texture.
Once cool, it’s time for the messy (but fun!) part. You need to crumble those brownies super finely into a large bowl. Don’t be shy; you want fine, uniform crumbs. Get rid of any big chunks that might prevent your dough from sticking together later.
Forming and Chilling the Brownie Truffles Dough
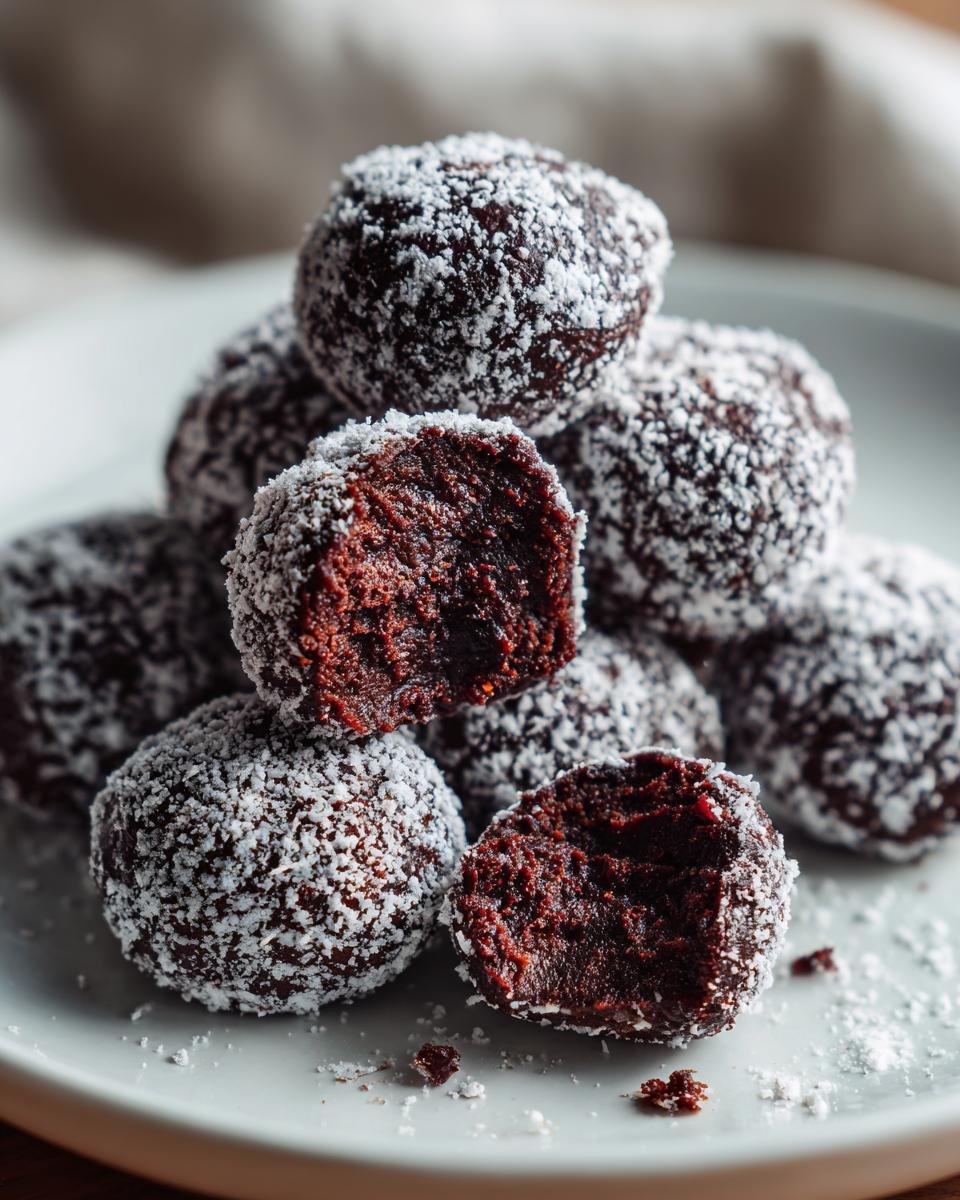
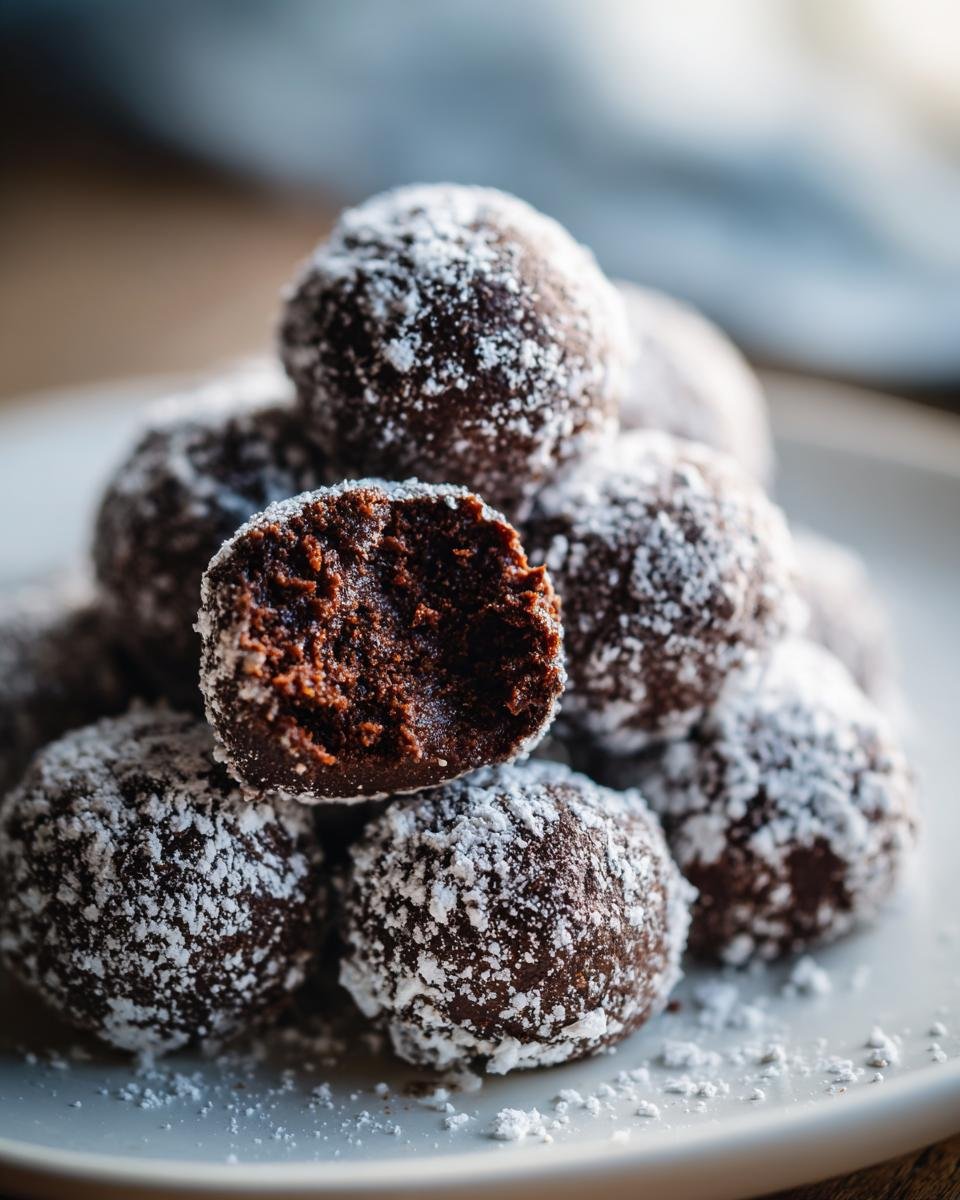
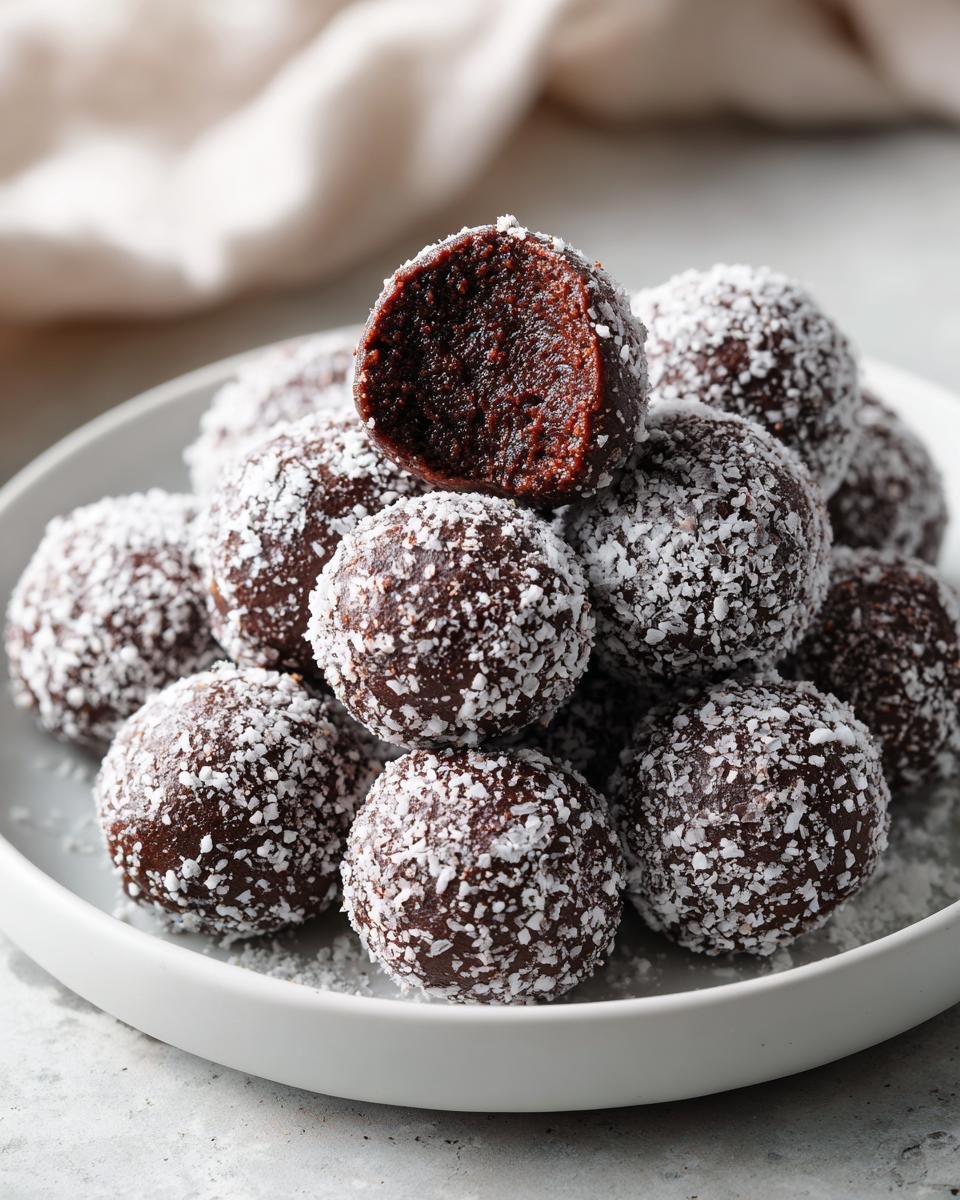
Now, use your hands—this is where the heat helps bind everything—and mix those crumbs until they start clinging together into a dense, uniform dough. You should be able to press a portion firmly between your palms and have it hold its shape easily. Roll these out into small balls, about one inch across. This recipe usually gives us about 24 perfect little treats!
Place them all neatly on a parchment-lined sheet. Pop that whole tray into the refrigerator for at least 30 minutes. Seriously, do not skip the chill time! Cold balls are essential; they won’t fall apart when they meet the hot chocolate dip.
Melting Chocolate and Coating the Brownie Truffles
While they’re firming up, melt your semi-sweet chocolate chips and that little bit of shortening. I use the microwave, doing it in 30-second bursts and stirring hard in between each blast until it’s completely smooth and glossy. Never let chocolate sit too long, or it seizes up! Stirring frequently is the trick.
Take the chilled balls out, stab one with a toothpick, and dip it right into that melted chocolate bath, spinning it around to coat completely. Let the excess drip off for a second, then place it back on the parchment. If you’re using powdered sugar, dust it lightly right now before the chocolate hardens. Then, back into the fridge until that chocolate layer is firm and snappy!

Tips for Making the Best Brownie Truffles Every Time
I’ve made these brownie truffles so many times I feel like I should have a certification! You want them beyond good; you want them looking professional, right? Even if you start with a box mix, a couple of tiny tweaks can take them from ‘great homemade treat’ to ‘where did you buy these?’ territory. We’re focusing on the finish and the form here, because nobody wants a lumpy truffle!
Achieving a Smooth Chocolate Coating on Your Brownie Truffles
When you melt chocolate, it looks beautiful right after sinking the ball in. But then, if it cools too fast or unevenly, you get that dull, slightly waxy look. That’s where tempering comes in, if you’re feeling fancy! Tempering means managing the crystal structure of the cocoa butter in the chocolate. It sounds intense, but it just gives you that gorgeous, high-gloss shine and that satisfying little *snap* when you bite into the shell.
If you don’t want to mess with swirling and heating, just remember the shortening we added! That little bit of shortening helps keep the chocolate flowy and smooth, which helps prevent dullness even without full tempering. If your chocolate gets too stiff while you’re working, just stir it hard and give it ten seconds in the microwave—but please, stir often! For other amazing chocolate ideas, take a look at this guide on fudgy brownie recipes; some of those blending secrets help here too.
How to Keep Your Brownie Truffles Uniformly Shaped
Consistency is everything when you’re dipping. If you have one truffle the size of a golf ball and another the size of a marble, the small one will get totally drowned in chocolate, and the big one might not even get fully covered. I finally started using a small cookie scoop—the one that’s about one tablespoon size—to portion out the dough.
Scooping keeps them perfectly neat and uniform. Then, rolling them gently between your palms just to perfect the sphere shape before they head into the fridge for that vital chilling time. A balanced shape means a balanced chocolate-to-fudge ratio in every bite of these wonderful **Brownie Truffles**.
Serving Suggestions for Your Homemade Brownie Truffles
So you’ve got two dozen perfect, shiny little chocolate bombs sitting in your fridge. What’s next? You need the perfect stage for these stars! Since these **Brownie Truffles** are so intensely rich and fudgy, you want pairings that either cut through that richness with something bright or lean fully into the decadence.
For me, presentation is half the fun. I love arranging them on a simple white platter so the chocolate coating really pops. If you’re serving them after a big dinner, a little dusting of gold luster dust makes them look unbelievably fancy. It’s all theater, but effective theater!
If you want to go for a dramatic dessert experience, try serving them alongside something tart. A side of fresh raspberries or orange segments is divine because the acidity wakes up your palate after the deep cocoa flavor. If you are a true chocolate lover though, and you’re looking to make an even bigger chocolate impact, you have to try my recipe for the Triple Chocolate Mousse Cake—it’s intense, but these truffles make a great little side bite!
For beverages, these pair perfectly whether you’re keeping it casual or fancy. A strong cup of black coffee or a robust espresso is my go-to; the bitterness cuts right through the sweetness of the chocolate coating. If you’re serving them for an evening party, a small pour of raspberry liqueur or a deep, dry red wine makes these **Brownie Truffles** feel incredibly sophisticated.
Storage and Reheating Instructions for Brownie Truffles
Because these are essentially dense brownie dough rolled and dipped in chocolate, they are absolutely best kept cool. Think about it: if you leave them on the counter, that chocolate coating starts to sweat, and nobody wants sticky fingers from melted chocolate truffles that look less than perfect!
The simplest method, and the one that works best for freshness, is the refrigerator. Just like I mentioned earlier, grab an airtight container—make sure it’s a good seal—and place your **Brownie Truffles** inside. They keep beautifully! They stay perfectly dense and the chocolate coating stays firm and shiny.
Shelf life is surprisingly good! If you keep them sealed up tight in the fridge, they should be fantastic for at least a week, maybe even ten days. I always find they taste best within the first four or five days, but honestly, they rarely last that long in my house.
Now, about reheating them? Haha! You definitely don’t want to reheat these. If you put a chocolate-dipped truffle in the microwave, you’ll just melt the coating everywhere, and the dense interior will get crumbly and weird, not fudgy. We want these served cool, straight from the fridge, or maybe let sit out for just five minutes before biting into that perfect snap!
Frequently Asked Questions About Brownie Truffles
It happens every time I post these little chocolate gems online—people always have questions about how to keep them perfect or if they can skip a step. Don’t worry, I get it! Making delicious **Brownie Truffles** is easy, but knowing the little secrets to keep them looking professional makes all the difference. Here are the things y’all ask me most often!
Can I make Brownie Truffles without baking the mix first?
That’s a great question, and the answer is sadly no, unless you want something just… mushy. The entire structure of these fantastic chocolate truffles depends on baking that brownie mix first! You need the batter to transform into a fully cooked, slightly dry crumb during that bake time in the 9×13 pan. If you just mix the powder with oil and eggs and try to roll it, you end up with sticky sludge, not a dense dough that can hold its shape.
We need that structure before we start the rolling and dipping process. Think of the baking step as creating your foundation material. Once it’s baked and cooled, *then* we can turn it into something special. For other things you can skip baking on, I have a whole selection of no-bake desserts that might interest you!
How long do these chocolate truffles last in the fridge?
This is where keeping them refrigerated really pays off! Because these **Brownie Truffles** are stored cold in an airtight container, they stay wonderfully fresh. I find they are at peak deliciousness for about five to seven days. After that, the brownie crumb might start to lose some of that initial fudgy moisture, although they are still perfectly safe to eat for up to ten days.
My advice? Only make what you think you can get rid of in a week. If you need to make them further ahead for a party, freezing is an option! Just make sure they are fully set and layered with parchment paper between layers in a freezer-safe container. They thaw perfectly overnight in the fridge.
What is the best way to get a clean chocolate dip for my Brownie Truffles?
If you see pictures of these all shiny and perfectly coated, you might think it’s all about the tempering (which helps, but is finicky!). For the home cook, the absolute number one game-changer is chilling those dough balls until they are rock solid! Remember, we chilled them for at least 30 minutes? You can even leave them in there for an hour.
The colder the brownie ball, the less quickly the melted chocolate warms it up when you dip it. A cold ball causes the chocolate to set almost immediately when it hits the shell, preventing that slow melt that makes the edges look messy and thick. Dip quick, spin once, let excess drip, and place gently on the parchment. Cold balls equal clean dips!
Estimated Nutritional Information for Brownie Truffles
I always get asked about the nutrition facts for these decadent little balls of chocolate goodness. While I spend my time perfecting the fudginess and the chocolate dip, I’m not a registered dietitian, so you have to take this with a tiny grain of salt!
Since these **Brownie Truffles** are made from a standard fudge brownie mix, oil, eggs, and coated in chocolate, the numbers are what you’d expect for a rich treat. I’ve listed out the estimates below based on the recipe yielding 24 truffles. Remember, these figures can jump around quite a bit depending on which brand of brownie mix you use, or whether you skip the optional powdered sugar coating!
- Serving Size: 1 truffle
- Calories: 150
- Sugar: 15g
- Sodium: 80mg
- Fat: 9g
- Saturated Fat: 4g
- Carbohydrates: 17g
- Protein: 2g
Don’t forget that these are estimates! If you use a dark chocolate coating instead of semi-sweet, or maybe use a different oil, the totals will shift slightly. But generally, this breakdown gives you a good idea of what you’re indulging in when you grab one of these perfect chocolate truffles. Seriously though, 150 calories for that much chocolate bliss? I call that a win!
Share Your Homemade Brownie Truffles Creations
Okay, that’s it! You’ve baked, you’ve crumbled, you’ve dipped, and now you have a platter of the most unbelievably rich, fudgy chocolate truffles that required almost no actual effort!
I truly hope you love these as much as my family does. They are my go-to for everything from movie nights to slightly panicked holiday dessert needs. But now that you’ve made them, I want to see them! Did you go for the powdered sugar dusting, or did you try the cocoa powder trick?
Once you’ve tried these simple brownie truffles, please hop on down to the comments section below and let me know how they turned out! Did they hold their shape during the dip? Were they fudgy enough for you? I read every single comment, and your feedback helps me refine my methods even more.
If you have any burning questions that I didn’t cover in the FAQ, now is the time to ask! You can always reach out to me directly through my contact page if you have a private note, but general recipe questions are best kept right here so everyone can learn together.
Don’t forget to rate the recipe above—five stars if you think these are the easiest, fudgiest chocolate truffles you’ve ever made! Happy baking (or rather, happy crumbling and dipping)!
Print
Simple Brownie Truffles
- Total Time: 50 min
- Yield: 24 truffles 1x
- Diet: Vegetarian
Description
A recipe for making rich, dense brownie truffles coated in chocolate.
Ingredients
- 1 box (18.3 ounces) fudge brownie mix
- 1/3 cup vegetable oil
- 2 large eggs
- 1 teaspoon vanilla extract
- 1 cup semi-sweet chocolate chips
- 1 tablespoon shortening
- 1/2 cup powdered sugar (for rolling, optional)
Instructions
- Prepare the brownie mix according to package directions, substituting the required water with vegetable oil and adding the eggs and vanilla extract.
- Bake the brownies in a 9×13 inch pan as directed on the box.
- Let the brownies cool completely.
- Crumble the cooled brownies into fine crumbs in a large bowl.
- Mix the brownie crumbs thoroughly with your hands until they form a uniform, dense dough.
- Roll the dough into small balls, about 1 inch in diameter. Place them on a parchment-lined baking sheet.
- Chill the brownie balls in the refrigerator for at least 30 minutes.
- Melt the chocolate chips and shortening together in a microwave-safe bowl in 30-second intervals, stirring until smooth.
- Dip each chilled brownie ball into the melted chocolate, ensuring full coverage.
- Return the coated truffles to the parchment-lined sheet.
- If desired, immediately sprinkle the tops with powdered sugar before the chocolate sets.
- Refrigerate the truffles until the chocolate coating is firm.
Notes
- For a smoother coating, use tempered chocolate.
- You can roll the truffles in cocoa powder or sprinkles instead of powdered sugar.
- Store finished truffles in an airtight container in the refrigerator.
- Prep Time: 20 min
- Cook Time: 30 min
- Category: Dessert
- Method: No-Bake/Chilling
- Cuisine: American
Nutrition
- Serving Size: 1 truffle
- Calories: 150
- Sugar: 15
- Sodium: 80
- Fat: 9
- Saturated Fat: 4
- Unsaturated Fat: 5
- Trans Fat: 0
- Carbohydrates: 17
- Fiber: 1
- Protein: 2
- Cholesterol: 15
Keywords: brownie truffles, chocolate truffles, easy dessert, fudge balls, no bake