
Sometimes I just crave that sharp, electric PUCK of real lime flavor, you know? Nothing else touches that spot! But honestly, full-on pie can feel like such a commitment—the slicing, the slippery filling… Nope! That’s why I doubled down on perfecting these Key Lime Pie Bars. They give you everything you love about the classic Florida dessert—that buttery, crisp graham cracker crust hugging the most perfectly tart, creamy filling—but in a sturdy, easy-to-serve square.
I cracked this recipe years ago when I brought them to a summer BBQ, and people were grabbing them faster than I could restock the platter. The secret, and I mean the absolute game-changer, is the juice. Don’t even *think* about reaching for that bottled stuff; this recipe screams for fresh key lime fruit. Trust me, once you nail that balance between the bright lime zing and the sweet, buttery base, you won’t look back. These bars are ridiculously easy but taste like you spent all day fussing over them!

Why You Will Love These Key Lime Pie Bars (Quick & Tart)
Honestly, these bars are my secret weapon for summer gatherings. They pack such a punch of flavor without any of the fuss of rolling out pie dough or worrying about carving perfect slices. I always have extra parchment paper handles sticking out of the pan just so I can lift the whole thing out and slice it later. It’s genius, if I do say so myself!
Why should you drop everything and make these right now? Well, for starters, they scream summer flavor.
- They are ready to chill faster than you can finish cleaning up the measuring spoons. You can have these done baking in under 30 minutes!
- They are sturdy! No sliding filling here.
- The size is perfect—you get a lovely bite of richness without feeling like you need to lie down afterwards.
Perfectly Balanced Tartness
The goal here is *bright*, not mouth-puckeringly sour. When you use real key lime juice, that unmistakable floral, tart aroma hits you immediately. That’s the good stuff! It cuts through the richness of the condensed milk so beautifully. If you want to see how other bright, zesty desserts shine, you should really check out my lemon pave recipe too; it uses a similar balancing act.
Simple Graham Cracker Crust
Forget butter temperature drama or chilling dough for hours. This crust is literally three things mixed together and pressed right into the pan. We bake it for just ten minutes to set it up, and that’s it! It forms this wonderful, buttery ledge that holds that gooey lime goodness perfectly when you cut the bars.
Essential Ingredients for Perfect Key Lime Pie Bars
Okay, listen up, because the quality of your ingredients here totally dictates whether you get a good bar or a *great* bar. Since this recipe is so simple—we aren’t hiding anything behind heaps of flour or heavy cream—every single item needs to pull its own weight. Grab your mixing bowls, because we need to measure everything out precisely. We need that graham cracker crumble, butter, and sugar for the bottom, then the creamy filling components.
You’ll need:
- 1 1/2 cups graham cracker crumbs (make sure they’re actually crumbs, not giant chunks!)
- 1/2 cup granulated sugar for the crust AND another 1/2 cup for the filling (that’s one cup total, folks!)
- 6 tablespoons unsalted butter, melted until it’s perfectly smooth
- 1 (14 ounce) can sweetened condensed milk (don’t substitute this, seriously!)
- 4 large egg yolks (just the yolks, we keep the whites for meringues later!)
- 1/2 cup fresh key lime juice
- 1 teaspoon lime zest
This recipe relies heavily on that lime juice, so splurge on the fresh ones if you can. If you’re looking for other backbone recipes that rely on quality staples, you can definitely find inspiration over in my ultimate homemade cornbread guide—it’s all about starting right!
Ingredient Notes and Substitutions for Key Lime Pie Bars
This is where I impart some hard-won wisdom about that citrus! Please, please, please use fresh key lime juice. The bottled stuff is often preserved and has a duller, flatter flavor. Fresh key limes give you that vibrant, electric zing that makes these bars what they are. If you absolutely cannot find key limes where you shop, you can substitute regular Persian limes, but I’d dial it back to maybe 1/3 cup of juice instead of a full 1/2 cup because they are usually stronger.
Now, don’t forget the zest! The zest holds all the aromatic oils, so even if you use regular limes instead of key limes, grabbing that extra teaspoon of zest really boosts the whole lime dessert experience. It smells incredible while you’re mixing the filling!
Step-by-Step Instructions for Making Key Lime Pie Bars
This process moves fast once you get going, so have your pan ready! I always preheat the oven first, 350 degrees Fahrenheit, while I measure out the crust ingredients. It’s that classic baking rhythm—get the heat ready, mix the base, bake the base, then mix the topping. Once you get the hang of it, you’ll be amazed at how little time this takes overall. If you enjoy fast recipes like this, you might want to check out my five delicious quick bread recipes for more speedy baking inspiration!
Preparing the Graham Cracker Crust for Key Lime Pie Bars
First order of business is lining that 8×8 inch pan. I absolutely insist on using parchment paper, leaving an overhang on two sides. This is crucial, trust me! It’s your built-in slingshot for lifting the whole thing out later. Now, in a bowl, mix your graham cracker crumbs, the first 1/2 cup of sugar, and the melted butter. It should look like sandy, wet gravel. Press it down into the bottom of your prepared pan. And I mean press! Use the bottom of a flat measuring cup to really compact it. We need this crust to be sturdy enough to hold that lush filling without crumbling everywhere.
Pop that pan into the 350-degree oven for exactly 10 minutes until it smells slightly toasted. Pull it out and let it cool down just a touch while you jump to the filling.
Mixing the Tart Key Lime Filling
This filling comes together lightning fast, which is why we have to be gentle here. In a separate bowl—don’t even use the one you mixed the crumbs in, keep it clean!—we whisk together the sweetened condensed milk, the remaining 1/2 cup of sugar, those four egg yolks, the fresh key lime juice, and the zest. You need to whisk this until it’s beautifully combined and smooth. I always stop and scrape the sides down just to make sure there are no hiding pockets of condensed milk floating around. We want those Key Lime Pie Bars to be perfectly consistent, not streaky!
Baking and Chilling Your Key Lime Pie Bars
Gently pour that luscious mixture right over your slightly cooled crust. Try to pour it slowly right near the center so it spreads evenly without digging into the crust too much. Back into the oven it goes! You’re looking for about 15 to 20 minutes. How do you know when it’s done? Look at the edges—they should look set, maybe even slightly pale gold. But the very center? It should still have a little bit of a wiggle, that slight jiggle that tells you it’s creamy inside. Don’t overbake this, or you’ll get cracks!
This is the hardest but most important step for clean cuts: cooling! Let them sit on a wire rack until they reach room temperature, and then you must chill them in the refrigerator for a minimum of two hours. Seriously, two hours. This firms up the filling so those squares come out pristine.
Tips for Achieving Perfect Key Lime Pie Bars Texture
Look, everyone wants that dream texture—a crisp, perfectly baked graham cracker crust that doesn’t weep or get soggy under the lime filling. We avoid that rookie mistake easily! Making these Key Lime Pie Bars perfect is all about a little patience during the cooling phase. If you’re experimenting with lime desserts, remember that the cooling process is just as important as the baking!
Preventing a Soggy Crust on Your Key Lime Pie Bars
The key here is avoiding direct temperature shock. After you bake that crust for 10 minutes, take it out and let it just sit on the counter for about 15 minutes. You don’t want it piping hot when you pour on that cold, rich filling. That slight cool-down allows the butter in the crust to re-solidify just a bit, creating a better barrier against moisture seeping up from the creamy topping.
Ensuring a Smooth Key Lime Filling Set
Once you add your egg yolks to the milk and lime mixture, you need to switch gears in how you mix. Don’t go crazy whipping it the second the yolks go in! Over-whisking incorporates too much air, and that air expands in the oven, which leads to cracking when it cools down. Just gently whisk until those yolks disappear and everything looks homogenous and smooth. This keeps the filling dense and creamy, just like a real pie!
If you’re into making sure your baked goods stay structured, you know how important that is, just like when I make my pineapple quick bread—you can’t rush the internal structure, or it collapses!
Serving Suggestions for Your Key Lime Pie Bars
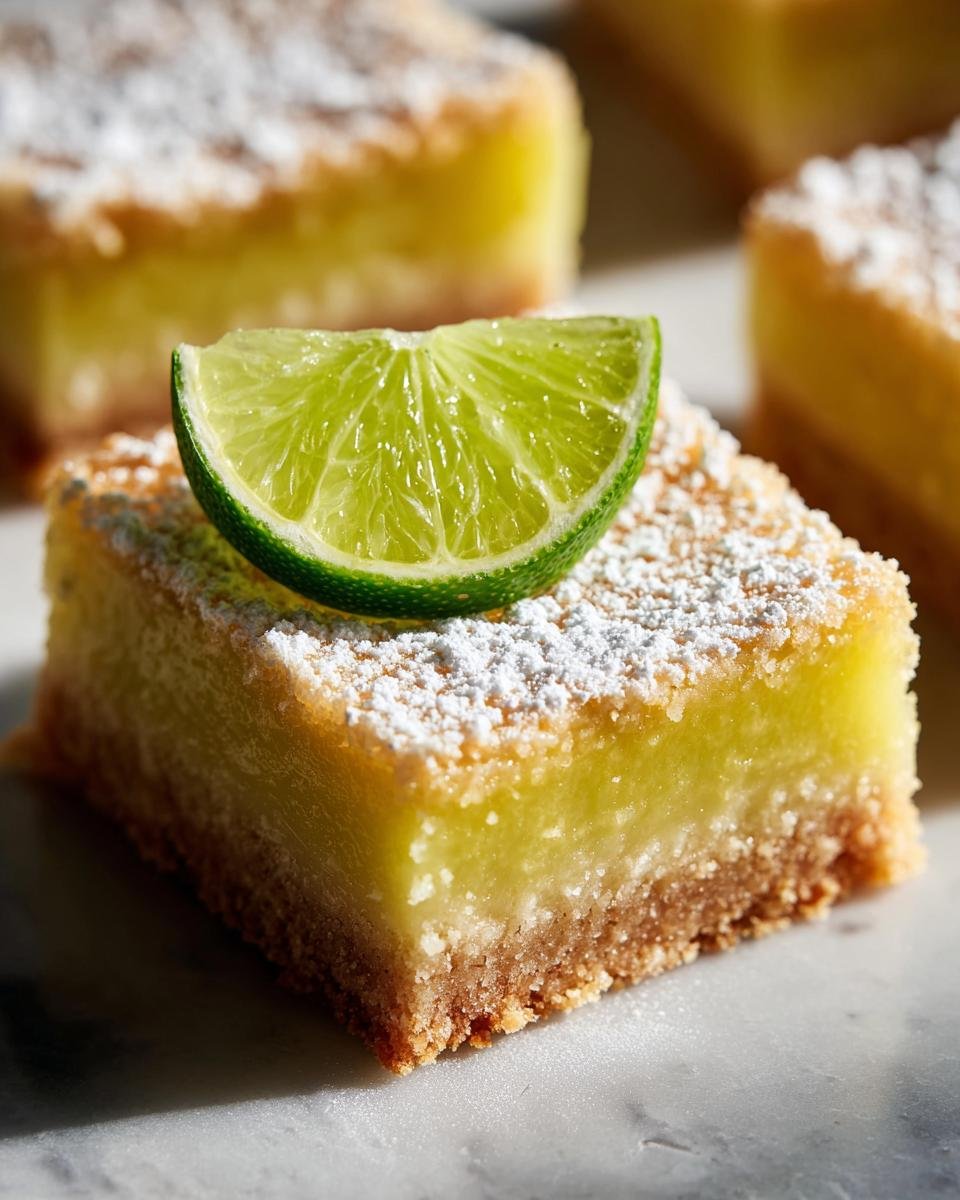
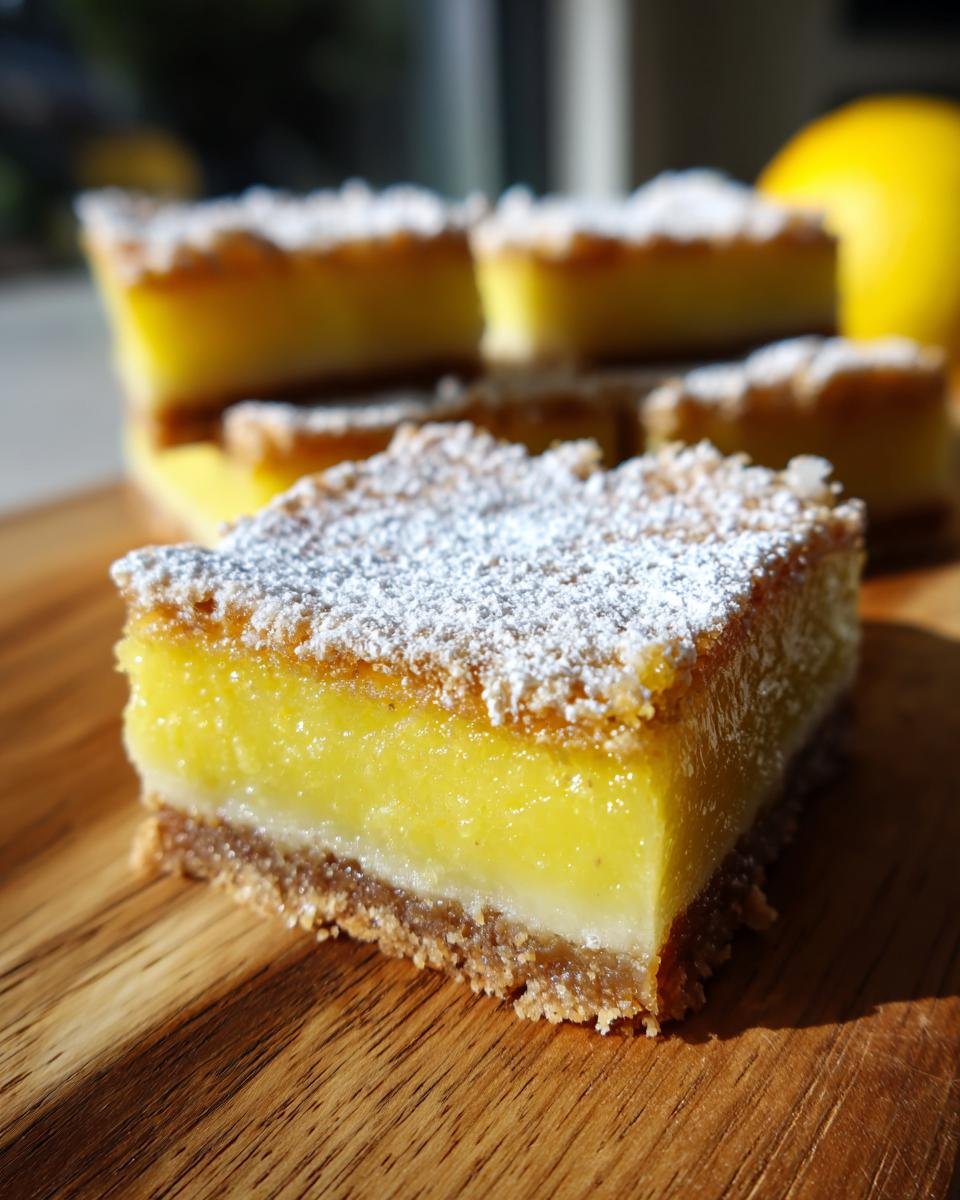
Once these Key Lime Pie Bars are totally chilled—and trust me, resisting that urge to cut them early is the real test—it’s time to make them look as gorgeous as they taste. Because the filling is so intensely tart and creamy, you don’t need a lot of fuss on top! My absolute favorite quick finish is just a light, delicate dusting of powdered sugar right before serving.
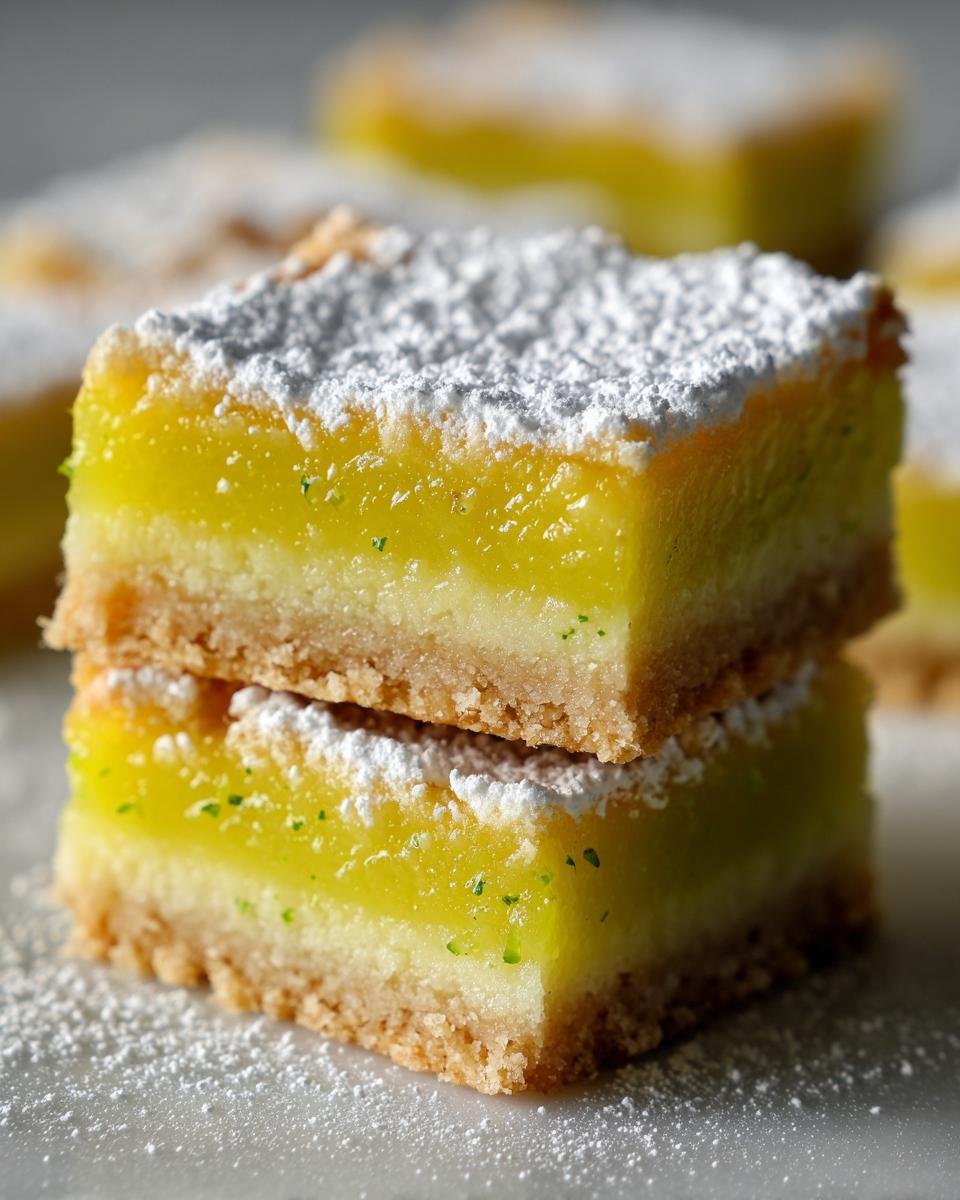
It looks beautiful against the pale yellow filling and adds just a hint more sweetness to balance that zing. If you’re feeling fancy, a tiny dollop of fresh whipped cream on the side is divine! If you enjoy dressing up simple treats, you might enjoy ideas over on my garlic breadsticks recipe page for presentation tips, even though they are savory!
Storage and Reheating Instructions for Key Lime Pie Bars
These Key Lime Pie Bars are seriously best enjoyed cold, straight from the fridge, so storage is super simple, but there are a few things you gotta remember to keep that filling perfectly creamy.
Once you’ve cut them (after that crucial chilling time!), you need to keep them airtight. I usually just pop the whole slab back into the 8×8 pan, cover it tightly with plastic wrap, or stack them layer-by-layer in an airtight container with parchment paper in between each layer so they don’t stick.
They stay fantastic in the refrigerator for about four or five days. That creamy, tart flavor actually seems to deepen a little overnight, which I love! Just pull them out about 10 minutes before you plan to serve them so they aren’t rock-hard, but honestly, they are delicious straight out of the chill.
Now, about reheating—don’t even think about it! These aren’t like a brownie or a quick bread where a little warmth makes them taste fudgy. Since the filling is mostly condensed milk, egg yolk, and citrus, heating them up will completely mess up that perfect, smooth set. It’ll just turn into soupy, warm lime custard, and nobody wants that mess. Keep these babies cool!
Frequently Asked Questions About Key Lime Pie Bars
I know baking can bring up all sorts of questions, especially when dealing with citrus and dairy combinations! These Key Lime Pie Bars are pretty straightforward, but here are a few things folks usually ask me after they try the recipe. If you’re looking for more dessert troubleshooting, check out my thoughts on keto cranberry pecan magic bars for structure tips!
Can I use bottled key lime juice in these Key Lime Pie Bars?
Oh, I wish I could say yes, but for this lime dessert, you really, really shouldn’t! Bottled juice just doesn’t carry that bright, complex, floral flavor that fresh key limes have. The bottled stuff is often pasteurized, and it tastes flatter. If you use it, your bars will still taste like lime, but they won’t have that signature, electric zing that makes them so addictive. Stick to fresh if you want them to sing!
How long can I store the Key Lime Pie Bars?
Since they rely on that chilled, smooth filling, they keep wonderfully in the fridge! Once you have them cut and stored airtight (I use parchment in between the layers), they stay perfect for about four to five days. Honestly, I think the flavor gets even better on day two when everything has fully melded together. They are definitely not a recipe you want to let sit out on the counter, though!
What is the best way to cut clean squares from the chilled Key Lime Pie Bars?
This is where you earn those perfect-looking squares! Never try to cut them when they’re just slightly cool, that’s a guaranteed mess that sticks to the knife. You need them fully chilled from the fridge. Once they have that rock-solid texture, grab a long, sharp knife and run it under very hot tap water for about 15 seconds. Wipe the blade completely dry, and then make your first cut. Heat softens the filling right at the cutting surface, which allows the knife to glide through the dense filling and the buttery graham cracker crust without dragging or cracking. Wipe the blade clean with a paper towel and run it under hot water again before making the next cut. It sounds fussier than it is, I promise!
Estimated Nutritional Information for Key Lime Pie Bars
Now, I know some of you are counting macros or maybe just curious about what goes into these delicious little squares. I always run the numbers just to have an idea, but remember these nutrition facts are total estimates based on the serving size being 16 bars and the exact ingredients I listed. Baking is funny that way; slight variations in fruit size or slightly different brands of condensed milk can shift things around a bit!
If you are someone who is always looking for lighter recipes, maybe you want to see how to cut back on fats elsewhere in your baking repertoire, you could check out my notes on how to make a light cake without butter and sugar for comparison.
Here’s the breakdown for one single Key Lime Pie Bar:
- Serving Size: 1 bar
- Calories: 220
- Sugar: 20g
- Fat: 12g (with 7g saturated)
- Sodium: 100mg
- Carbohydrates: 26g
- Protein: 3g
- Cholesterol: 50mg
I have to say, for something this rich and tangy, 220 calories feels like a solid bargain! But just a friendly reminder—this is homemade baking, not a lab-tested product, so treat these numbers as a very good guideline!
Share Your Key Lime Pie Bars Success
Honestly, when you spend the time zesting those tiny key limes and waiting for that perfect chilling time, I want to see the results! I live for hearing how these bright, tart Key Lime Pie Bars turned out in your kitchen. Did you dust them with powdered sugar, or did you leave them plain and glossy?
Please, if you loved the flavor—that beautiful punch of fresh lime cutting through the sweet crust—leave me a star rating right down below! It truly helps other bakers decide if this easy lime recipe is what they need next. I read every single comment, so tell me what you thought, or what little tweak you tried!
And here’s the big ask: tag me on social media if you post a picture! Seeing those perfectly chilled squares makes my day. If you’re curious about the baker behind all these recipes, you can always check out my About page any time!
Print
Key Lime Pie Bars
- Total Time: 135 min
- Yield: 16 bars 1x
- Diet: Vegetarian
Description
Simple bars with a graham cracker crust and a tart key lime filling.
Ingredients
- 1 1/2 cups graham cracker crumbs
- 1/2 cup granulated sugar plus 1/2 cup for filling
- 6 tablespoons unsalted butter, melted
- 1 (14 ounce) can sweetened condensed milk
- 4 large egg yolks
- 1/2 cup fresh key lime juice
- 1 teaspoon lime zest
Instructions
- Preheat your oven to 350 degrees Fahrenheit. Line an 8×8 inch baking pan with parchment paper, leaving an overhang on two sides.
- Combine graham cracker crumbs, 1/2 cup sugar, and melted butter in a bowl. Press the mixture firmly into the bottom of the prepared pan.
- Bake the crust for 10 minutes. Remove from the oven and let it cool slightly.
- In a separate bowl, whisk together the sweetened condensed milk, 1/2 cup sugar, egg yolks, key lime juice, and lime zest until smooth.
- Pour the filling over the cooled crust.
- Bake for 15 to 20 minutes, or until the edges are set but the center still has a slight jiggle.
- Cool the bars completely on a wire rack.
- Chill in the refrigerator for at least 2 hours before cutting into squares.
Notes
- Use fresh key lime juice for the best flavor. Bottled juice changes the taste.
- If you cannot find key limes, use regular limes, but reduce the amount slightly.
- Dust with powdered sugar before serving, if desired.
- Prep Time: 15 min
- Cook Time: 20 min
- Category: Dessert
- Method: Baking
- Cuisine: American
Nutrition
- Serving Size: 1 bar
- Calories: 220
- Sugar: 20
- Sodium: 100
- Fat: 12
- Saturated Fat: 7
- Unsaturated Fat: 5
- Trans Fat: 0
- Carbohydrates: 26
- Fiber: 1
- Protein: 3
- Cholesterol: 50
Keywords: key lime pie bars, graham cracker crust, lime dessert, chilled bars, easy lime recipe